Table of Contents

Plug-In Gait Clavicle

Introduction

This section describes the implementation of the Clavicle in Vicon's Plug-In Gait model.[1]

There are other simpler methods to create a Clavicle segment, so this is only recommended if you are trying to replicate the Plug-In Gait model AND you are using Inverse Kinematics.

Sample Files

You can use the static trial in the sample files from the Plug-in Gait Upper Extremity tutorial. These sample files can be downloaded here.

Clavicle

The clavicle is used as an intermediate segment in Vicon, and is not used for kinematics or kinetics, so there is no reason to create the clavicle in Visual3D when reproducing the Plug in Gait model.

For the most part, users will not need a clavicle segment, however, since it exists in the Vicon model, it is described here. If you do not have a need for the clavicle segment, you should not create this segment =]

If you do choose to create the clavicle - you will create the RSJC and LSJC landmarks in this section. These landmarks will also be described in the upper arm section, so you will not need to create the RSJC and LSJC landmarks a second time.

The Clavicle is defined along the line from the CLAV offset to the shoulder joint center. The orientation is defined using the wand landmark.

Clavicle Landmarks

A line (LWand) is created perpendicular to the plane created by the clavicle offset (CLAV_Offsest), the AP axis of the trunk (CLAV_X), and the shoulder target (LSHO). The shoulder joint center (LSJC) is then defined below the LSHO target on the plane defined by the LWand, Clav_Offset and LSHO.[1] pg. 42

The Wand landmark is used to define the orientation of the Clavicle segment, so this landmark must be created. However, the SJC landmark can be created as described below, or using the definition described in the PiG Upper Extremity Tutorial.

Clavicle Landmarks
1. Create CLAV_Offset:


  1. Click Landmarks button


  2. Click Add New Landmark button


  3. Create Landmark: CLAV_Offset


       Landmark Name: CLAV_Offset


       Define Orientation Using:
       Starting Point: CLAV
       Existing Segment: Thorax/Ab


  4. Offset Using the Following ML/AP/AXIAL Offsets:
       ML: 0.0
       AP: -MarkerRadius
       AXIAL: 0.0


  5. Do NOT Check: Offset by Percent (1.0 = 100%)


  6. Check: Calibration Only Landmark


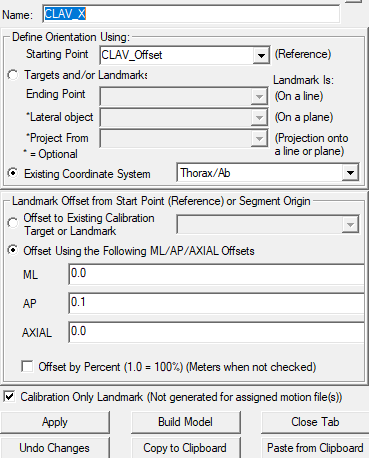
    2. Create CLAV_X:


    1. Click Landmarks button


    2. Click Add New Landmark button


    3. Create Landmark: CLAV_X


         Landmark Name: CLAV_X


         Define Orientation Using:
         Starting Point: CLAV_Offset
         Existing Segment: Thorax/Ab


    4. Offset Using the Following ML/AP/AXIAL Offsets:
         ML: 0.0
         AP: 0.1
         AXIAL: 0.0


    5. Do NOT Check: Offset by Percent (1.0 = 100%)


    6. Check: Calibration Only Landmark


      3. Create LSJC:


      1. Click Landmarks button


      2. Click Add New Landmark button


      3. Create Landmark: LSJC


           Landmark Name: LSJC


           Define Orientation Using:
           Starting Point: LSHO
           Ending Point: CLAV_X
           Lateral Object: CLAV_Offset


      4. Offset Using the Following ML/AP/AXIAL Offsets:
           ML: 0.0
           AP: LShoulderRadius + MarkerRadius
           AXIAL: 0.0


      5. Do NOT Check: Offset by Percent (1.0 = 100%)


      6. Check: Calibration Only Landmark


        4. Create RSJC:


        1. Click Landmarks button


        2. Click Add New Landmark button


        3. Create Landmark: RSJC


             Landmark Name: RSJC


             Define Orientation Using:
             Starting Point: RSHO
             Ending Point: CLAV_Offset
             Lateral Object: CLAV_X


        4. Offset Using the Following ML/AP/AXIAL Offsets:
             ML: 0.0
             AP: RShoulderRadius + MarkerRadius
             AXIAL: 0.0


        5. Do NOT Check: Offset by Percent (1.0 = 100%)


        6. Check: Calibration Only Landmark

          Clavicle Definition

          Clavicle Definition
          1. Create LClavicle Segment:


          1. In the Segments tab, select LClavicle in the Segment Name box.


          2. Select Kinematic Only


          3. Click on the Create Segment button.


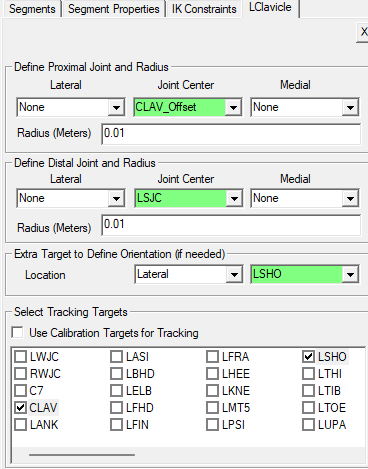
          4. In the LClavicle tab, enter these values:

               Define Proximal Joint and Radius
               Lateral: None     Joint: CLAV_Offset     Medial: None     
               Radius: 0.01


               Define Distal Joint and Radius
               Lateral: None     Joint: LSJC     Medial: None     
               Radius: 0.01


               Extra Target to Define Orientation
               Location: Lateral     LSHO


               Select Tracking Targets:
                 CLAV, LSHO


          5. Click on Build Model.


          6. Click on Close Tab before proceeding.


            2. Create RClavicle:

            - When defining the right landmark, use same definitions as for the left landmark.

            NOTE: Because there are only two tracking targets, the Clavicle segment will not be built until the POSE is set to Inverse Kinematics.

            An Example of an IK chain using this clavicle segment can be downloaded here.

            References

            1. 1.0 1.1 “Plug-In Gait” Web. 6 Jan 2016. http://www.irc-web.co.jp/vicon_web/news_bn/PIGManualver1.pdf