Image Preview
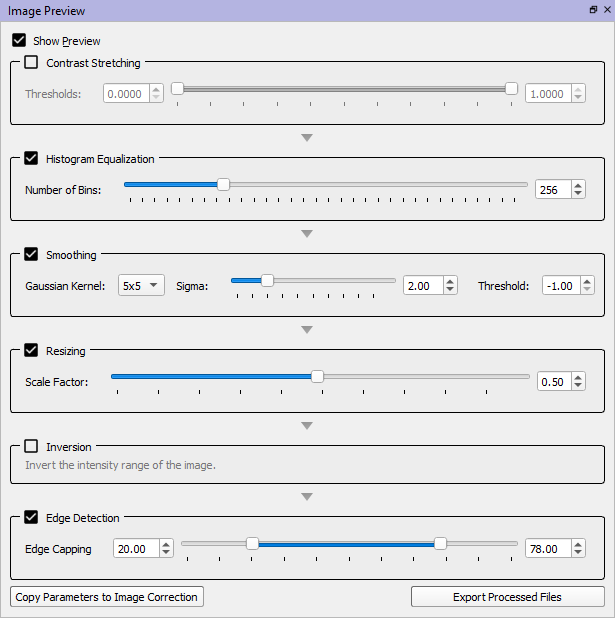
The Image Preview widget enables you to try out the different image correction options before correcting the X-ray trial images. To use it on an uncorrected trial, load the subject file, select the trial, then choose the Load Raw option. This will load the uncorrected X-ray image files. Then use this widget to experiment with the various filters. After turning on and setting up several filters, you can toggle individual filters on and off to see their specific effects. The filters are applied in the order that they are listed in the widget.
This widget does not apply non-uniformity or distortion correction to the images; it is only for experimenting with the intensity manipulation, smoothing, and resizing filters to see which ones produce the best images for tracking. However, if you copy the preview parameters to the Image Correction widget and correct the trial normally, the trial will be processed with the full correction pipeline, including non-uniformity and distortion correction, if selected.
- Show Preview This checkbox toggles the display of the processed X-ray images in the 2D windows.
- Contrast Stretching Contrast stretching is a technique to increase the contrast within a specific intensity range of the image. Pixels with intensities below the lower threshold are set to zero. Pixels with intensities above the upper threshold are set to the maximum intensity. Intensities between the thresholds are stretched linearly to cover the entire intensity range for the image data type.
- Histogram Equalization Histogram equalization is another technique to increase the contrast of the image. It uses the image's histogram to spread out the most frequent intensity values. The pixels are first grouped into the specified Number of Bins based on their intensity values. Then the intensities are scaled non-linearly so that each bin contains approximately the same number of pixels as the other bins.
- Smoothing Smoothing of the X-ray images is performed with a 2D Gaussian convolution. The size of the kernel (3×3, 5×5, or 7×7) is specified with the Gaussian Kernel combobox. The standard deviation of the Gaussian distribution curve is specified by the Sigma value. The larger the value, the higher the weight of a pixel’s neighbors when smoothing that pixel. The Threshold can be used to help preserve the sharpness of edges when smoothing. Pixels in the kernel that are not within this threshold of the value of the pixel being smoothed are ignored. This threshold is a percentage (0.0 to 1.0) of the maximum intensity in the entire image. A negative value indicates that no thresholding will occur.
- Resizing This filter lowers the resolution of the X-ray images. Lowering the resolution usually increases the signal-to-noise ratio of the pixel intensities, which can have a dramatic effect on the strength of the edges calculated by the edge-detection filter. The trade-off is increasing the edge strengths without losing the finer features of the objects being tracked. In addition, lowering the resolution will increase the speed of DRR generation in X4D because the DRRs are generated at the same resolution as the X-ray images.
- Inversion This filter simply inverts the intensity range of the image, as would occur during non-uniformity correction. When examining the effects of the other filters, it may be useful to view the X-ray images with the bones appearing brighter than the background, rather than darker.
- Edge Detection This filter applies a Sobel edge-detection algorithm to the images. It is not part of the image correction process, but since X4D primarily uses feature edges to track bones and implants, it is very helpful to see these edges as you are evaluating the other filters. You can also “cap” the edge values the same way that they are capped in X4D's Xray and DRR Settings widget. Pixels in the edge image whose values are greater than the upper threshold are set to zero. Very bright pixels (sharp edges) are usually inorganic objects such as EMG electrodes or metal plates or wires, and can be removed by lowering the upper threshold from 100. Every pixel in the edge image whose value is above the lower threshold is set to the lower threshold. This effectively strengthens weaker edges (those below the lower threshold) because the entire image is later scaled.
- Copy Parameters to Image Correction This command copies the values for contrast stretching, histogram equalization, smoothing, and resizing to the Image Correction widget. Once you have determined the best filter parameters for your images, you can use this command to copy the values to that widget so they can be applied during image correction.
- Export Processed Files This command exports the processed images (including inversion and edge detection, if selected) to TIFs so you can view and manipulate them in another imaging program. This is not part of the normal DSX image processing pipeline, but it may be helpful to analyze the images in a third-party application.
See Also
Go back to an overview of CalibrateDSX's widgets.

