Table of Contents
Orient3D Overview
Orient3D is part of the DSX Suite of applications for dynamic stereo x-ray (DSX).
Orient3D prepares surface models created by Surface3D (or third-party software such as Mimics and ScanIP) for use in kinematic analyses after they have been tracked in X4D or Locate3D. With Orient3D you can define a local coordinate system (LCS) for each object, landmarks, such as ligament attachment sites, and regions of interest (ROIs), which are used in the calculation of distance maps. The local coordinate system of an object is usually, but not necessarily, its “anatomical” reference frame. When a local coordinate system is defined for an object, it is stored in the subject file as a transform from the frame of the object’s segmented image data to the local coordinate system. To analyze tracking results from X4D in Visual3D, the surface model, landmarks, and regions of interest must be saved in the local coordinate system. Even if you are not exporting your data for kinematic analysis in Visual3D, it is still recommended to define the anatomical coordinate system in Orient3D. X4D's tracking results are output using this coordinate system, and it is easier to manipulate the bone in X4D when an anatomical coordinate system is defined.
Tutorials
Follow these tutorials to learn how to use Orient3D as part of the DSX Suite:
See also an overview of the Image and Surface Files used within the DSX Suite.
Menus
File Menu
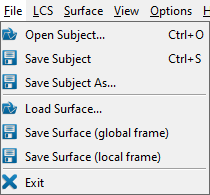
- Load Subject (Ctrl + O) loads a subject file. Note: Only available with a DSX Suite license.
- Save Subject (Ctrl + S) saves the currently loaded subject to its existing subject file. Note: Only available with a DSX Suite license.
- Save Subject As saves the currently loaded subject to a new subject file. Note: Only available with a DSX Suite license.
- Load Surface… loads a single surface model file. If you load a surface with this command, there is no way to save the local coordinate system or any landmarks you may define, because these items are saved in the subject file. Orient3D is able to load the following formats:
- Open Inventor (*.iv)
- After the file is loaded the surface model is automatically triangulated to facilitate additional processing, such as decimation and smoothing. Note: Orient3D currently ignores color and texture definitions from MTL and COL files that sometimes accompany Wavefront OBJ files.
- Save Surface (global frame) saves the current surface model in the global reference frame as an OBJ file. If a subject file is loaded, it will be updated with the name of the saved surface file. The file dialog contains an option for specifying the units of the vertex coordinates.
- Save Surface (local frame) saves the current surface model in its local reference frame as an OBJ file. If a subject file is loaded, it will be updated with the name of the saved surface file. The file dialog contains an option for specifying the units of the vertex coordinates. Meters should be chosen if you plan to import the surface model into Visual3D.
- Exit exits the program. The program can also be closed using the X in the top right corner of the program window.
LCS Menu
- Reset to Identity resets the LCS to the identity matrix (i.e., aligned with the global frame).
- Load from File… loads a 4×4 transform matrix from a file and assigns it to the LCS. The transform must be specified as 16 comma-separated values defining the row-major transform from the global frame to the local frame.
- Save to Subject Object saves the current LCS to the subject object in the subject file. It is useful for saving the LCS when you have manually moved it on the surface model in the 3D window. If you use an algorithm to calculate the LCS, or load it from a file, the subject file is automatically updated, so you do not need to use this command.
Surface Menu
- Erase ROI Polygons (Alt + E) Toggles in and out of Erase ROI Polygons mode. In this mode, the cursor changes to a crosshair with the label ROI eraser. If you press and hold the left mouse button and drag the cursor over the surface model, all polygons under the cursor will be removed from any ROIs. This is useful for “cleaning up” an ROI if it projected onto an undesired part of the surface model. Press Esc to exit this mode.
Note: There is no undo for this command.
- Align with Cylinder Aligns and scales the oriented bounding box of the surface model with the “Visual3D cylinder”. There is no undo for this command.
Note: This command is not intended to be used in a DSX context.
- Clean Polyhedral Model Fixes face and vertex normals so that they point outward, and fills in holes in the surface.Note: There is no undo for this command.
View Menu
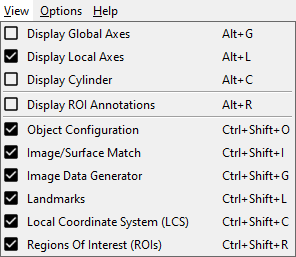
- Display Global Axes (Alt + G) toggles the display of the global coordinate system in the 3D view.
- Display Local Axes (Alt + L) toggles the display of the local coordinate system in the 3D view.
- Display Cylinder (Alt + C) toggles the display of a cylinder to which the surface model can be aligned when preparing the surface for use in Visual3D. The Z-coordinates of the cylinder range between -1.0 and 0.0 and its radius is currently hard-coded to 0.2. Note: This command is not intended to be used in a DSX context.
- Display ROI Annotations (Alt + R) toggles the display of annotations on the subregions of each ROI.
- Object Configuration (Ctrl + Shift + O) toggles the appearance of the dockable Object Configuration widget. Note: Only available with a DSX Suite license.
- Image/Surface Match (Ctrl + Shift + I) toggles the appearance of the dockable Image/Surface Match widget. Note: Only available with a DSX Suite license.
- Image Data Generator (Ctrl + Shift + G) toggles the appearance of the dockable Image Data Generator widget. Note: Only available with a DSX Suite license.
- Landmarks (Ctrl + Shift + L) toggles the appearance of the dockable Landmarks widget.
- Local Coordinate System (Ctrl + Shift + C) toggles the appearance of the dockable Local Coordinate System widget.
- Regions of Interest (Ctrl + Shift + R) toggles the appearance of the dockable Regions of Interest widget.
Options Menu
Help Menu
- Help (F1) opens the Orient3D wiki page in the default browser.
- About… displays a dialog with information about Orient3D, including the installed version number. It also contains the Deactivate button, for deactivating your license.
Widgets
Orient3D contains 8 different widgets, which are each documented on their dedicated pages:


