Points of Interest
Points of interest (POIs) are features of an object that you are planning to track in X-ray motion trials using Locate3D. They are most commonly used for radiopaque beads implanted in an object whose motion you want to measure. They are distinguished from landmarks, which are object features whose locations you want to calculate once the object pose is known. A common type of landmark is ligament attachment sites. Thus, POIs are used to determine the pose of an object and landmarks are used to calculate locations dependent on the pose.
POI Widget
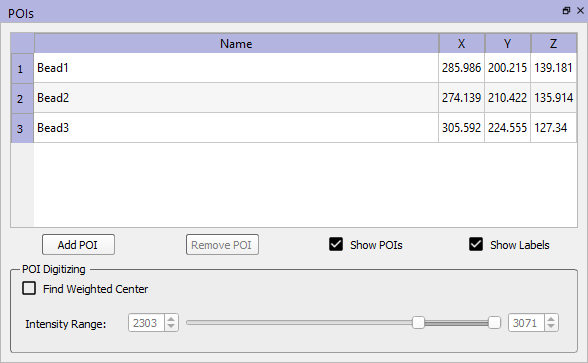
Although Surface3D's POI widget has commands for adding and deleting POIs it is recommended that you define these in xManager, where you can specify their radii and colors for display in the GUI. Tracking a POI in Locate3D requires that POI's radius to be specified so that the circle-finding algorithm can estimate its size in the X-ray images. Once they have been added to an object in xManager, you can use Surface3D to define their locations. If you do create new POIs in Surface3D, be sure to go back to xManager later to define their radii and colors.
- Add POI adds a new POI to the object. After pressing the button, left-click in one of the 2D image data windows to set the location of the point. Surface3D will create a POI with a default name and add it to the table. To change the name, double-click on it and type in a new name.
- Remove POI deletes the currently selected POI from the object. To select a POI, click on its row in the table.
- Show POIs toggles the display of the POI spheres in the 2D and 3D image data windows.
- Show Labels toggles the display of the POI labels (names) in the 2D and 3D image data windows.
- POI Table The table shows all of the object's POIs. The columns are the name of the POI, and the X, Y, and Z coordinates in the image data's reference frame. A POI name can be changed by double-clicking on it and typing in a new name. To change the XYZ coordinates, select the POI by clicking on its row in the table, then click on the new location in one of the 2D image data windows.
- POI Digitizing This control lets you choose how the coordinates of the POI will be determined when you left-click in one of the image data windows to add or modify a POI. If the Find Weighted Center checkbox is not checked, the POI is placed at the exact coordinates of the location you clicked on. If this box is checked, a marching cubes algorithm searches for all voxels connected to the one you clicked on that are within the specified Intensity Range. Surface3D then calculates the weighted center of these voxels and puts the POI at the center. For implanted beads, the recommended approach is to set the Intensity Range to the expected range for voxels containing beads, then left-click on any bead voxel to define a POI at the weighted center.

