Table of Contents
Foot Collection
Introduction
| Each lab has a different data collection protocol, however, there are some important data collection requirements to use the IORGait protocol. This section describes requirements such as the marker set specific to the foot analysis. The requirements for completing the gait analysis can be found here. |  |
Lab Setup - Before the Patient Arrives
1. Calibrate you capture volume as recommended by your camera's manufacturer.
2. Zero your force plates.
3. Set up all materials that you will need for the capture including, but not limited to: at least 36 markers, with adhesives attached; scale; and measuring tape for height. The referring physician may request other measurements, so you should discuss these prior to the subject's visit.
Subject Setup - Marker Placement
The anatomical location of each target is referenced to the description in the Color Atlas of Skeletal Landmark Definitions. This text is useful for further description of target location as well as recommendations for palpation.
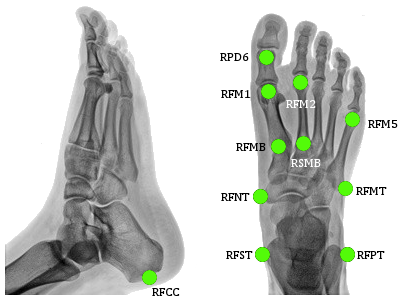
The FMB and SMB target locations are not described in the Color Atlas, but are described in the Leardini multi-segment foot paper.
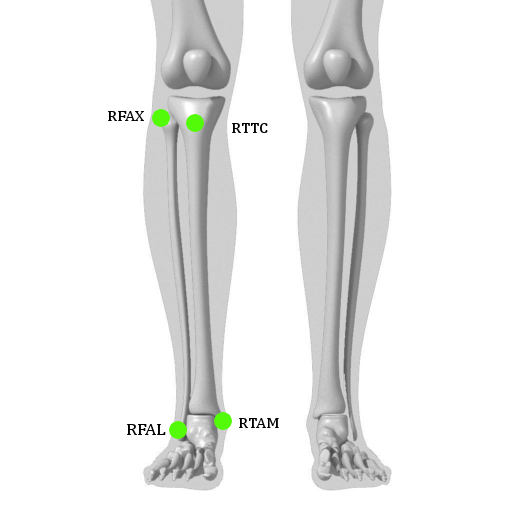
Marker Placement - Listed by from knees to toes | Marker Name | Description | Reference Page | L/RFAX | Proximal tip of the head of the fibula | [1]:p. 154 | L/RTTC | Most anterior border of the tibial tuberosity | [1]:p. 144 | L/RFAL | Lateral prominence of the lateral malleolus | [1]:p. 158 | L/RTAM | Most medial prominence of the medial malleolus | [1]:p. 148 | L/RFCC | Aspect of the achilles tendon insertion on the calcaneous | [1]:p. 162 | L/RFST | Sustentaculum Tali of Calcaneus | [1]:p. 164 | L/RFPT | Lateral apex of the peroneal tubercle | [1]:p. 171 | L/RFNT | Navicular tuberosity | [1]:p. 165 | L/RFMT | Tuberosity of 5th Metatarsal | [1]:p. 172 | L/RFMB | Base of First Metatarsal | [2]:p. 454 | L/RSMB | Base of Second Metatarsal | [2]:p. 455 | L/RFM1 | Dorsal margin of the first metatarsal head | [1]:p. 173 | L/RFM2 | Dorsal aspect of the second metatarsal head | [1]:p. 173 | L/RFM5 | Dorsal margin of the fifth metatarsal head | [1]:p. 173 | L/RPD6 | Distal epiphysis, midpoint between PL6 and PM6 | [1]:p. 175 |   |
References
- ↑ 2.0 2.1 Leardini, A., M.G. Benedetti, L. Berti, D. Bettinelli, R. Nativo, and S. Giannini. “Rear-foot, Mid-foot and Fore-foot Motion during the Stance Phase of Gait.” Gait & Posture 25 (2007): 453-55
Data Collection
Static Trial
During the static trial, the subject should:
1. Stand stationary 2. Feet on one or two of the force platforms 3. Comfortable stance 4. Feet shoulder width apart 5. Arms out to so that markers are not occluded During the static trial, the user should:
1. Instruct the subject where to stand and in what posture 2. Collect approximately a three second trial using the motion capture software while the subject is stationary 3. Instruct the subject to relax 4. Label the static trial to ensure all targets appear If all targets have been placed on the subject, if not, collect a new static trial, or overwrite the original static trial
Dynamic Gait Trials
Collect dynamic trials:
1. Have the patient start at one end of the capture volume and have them walk across the force plates at a self selected normal speed. 2. Collect at least one good foot strike per gait trial. Click here to find out more information about a "good" foot strike 2. Make sure: 1. No targets fall off the subject during data collection 2. Targets do not become occluded due to clothing, etc. To complete the IORgait analysis, at least two clean foot strikes (one right, one left) must be collected. However, the total number of trials collected is an individual lab decision. Many users collect at least five clean foot strikes for the left and five for the right. The amount of trials this requires may depend on the number of force platforms in your lab.
