User Tools

Site Tools


visual3d:documentation:modeling:landmarks:landmarks_overview

Landmarks Overview

This page has been updated, but the original page can be found here.

Landmarks are like virtual markers, whose positions are computed automatically by Visual3D based on the positions of the actual markers, segments, or equations, according to rules which you define.

Landmarks provide a powerful method of representing significant locations within space or locations defined by the model. Landmarks are created by either specifying a location in a segment coordinate system or by transforming markers or other landmarks into a significant location.

Marker Set for Examples

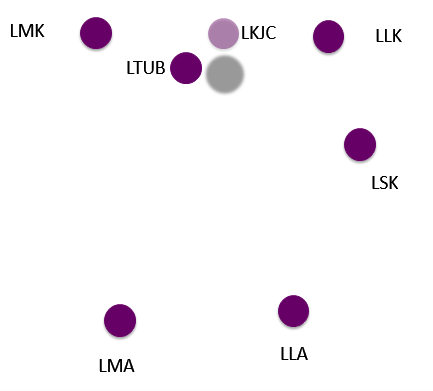
The following examples use the markers related to the left shank illustrated below.

  1. LMK: Left medial knee
  2. LLK: Left lateral knee
  3. LSK: Left shank
  4. LMA: Left medial ankle
  5. LLA: Left lateral ankle
  6. LTUB: Left tibial tuberosity (shown projecting a shadow onto the plane)
  7. LKJC: Left knee joint centre (landmark)

General Options

The landmark dialog can be broken into 3 sections:

  1. Define Orientation
  2. Offset
  3. Calibration Only

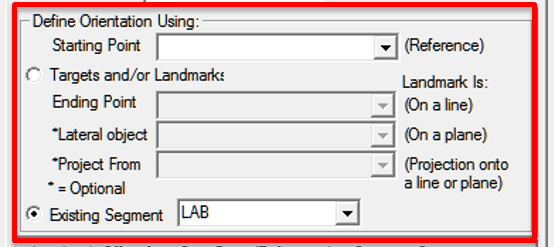
1. Define Orientation Using

Landmarks can be defined relative to a target, along a line, on a plane, or as a projection onto a line or a plane.

Landmarks can be defined in lab space, or in a segment coordinate system.

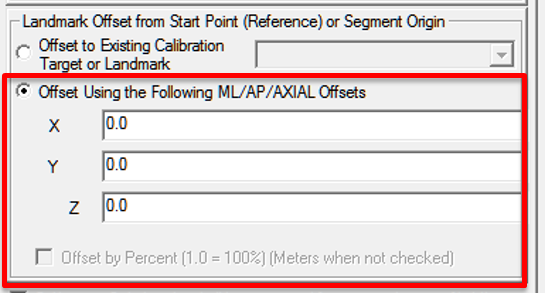
2. Landmark Offset from Start Point (Reference) or Segment Origin

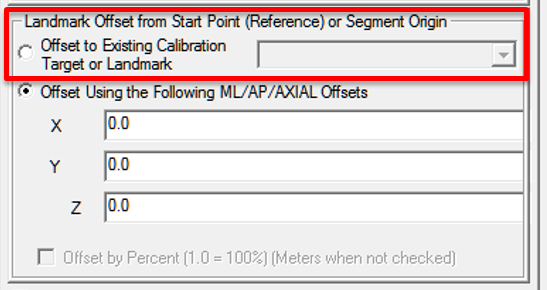
Any time a landmark can be defined using Offsets in three directions, a user has the option to define the offsets manually (X/Y/Z or ML/AP/AXIAL) or they can use the “Offset to Existing Calibration Target or Landmark” option.

2a. Offset to Existing Calibration Target or Landmark
The Offset to Existing Calibration Target or Landmark option allows users to get the location of a target (or landmark) relative to a plane or segment coordinate system. The offsets are populated automatically. This option can be used any time all three offsets can be specified, but it is only described as a special type for Type 4 since this is a crucial example.
2b. Offset Using the Following ML/AP/AXIAL Offsets
Offsets should be specified in meters unless “Offset by Percent” is checked.

Offsets can be specified as Expressions.

3. Calibration Only Landmark

When a landmark is set to “Calibration Only” it means that the landmark will only exist in the calibration file. When this option is not checked, it means that the landmark will be created in the associated motion files.

If a landmark is created in the associated motion files, it can be used to track a segment or for other calculations.

Landmark Types

Although there are many different ways to define a landmark, all of these methods result in a “virtual marker” whose position is calculated by Visual3D throughout motion trials.

Type 1: In Reference Coordinate System

The simplest landmark is a landmark which is defined in a segment coordinate system. There are many variations of this, but a landmark can be defined in LAB space, a landmark can be defined in a segment coordinate system, or a landmark can be defined by a 4x4Rotation Signal . The offsets define where the landmark is created relative to the coordinate system.

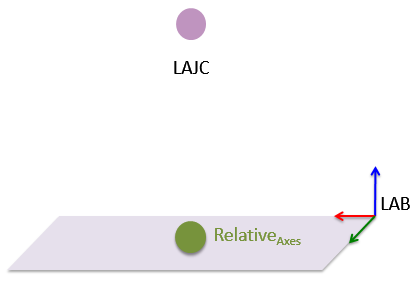
Type 1a: In LAB Space

A landmark defined in LAB space.


Sample Landmark Definition (click to expand)

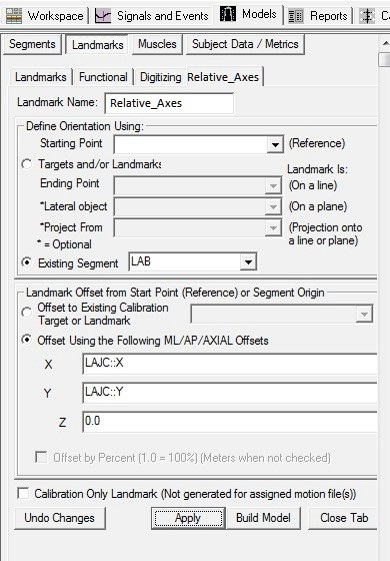
1. Create Relative_Axes:


  1. Click Landmarks button


  2. Click Add New Landmark button


  3. Create Landmark: Relative_Axes

       Landmark Name: Relative_Axes


       Define Orientation Using:
       Existing Segment: Lab


  4. Offset Using the Following ML/AP/AXIAL Offsets:
       X: LAJC::X    Y: LAJC::Y    Z: 0.0


  5. Do NOT Check: Offset by Percent (1.0 = 100%)

    landmark_type4_definition.jpg


    Example Using Starting Point (click to expand)

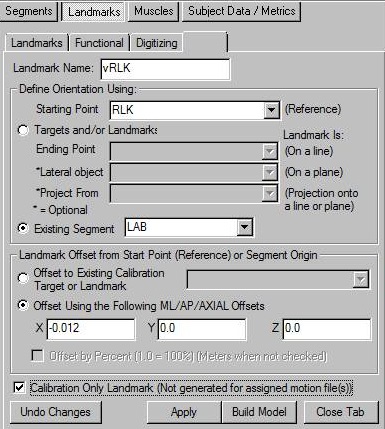
    Landmarks can be created as an offset from the specified marker in a segment coordinate system or in the LAB coordinate system. vRLK that is created from RLK as an offset in the x direction in the LAB coordinate system. landmark_point_relative_to_target.jpg


    Other Examples:

    • Virtual Lab Tutorial: The LAB_O, LAB_X, and LAB_Y landmarks in the virtual lab tutorial are defined in LAB space, where the offsets refer to the distance the landmarks are created in meters.
    • The following two examples describe how to define landmarks that represent stair corners. The position of targets placed on the steps are calculated from dynamic trials is used to define the landmarks.


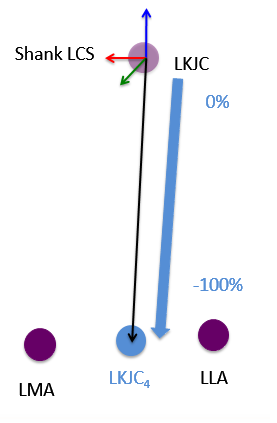
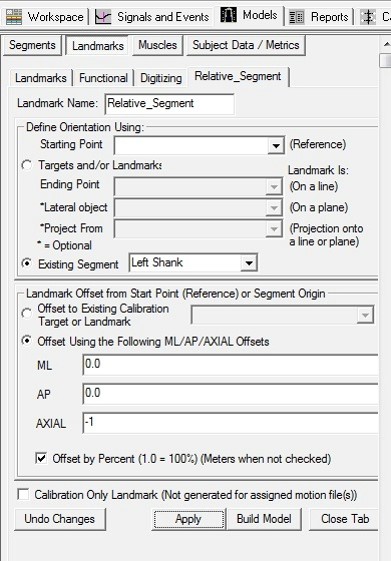
    Type 1b: In a Segment Coordinate System

    Landmarks can be created relative to a segment (in the segment coordinate system).


    Sample Landmark Definition (click to expand)

    1. Create Relative_Segment:


    1. Click Landmarks button


    2. Click Add New Landmark button


    3. Create Landmark: Relative_Segment

         Landmark Name: Relative_Segment


         Define Orientation Using:
         Existing Segment: Left Shank


    4. Offset Using the Following ML/AP/AXIAL Offsets:
         X: 0.0    Y: 0.0    Z: -1


    5. Check: Offset by Percent (1.0 = 100%)

      landmark_type6_definition.jpg


      Other Examples:


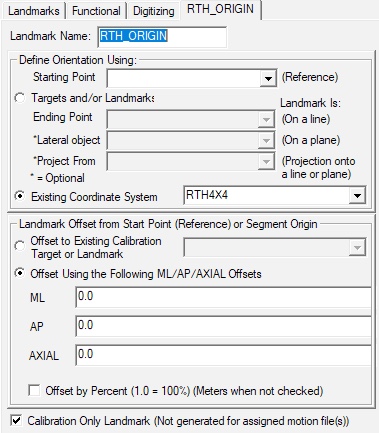
      Type 1c: Relative to a 4x4 Rotation Matrix

      Sample Landmark Definition (click to expand)

      1. Create RTH_Origin: This will create a Landmark at the position of the Rotation signal RTH4x4


      1. Click Landmarks button


      2. Click Add New Landmark button


      3. Create Landmark: RTH_Origin

           Landmark Name: RTH_Origin


           Define Orientation Using:
           Existing Coordinate System: RTH4X4


      4. Offset Using the Following ML/AP/AXIAL Offsets:
           X: 0.0    Y: 0.0    Z: 0.0


      5. Check: Offset by Percent (1.0 = 100%)

        landmark_type1c_definition.jpg

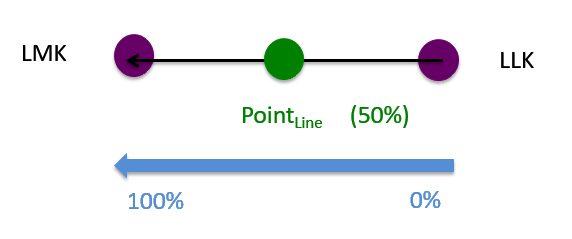
        Type 2: On a Line

        A landmark can be defined along a line.


        Sample Landmark Definition (click to expand)

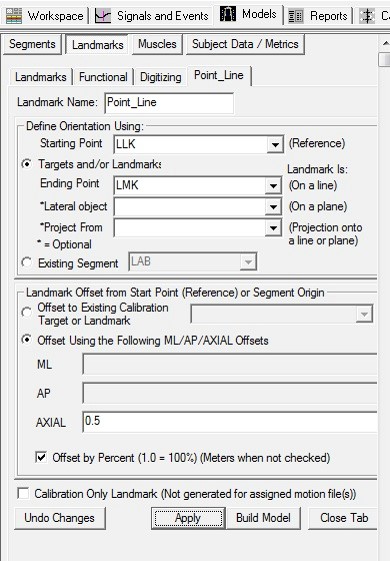
        1. Create Point_Line:


        1. Click Landmarks button


        2. Click Add New Landmark button


        3. Create Landmark: Point_Line

             Landmark Name: Point_Line


             Define Orientation Using:
             Starting Point: LLK
             Ending Point: LMK


        4. Offset Using the Following AXIAL Offset: 0.5


        5. Check: Offset by Percent (1.0 = 100%)

          landmark_type1_definition.jpg


          Create landmark as a midpoint (click to expand)

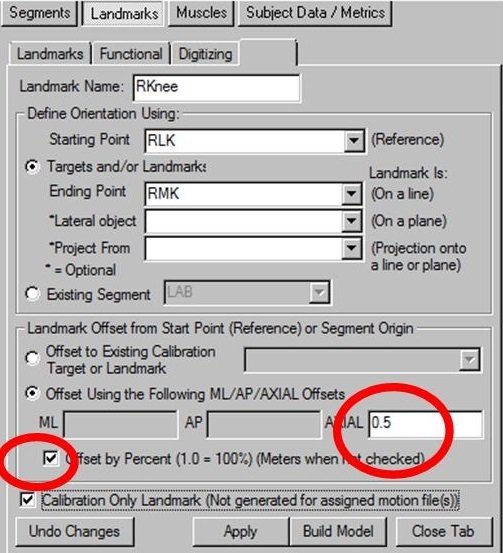
          The landmark RKnee is a point that is halfway between the lateral and medial knee markers RLK and RMK.

          The point on a line can be defined as a distance in percentage or distance in meters. When Offset by Percent is checked, the distance is defined as a percentage.

          Note: When using a Point on a Line landmark, only the AXIAL offset is used.
          landmark_point_on_line.jpg


          Type 3: On a Plane

          Type 3a: On a Plane using manual offsets

          Landmarks can be created relative to a plane or technical coordinate system.

          Sample Landmark Definition (click to expand)

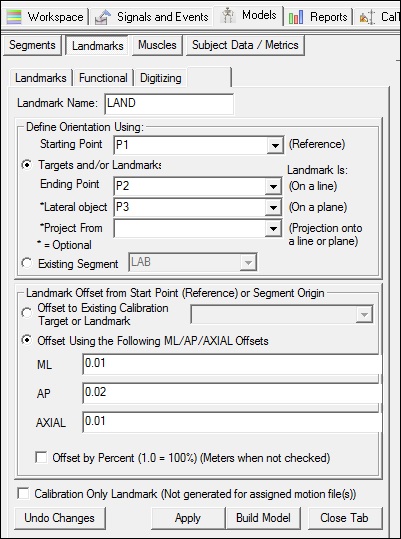
          1. Create LAND:


          1. Click Landmarks button


          2. Click Add New Landmark button


          3. Create Landmark: LAND

               Landmark Name: LAND


               Define Orientation Using:
               Starting Point: P1
               Ending Point: P2
               Lateral Object: P3


          4. Offset Using the Following ML/AP/AXIAL Offsets:
               X: 0.01    Y: 0.02    Z: 0.01


          5. Do NOT Check: Offset by Percent (1.0 = 100%)

            landmark3a.jpg
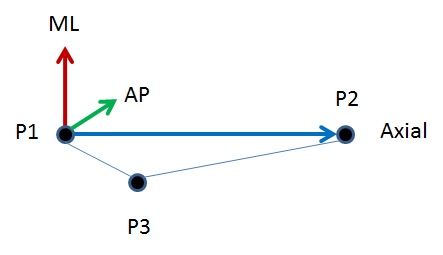
            A right handed orthogonal coordinate system is defined by the three points (P1, P2, P3).

            The origin of the coordinate system is at the point P1. The frontal plane of the coordinate system is defined by the three points. The positive AP direction is into the screen.
            landmark3b.jpg


            Other Examples:

            Type 3b: On a Plane using target/landmark offsets
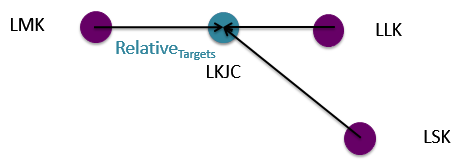
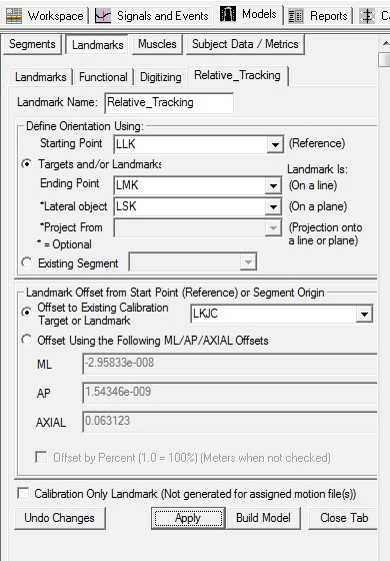
            Create a landmark relative to three targets. The offset of the landmark is defined using the location of a target relative to the three targets during the static trial.


            Landmark Definition (click to expand)

            1. Create Relative_Tracking:


            1. Click Landmarks button


            2. Click Add New Landmark button


            3. Create Landmark: Relative_Tracking

                 Landmark Name: Relative_Tracking


                 Define Orientation Using:
                 Starting Point: LLK
                 Ending Point: LMK
                 Lateral Object: LSK


            4. Offset to Existing Calibration Target or Landmark: LKJC


            5. Do NOT Check: Offset by Percent (1.0 = 100%)

              landmark_type7_definition.jpg


              Example 1 (click to expand)

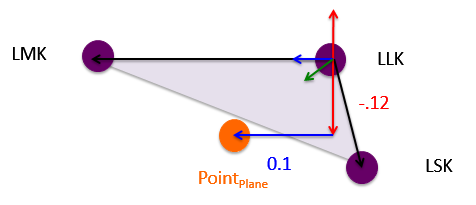
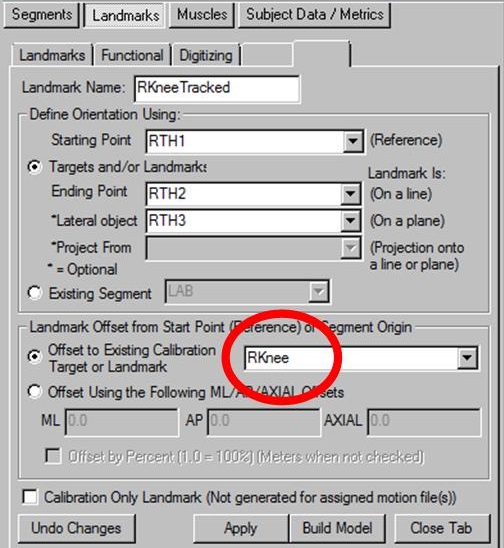
              To define a landmark as a point on a plane defined by 3 points

              * Select the Targets and/or Landmarks radio button
              * Select three targets and/or landmarks for the Reference/Axial Starting Point, Axial Ending Point and lateral object.

              The landmark/target reference offset is also selected.

              The RKnee calibration only landmark is the point that is being tracked by 3 target markers on the thigh RTH1, RTH2, and RTH3.
              landmark_point_in_a_plane.jpg


              Other Examples:

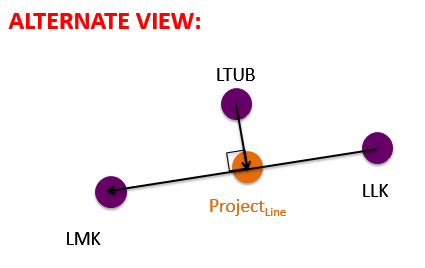
              Type 4: Project on a Line

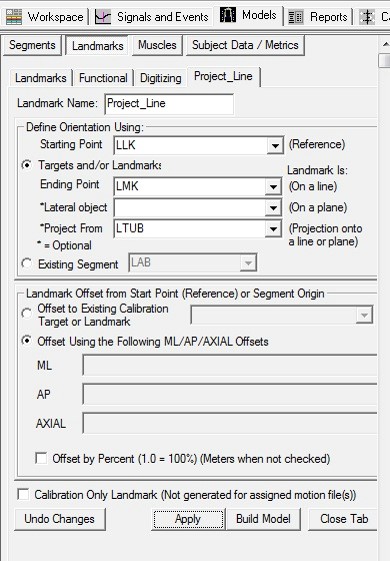
              A target or landmark may be projected onto a line defined by two points.

              Landmark Definition (click to expand)

              1. Create Project_Line:


              1. Click Landmarks button


              2. Click Add New Landmark button


              3. Create Landmark: Project_Line

                   Landmark Name: Project_Line


                   Define Orientation Using:
                   Starting Point: LLK
                   Ending Point: LMK
                   Project From: LTUB


              4. Do NOT Check: Offset by Percent (1.0 = 100%)

                landmark_type3_definition.jpg


                Project the heel target onto the line defined by the mediolateral ankle targets (click to expand)

                Point projection onto a line can be used at the shoulder to project a lateral target on to a vertical line passing through the acromium or it can be used at the knee to project lateral or medial targets on a functional axis.

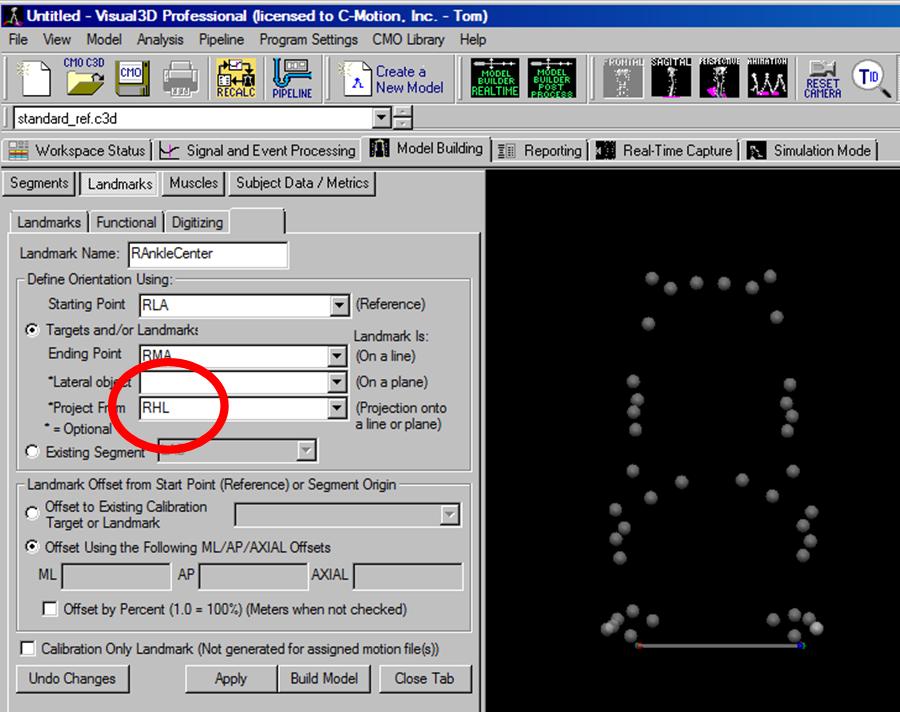
                The RAnkleCenter is the point that is created by projecting the RHL heel marker onto the line created from the lateral and medial ankle markers RLA and RMA.
                landmark_point_projected_onto_a_line.jpg


                Other Examples:

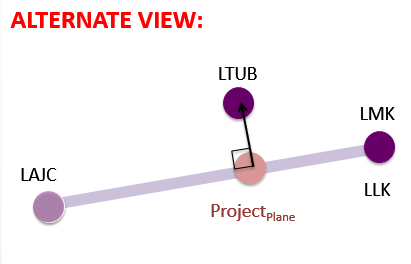
                Type 5: Project on a Plane

                A point can be projected onto a plane defined by three points.
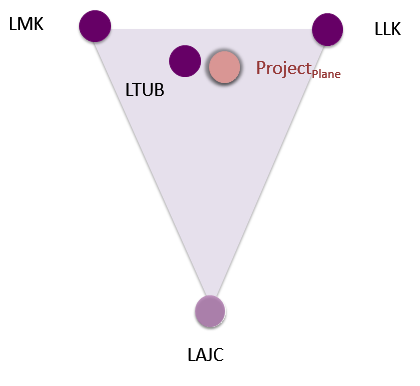
                Landmark Definition (click to expand)

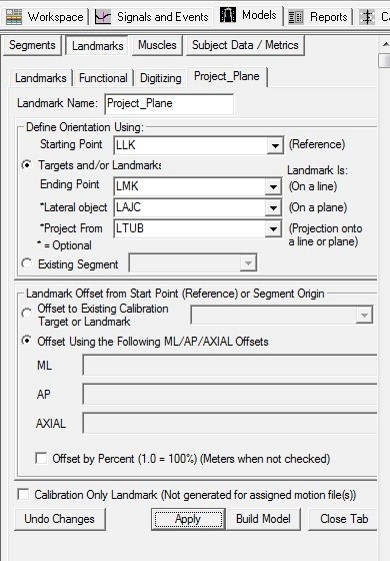
                1. Create Project_Plane:


                1. Click Landmarks button


                2. Click Add New Landmark button


                3. Create Landmark: Project_Plane

                     Landmark Name: Project_Plane


                     Define Orientation Using:
                     Starting Point: LLK
                     Ending Point: LMK
                     Lateral object: LMK
                     Project From: LTUB


                4. Do NOT Check: Offset by Percent (1.0 = 100%)

                  landmark_type5_definition.jpg


                  Example: Project the iliac crest target onto the plane defined by the R/LASIS and RPSIS (click to expand)

                  By projecting multiple landmarks onto the same plane you can build segment coordinates systems in a specific plane.

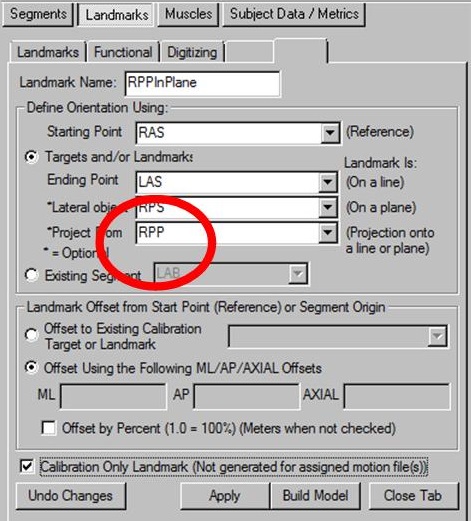
                  The RPPinPlane is the point that is created by projecting the RPP marker on the illiac crest onto the plane created from the right and left ASIS's (RASI,LASI) and the right PSIS RPS marker.
                  landmark_point_projected_onto_a_plane.jpg


                  Other Examples:


                  Digitized Landmarks

                  Digitized landmarks are defined using a digitized pointer and again result in a “virtual marker” being computed by Visual3D relative to the positions of other, existing markers. The goal of digitized landmarks is to allow users to track anatomical landmarks without having to place markers on that location. See instructions for using a digitizing pointer to learn more.

                  Functional Landmarks

                  Functional landmarks indicate the locations of functional joints. Calculating functional joint positions requires movement of one segment relative to another segment. The chosen algorithm then searches for a point (or for a one degree of freedom joint, an axis) that is stationary relative to the 2 segments (or 2 sets of markers).

                  Visual3D's algorithms for computing functional joint positions are adapted from:

                  Schwartz MH, Rozumalski A (2005) A new method for estimating joint parameters from motion data. Journal of Biomechanics, 38, 107-116] and from Jensen E, Lugade V, Crenshaw J, Miller E, Kaufman K (2016) A principal component analysis approach to correcting the knee flexion axis during gait. Journal of Biomechanics, in press] See the in-depth explanation of functional joints to learn more.

                  visual3d/documentation/modeling/landmarks/landmarks_overview.txt · Last modified: 2024/07/17 11:45 by sgranger