Table of Contents
Example: Gait Events using Kinematic Data
Typically, creating gait events using force data is the most reliable method of gait event detection. However, if force data is not available, there are several methods for computing gait events using kinematic data.
This tutorial describes three methods to create gait events:
- Method 1A: Zeni using foot position relative to pelvis [1]
- Method 1B: Zeni using foot velocity relative to pelvis [1]
- Method 2: DeAsha using hip kinematics [2]
Alternative methods can also be implemented in Visual3D, although they are not described in this tutorial. [3] [4] [5] [6] Keep in mind that computing gait events from only kinematic data is challenging, especially for subjects with movement disorders.
Downloads
Example scripts which create events using the three methods along with a sample workspace can be downloaded here.
Method 1A + 1B: Zeni Paper
The Zeni paper describes two methods of creating kinematic gait events. Step 1 is the same in both methods, but the steps diverge in Step 2.
Step 1: Transform Heel and Toe Markers into Pelvis Coordinate System
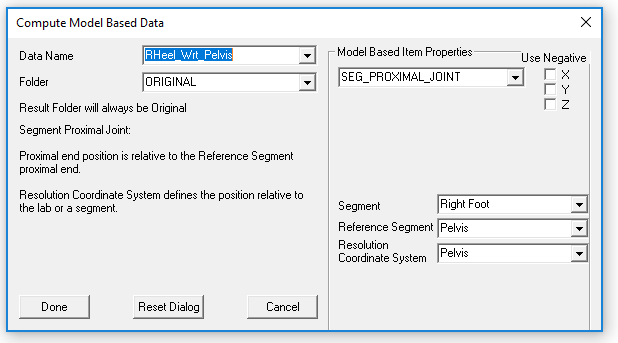
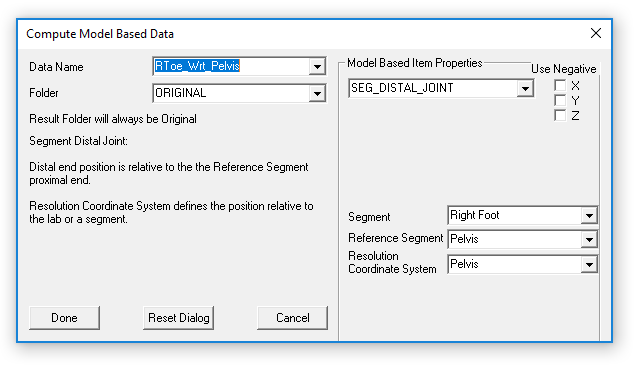
Transform the proximal and distal ends of the feet into the pelvis coordinate system, this can be accomplished using the following functions in the Compute_Model_Based_Data command:
- SEG_PROXIMAL_JOINT: The proximal location of the foot in the pelvis coordinate system (the proximal end of the foot is essentially the heel)
- SEG_DISTAL_JOINT: The distal location of the foot in the pelvis coordinate system (the distal end of the foot is essentially the toe)
This tutorial explains implementing this method as a pipeline (v3s file), but it's also possible to create the events using a Meta-Command. An example of using a Meta-Command can be found here.
Right/Left Proximal Position in Pelvis:
Right/Left Distal Position in Pelvis:
Step 2: Create Events
The Zeni paper provides two examples of creating gait events, one using the position of the foot relative to the pelvis and the other using the velocity of the foot relative to the pelvis.
Up to now, the two methods have been identical, but the methods differ here in Step 2. You should follow either 2A OR 2B:
- Step 2A: Uses the position of the foot
- Step 2B: Uses the velocity of the foot
Step 2A: Create Events from Foot Position Max/Min
Create events based on the position of the foot in the pelvis coordinate system. The location of the foot in front/behind the pelvis is used to create the events. This means, SELECT_Y is set to TRUE, since the Y axis is the AP direction of the pelvis.
For LHS: Select the same parameters as for RHS, but use the LHEEL_WRT_PELVIS signal.
For LTO: Select the same parameters as for RTO, but use the LTOE_WRT_PELVIS signal.
Step 2B: Create Events from Foot Velocity
Create events based on the velocity of the foot in the pelvis coordinate system. The velocity of the foot in front/behind the pelvis is used to create the events. This means, SELECT_Y is set to TRUE, since the Y axis is the AP direction of the pelvis.
Calculate the Velocity of the Foot relative to the Pelvis:
The velocity of the foot can be calculated by taking the first derivative of position signals of interest.
Calculate Heel Strike Events:
Use the Event_Threshold command to place heelstrike events at points where the signal crosses the 0-value threshold on the descent.
For LHS: Select the same parameters as for RHS, but use the LHEEL_WRT_PELVIS_Vel signal.
Calculate Toe Off Events:
For LTO: Select the same parameters as for LTO, but use the LToe_Wrt_Pelvis_Vel signal.
Meta-Command
When writing your own kinematic gait algorithm, it may be useful to create the script as a Meta-Command. More information (and an example) can be found here.
Method 2: De Asha Paper
This method defines heel strike when the contralateral hip is in full extension.
Right/Left Hip Angle:
Right/Left Heel Strike Events:
IMPORTANT: The RHS event is created at the minimum of the LEFT hip angle so make sure the correct signal is selected.
For LHS: Select the same parameters as for RHS, but use the RHip_Angle signal.


