Table of Contents
COP Path
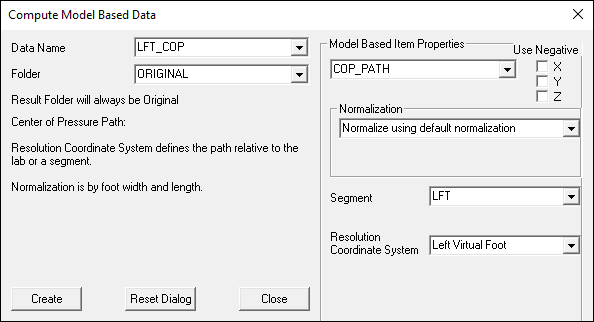
Creating a LINK_MODEL_BASED signal called the COP_PATH is a general way to compute the center of pressure. This command checks all force assignments to the specified segment and all force platforms, then resolves the resulting signal into the specified local coordinate system.
For example, to calculate the center of pressure path for the left foot with respect to the left virtual foot, choose LFT as your segment and Left Virtual Foot as your resolution coordinate system:
Normalization
Four options exist to normalize the computed value for the joint moment.
- Normalization Off: The computed value is not normalized.
- Normalize using default normalization: The computed value is normalized according to the segment width and length.
- Normalize to local file metric value: The user specifies the METRIC value in the local file with which to normalize the computed value.
- Normalize to global metric value: The user specifies the METRIC value in the GLOBAL workspace with which to normalize the computed value.
Note that the default normalization is relative to length (distance between proximal and distal ends of the segment) and width (distal radius) of the segment that is assigned to the force vector. If the foot segment defined from the ankle to the metatarsals is assigned to the force, then the range of motion might be on the order -1 to 2 in the axial direction, which may seem strange for a normalized value. In this case a negative axial value means the COP is behind the ankle and a positive axial value means the COP is in front of the ankle joint center. An axial value greater than 1 would mean that the COP was more distal than the metatarsals (e.g. under the toes)
The Right-Hand Rule
It is not quite possible to set up model-based items so that their components have the same sign on both sides of the body because Visual3D strictly follows the right hand rule. This is done by design because some Visual3D users analyse things other than people/animals where the terms flexion/extension, ab/aduction and axial rotation have no specific meaning.
In order to get the signs of the COP_PATH to be consistent between the left and right leg, i.e., to get around the fact that Visual3D enforces the right-hand rule, you can select the check boxes in the dialog to negate one or more components. This process is described in the tutorial explaining Knee Angle Signals.
Example: a foot segment parallel to the floor
Commonly the center of pressure is computed relative to a “special” foot coordinate system. A virtual foot is created that lies flat on the floor during the standing trial. The center of pressure is often scaled to the length and width of the foot segment. The following process can be used to create this signal:
Given a Left Foot gegment defined as:
Segment Name= Left Foot

Define Proximal Joint and Radius
Lateral= LLA Joint= none Medial= LMA

Define Distal Joint and Radius
Lateral= LMET5 Joint= none Medial= LMET1

Extra Target To Define Orientation (if needed)
Location Lateral= none
Select Tracking Markers: LFT1 LFT2 LFT3
Create landmarks by projecting the anatomical markers used to define the foot onto the floor of the laboratory.
Landmark Name= LLA_FLOOR
Define Orientation Using
Starting Point=
Existing Segment= LAB
Offset Using the Following ML/AP/AXIAL Offsets
X= LLA::X Y= LLA::Y Z= 0
Calibration Only Landmark= Checked

Landmark Name= LMA_FLOOR
Define Orientation Using
Starting Point=
Existing Segment= LAB
Offset Using the Following ML/AP/AXIAL Offsets
X= LMA::X Y= LMA::Y Z= 0
Calibration Only Landmark= Checked

Landmark Name= LMET5_FLOOR
Define Orientation Using
Starting Point=
Existing Segment= LAB
Offset Using the Following ML/AP/AXIAL Offsets
X= LMET5::X Y= LMET5::Y Z= 0
Calibration Only Landmark= Checked

Landmark Name= LMET1_FLOOR
Define Orientation Using
Starting Point=
Existing Segment= LAB
Offset Using the Following ML/AP/AXIAL Offsets
X= LMET1::X Y= LMET1::Y Z= 0
Calibration Only Landmark= Checked
Define the virtual foot segment as follows:
Segment Name= Left Virtual Foot

Define Proximal Joint and Radius
Lateral= LLA_FLOOR Joint= none Medial= LMA_FLOOR

Define Distal Joint and Radius
Lateral= LMET5_FLOOR Joint= none Medial= LMET1_FLOOR

Extra Target To Define Orientation (if needed)
Location Lateral= none
Select Tracking Markers: LFT1 LFT2 LFT3
Create the Center of Pressure signal as shown in the dialog above. Assuming the left foot segment has been assigned to a force platform and that the segment is specified as the LF,. Visual3D interprets this as finding the contacts of the LFT segment on any of the force platforms. The resolution coordinate system is defined as the “Left Virtual Foot” segment coordinate system, which is flat on the ground during standing posture. Normalization scales the COP_PATH signal to the length and width of the foot. This signal will appear in the data tree in the LINK_MODEL_BASED folder, and is available for graphing in the report.

