User Tools

Site Tools


visual3d:real_time_streaming:real-time_streaming

Real-time Streaming

Visual3D supports the real-time streaming of data from various motion capture systems with add-on modules for Visual3D, providing advanced modeling and virtual marker/landmark capabilities. The result has led to radical improvements in processing times, consistent improvement in data quality, improved reporting capabilities, and increased flexibility in ways to get good data and manage it. Many of our customers have said that they could never go back to the old ways of doing motion capture. Visual3D's usefulness at helping researchers, athletes, clinicians, therapists, physicians, animators, veterinarians, and many other professionals continues to improve and reach into new fields.

From Visual3D you can view data in real time. With that data you can create a model and see the data applied to a model in real-time and thus verify a meaningful data capture on the spot, rather than finding errors in post processing and having to redo (i.e. reschedule) a trial.

You can also process the data for biofeedback, process dynamic pointer data, or create functional joints.


C-Motion supports a limited number of systems via plug-ins that have to be downloaded and installed separately from Visual3D.


Compatible Motion Capture Systems

Real-time Plugins

Northern Digital Incorporated (32-bit only)

Vicon Nexus(64-bit and 32-bit)

Motion Analysis Corporation(64-bit and 32-bit)

Qualisys QTM(64-bit and 32-bit)

Codamotion(32-bit)

Phoenix Technologies(632-bit)

Polhemus(32-bit)

Tutorials

Interface

Creating Static Trial information from Streaming Data

It is not recommended to do this because when collecting in real time, if your motion capture software or Visual3D crash, you will need to re-do this step, which takes more time when the subject is standing in the volume. If you take and label a static trial in your motion capture software, you can load that static trial and apply the model template if there are any issues during the data collection (which minimizes the time the subject is standing there).

Create a Static Trial and Model from Streaming Data

It is possible to create the static trial (from which a hybrid model can be build) by taking a snapshot of 10 frames of data in the stream.

The steps to create a static trial from the data stream can be found here:
The first thing to do when collecting data is to create a model. From the menu option, create a model from streaming data. When this is done, Visual3D will switch to the Model Builder mode and a dialog box will pop up (scroll down to see the image).

Note that the toolbar has changed in the Model Builder - there is now an icon for opening the real-time processing dialog (green text), and the Open and Save Model Template (MDH files) are more prominent.

(When completed, the model can be saved as a template, and applied to motion files, including real time captures, by applying it to any open data file/stream. A template can also be modified or customized.)

createstatictrialfromstream.jpg


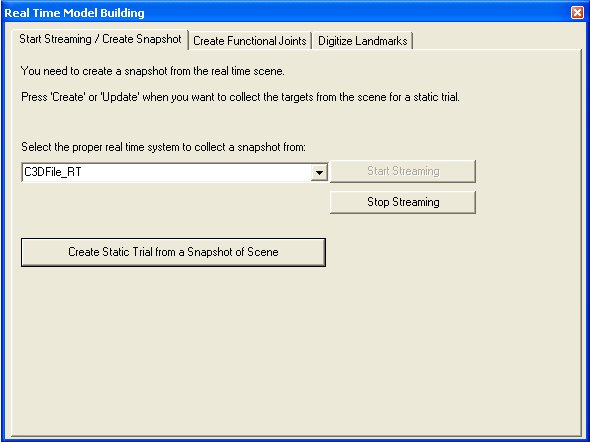
When creating a model in real-time, you need to define a few things. First, you need something to work with - a baseline. For that, we simply grab a single frame from the data stream. The subject should be in a frontal pose so that it is easy to see the segments that need to be created.

From the combo box, select your data source - either a c3d file (simulated streaming - enables post-processing of data) or the motion capture camera. (Note: the real-time interface libraries must be downloaded from C-Motion's web site and installed before this works.)

Click the “Start Streaming” button to get point data streaming in, and we are ready to create the model.

When the subject is in a proper pose, simply click the “Create Static Trial from Snapshot” button and a frame will be pulled from the data stream to use for model building.

–> This dialog box pops up then the “REALTIME” icon on the toolbar (green text) is clicked as well. ←-

takesnapshotfromstream.jpg

Functional Joints from Streaming Data

In version 4 we implemented an interface for computing functional joints from existing data files. This interface is an alternative to the existing pipeline command.
Note that the list of functional joints (the white box on the left) is blank. You need to first define which landmarks you want to process - as Landmarks in the model builder -

The alternative is to open/apply a model template on top of the streaming data with predefined values. This eliminates the need for the older .ini files. Note also that this exercise (defining joint names) need only be done once since they can be saved in a model template.

Note: If you already have an older .ini file with functional joints defined, you can import it via the Load Functional Joints… button at the bottom left of the screen.


After accumulating and defining the landmarks, select the Model Builder Realtime icon on the Toolbar

modelbuildericons.jpg


Start Streaming the Data from the Functional Movement Trial. Select the Streaming plugin compatible with your Motion Capture System. In this example, I have referred to the C3D File Streaming Emulator that all users are provided.
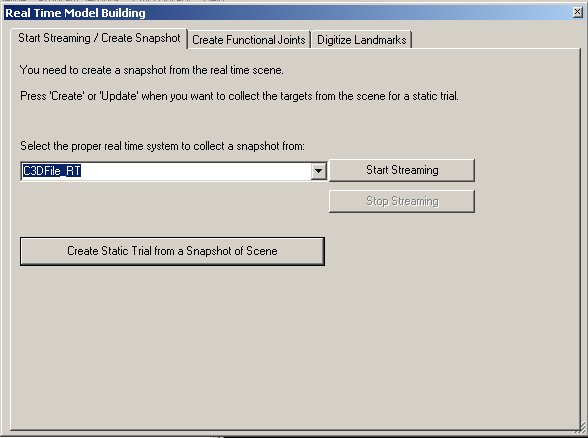
createsnapshotpp.jpg


Highlight the landmarks to be computed and select Start Collecting Frames
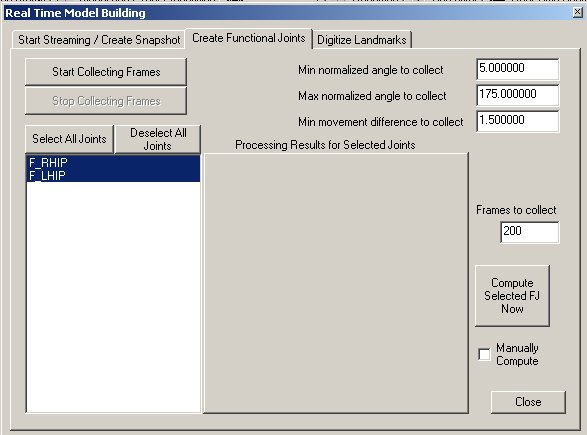
functionaljointsrtdialog.jpg


During streaming of the data Visual3D is searching for a set of unique poses. The number of poses is specified in Frames to Collect. If the parameters have been defined such that it doesn't seem to be able to accumulate the total number of poses, you can over ride the number and force Visual3D to compute the landmark by selecting the button

Compute Selected FJ Now

The processing results are equivalent to the post-processing results. This information can usually be ignored if there are no errors

functionaljointsprocessingresults.jpg

Digitizing Pointer from Streaming Data

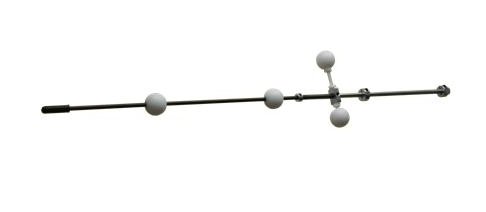
A digitizing pointer is used to create Virtual markers on the subject. These markers are traditionally used instead of anatomically placed physical calibration markers. For example, on an overweight subject, a “virtual” ASIS marker can be created for defining the model.
pointer.jpg


Note: Virtual markers are simply a special type of Landmark. Instead of using an .ini file that lists the ones you wish to collect (which can be imported so you don't lose the data) the Landmarks need to be predefined in the Model Builder, including which tracking markers they are associated with.

Just like with the functional joints definitions above, the landmarks for the digitizing pointer need to be pre-defined (or imported) in a similar process. They can be modified and saved in the model template, or as a separate file as well.

Select the Model Builder REALTIME icon on the Toolbar modelbuilderpostprocessicon.jpg


The following property page should appear containing the 3 landmarks that were defined above.

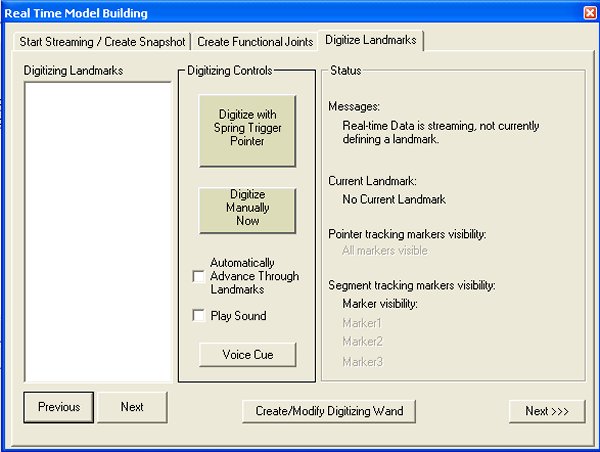
Back on the create snapshot dialog, the third tab can be used to define the virtual markers.

As the data is streaming, virtual markers can be processed in two ways - The landmarks can be defined immediately at the click of the button, or the list of landmarks can be processed in order - automatically (i.e. Check the Automatically Advance check-box).

The automatic way simply recognizes a trigger (point and compress the spring) and then moves on to the next one (in the lest on the left). All you do is point to the places in order and the landmarks are defined. A optional wave file can be played before each target telling a lone operator where to point next.

By pressing the “Digitize Manually Now” button, a landmark is created wherever the pointer tip is at that point in time - and it does not wait for a trigger. This is one way to correct a pointer landmark. Alternatively, you can highlight a landmark name in the left panel and click the upper button. The system will examine the streaming data, waiting for a spring-trigger event. If the automatically advance button is not checked, it will stop examining the streaming data when it gets the one event.

digitizelandmarkstab.jpg


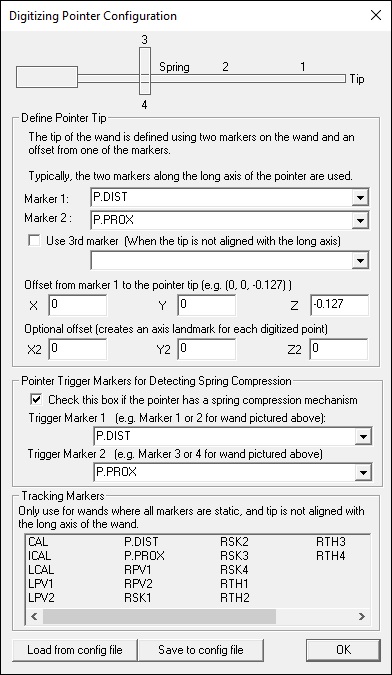
Note: it you are not using a pointer from C-Motion, you can define your own. At the bottom of the screen is the “Create/Modify Digitizing Wand” button for setting pointer attributes.

Without an event trigger, like a spring, automatic landmark creation requires a button push for each location (the “manual” button above).

Note: When using the calibration wand and trying to experiment with digitizing pointers using Nexus (Vicon), it is important to rename the “origin” wand marker to something else. “Origin”, as well as “Lab” are reserved names in Visual3D and will result in a name conflict.

digitizingpointerconfiguration.jpg
visual3d/real_time_streaming/real-time_streaming.txt · Last modified: 2024/07/17 15:46 by sgranger