Table of Contents
Rab Upper Extremity Model
This page is usable, but still under construction
Introduction
Model based on the upper extremity model developed by Dr. George Rab, Kyria Petuskey, and Anita Bagley from Shriners Hospital for Children, Northern California. Refer to their paper “A Method for Determination of Upper Extremity Kinematics” Gait & Posture 15 (2002) 113-119 for the exact model specifics. [1]] and a follow up article, Petuskey K, Bagley A, Abdala E, James M, Rab G (2007) Upper extremity kinematics during functional activities: Three-dimensional studies in a normal pediatric population. Gait & Posture 25, 573-579.Download is available here]
The Rab model has ten segments: head, neck, shoulder girdle, left upper arm, right upper arm, left lower arm, right lower arm, left hand, right hand, and Coda pelvis. In this tutorial, the neck and should girdle segments are not created.
Note that this represents a minimal marker set and minimal model of the upper extremities. This model is useful for gait analysis, but is insufficient for analyses of most upper extremity biomechanics.
Model Specifics
The following is a quick overview of the axes definitions. The Rab model axes are consistent with the Visual3D default axes (from anatomic neutral position & following the right-hand rule: X directed laterally to the right, Y directed forward (Anteriorly), and Z axis directed upward (Superiorly)).
Joint angles are defined using the default Visual3D Cardan sequence XYZ, which corresponds to forward flexion of the proximal segment, abduction, and axial rotation of the distal segment.
Example C3D Files
Marker Placement
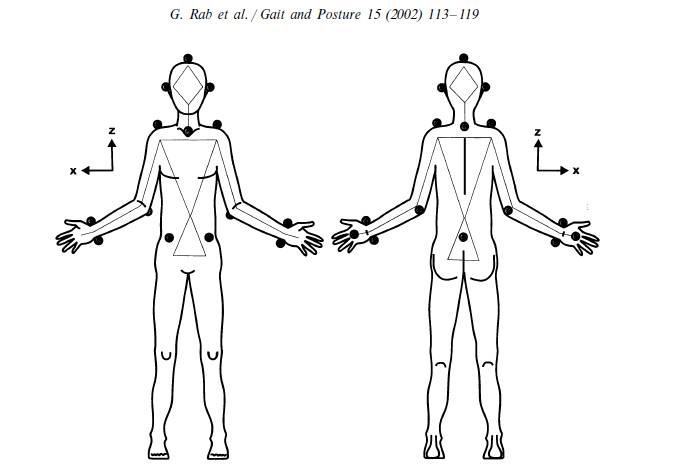
The model has 18 marker locations.
- Head: A helmet or hat is used for the head markers. The marker locations are: left ear, right ear, and top of the head.
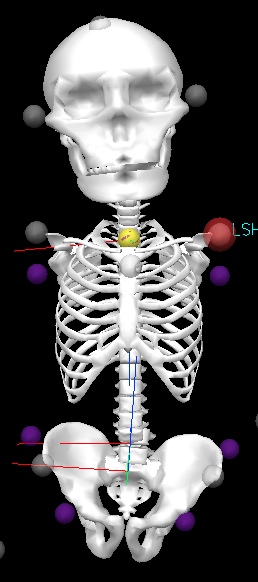
- Trunk: The trunk markers are placed on the Sternum (Manubrium), C7, left Acromion, and right Acromion.
- Left Arm: The left arm markers are placed on the left Olecranon, left Distal Radius, left Distal Ulna, and left Dorsal 3rd MCP Joint.
- Right Arm: The right arm markers are placed on the right Olecranon, right Distal Radius, right Distal Ulna, and right Dorsal 3rd MCP Joint.
- Pelvis: The pelvis markers reflect the locations for the Coda pelvis: left ASIS, right ASIS, and Sacral marker.
Visual 3D Model Construction
Pelvis
The Rab model uses a Helen Hayes Pelvis model but in this tutorial we will use a Coda Pelvis model, which has the same coordinate system.
To construct the Pelvis Segment:
- From the Segment Name box, select Pelvis.
- From the Segment Type box, select Coda.
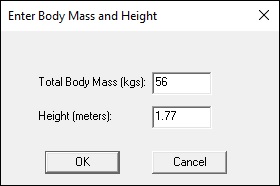
- A dialogue box labeled Enter Body Mass and Height will open because Visual3D needs the subject to be assigned a mass and a height. For this example, Enter 56 kg and 1.77 m, and click OK.
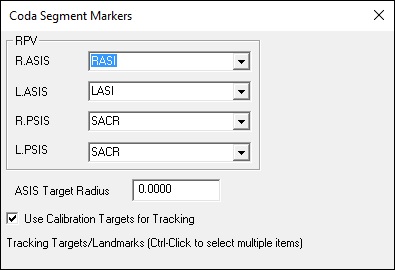
- A dialogue box labeled Coda Segment Markers will open. Select the markers so that they correspond to the figure below. Click Close.
- Click Build Model to build the segment. You should now see a pelvis segment on your standing model. If you do not see the pelvis segment after clicking Build Model, double check the values you entered in the last step.
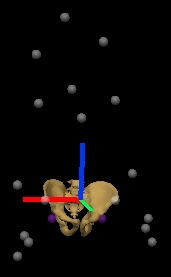 The hip joint center landmarks **RIGHT_HIP** and **LEFT_HIP** were created when the Pelvis segment was constructed.
Thorax/Ab
The Thorax/Ab segment is constructed from virtual landmarks on the lateral superior borders of the Iliac Crest and virtual landmarks at the shoulder joint centers.
Iliac Crest Landmarks
The Iliac Crest Landmarks were estimated using the Terry Database published as:
Kepple TM, Sommer HJ, Siegel KL, Standhope SJ (1998) A three-dimensional musculoskeletal database for the lower extremities. Journal of Biomechanics 31, pp 77-80 This landmark was not part of the original Terry Database, but we estimated the position from the database that can be downloaded Here.
The medial/lateral and superior/inferior location of the RIGHT_ILIAC and LEFT_ILIAC landmarks were defined as the most lateral point on the superior tubercle of the Iliac crest (landmarks 39 & 40 of the Terry Pelvis dataset)
The anterior/posterior location of the RIGHT_ILIAC and LEFT_ILIAC landmarks were defined as the lateral surface of the Right ilium at midpoint between most lateral point on superior tubercle of the Iliac crest and origin of the Gluteus Medius posterior fibers {landmarks 43 & 44 of the Terry Pelvis dataset)
The location of Terry Landmark 39 is (22.332 , -54.477 , 29.705)
The location of Terry Landmark 40 is (-251.082 , -49.732 , 36.540)
These values were averaged for creating the landmark.
From the Terry dataset the distance between the ASIS landmarks (Terry landmarks 1&2) is approximately 228 which is defined as the x-axis of the pelvis.
The x-component of the RIGHT_ILIAC landmark in Pelvis coordinates is (114+22.7)*ASIS_DISTANCE/228
The z-component of the RIGHT_ILIAC landmark in Pelvis coordinates is (33.1)*ASIS_DISTANCE/228
From the Terry dataset the perpendicular distance from the x-axis to the mid-point of the PSIS landmarks (Terry landmarks 3&4) is approximately 143.5
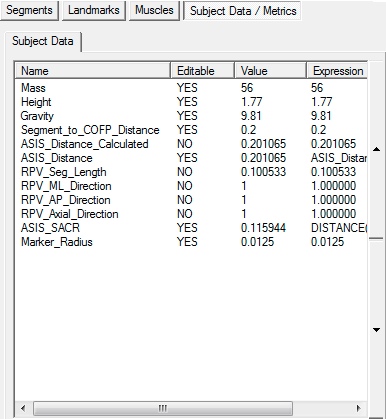
In Visual3D create a Subject/Model Metric to compute this distance as the distance from the SACR marker to the mid-point of the RASI and LASI markers.
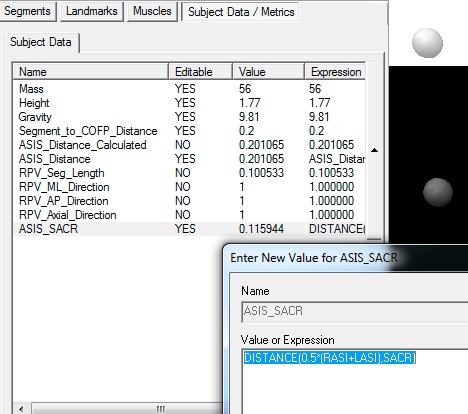 The y-component of the RIGHT_ILIAC landmark in Pelvis coordinates is (-54.477)*ASIS_SACR/143.5
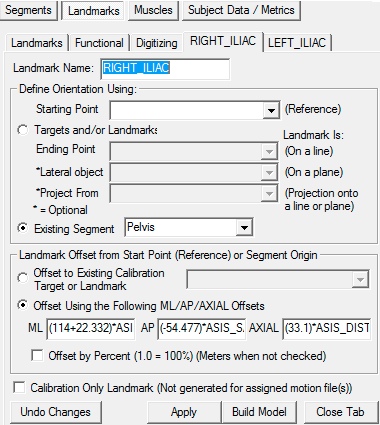
Create the RIGHT_ILIAC Landmark using these values as.
 In Summary:
The RIGHT_ILIAC landmark is defined as:
Existing Segment= Pelvis
ML= (114+22.332)*ASIS_DISTANCE/228
AP= (-54.477)*ASIS_SACR/143.5
AXIAL= (33.1)*ASIS_DISTANCE/228
The LEFT_ILIAC landmark is assumed to be located symmetrically and defined as:
Existing Segment= Pelvis
ML= -(114+22.332)*ASIS_DISTANCE/228
AP= (-54.477)*ASIS_SACR/143.5
AXIAL= (33.1)*ASIS_DISTANCE/228
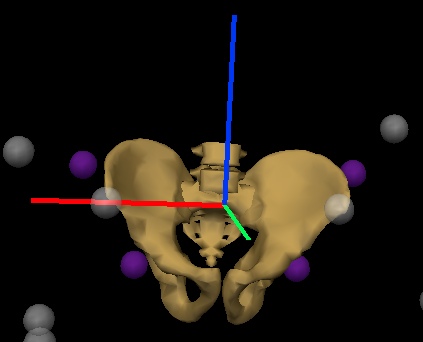
Construct the segment
We have now created all the needed landmarks for the thorax/ab segment. To create the thorax/ab segment in Visual 3D:
- Click on Segments tab
- From the Segment Name box, select Thorax/Ab.
- From the Segment Type box, select Visual 3D.
- Click Create.
A dialog will open that will allow us to define the segment.
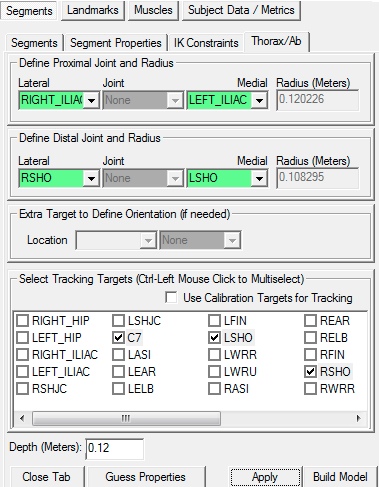
- In the Define Proximal Joint and Radius section, select RIGHT_ILIAC for the Lateral. and select LEFT_ILIAC for the Medial.
- In the Define Distal Joint and Radius section, select RSHO for the Lateral. and select LSHO for the Medial.
- In the Select Tracking Targets, click on C7, STRN, LSHO, RSHO
- In the Depth (Meters): box, enter 0.12
- Click on Build Model
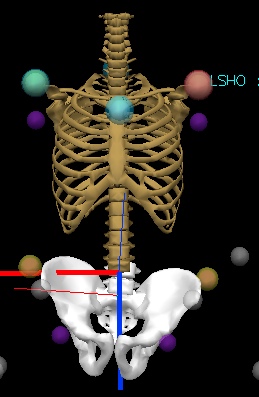
You should now see a thorax segment on your standing model. If you do not see the thorax segment after clicking Build Model, double check the values you entered in the last step.
Note that the Z-axis of the segment (Blue Line) is pointing down, so we must fix that.
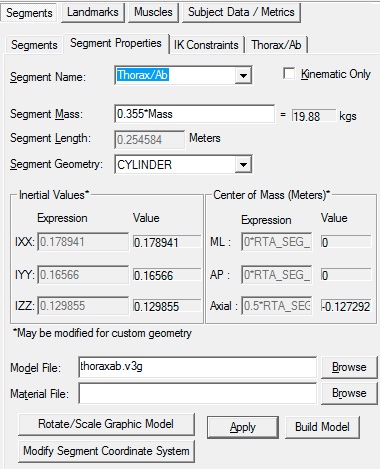
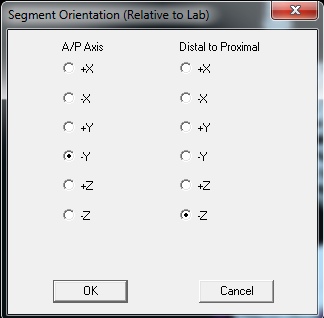
Switch to the segment properties tab, select the Thorax/Ab segment in the combo box, and select Modify Segment Coordinate System.
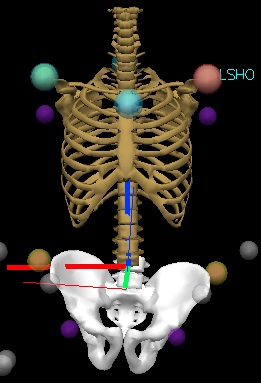
Select the AP direction to be -Y and the AXIAL direction to be -Z
This may seem a little strange at first because it is certainly an option to create the segment with the Acromion at the proximal end and the Iliac Crest at the distal end.
Placing the proximal end of the thorax/ab segment at the pelvis essentially places two proximal ends together (e.g. the Thorax/Ab and Pelvis), but now the distal end of the Thorax/Ab segment is at the shoulders, which allows the creation of shoulder and neck joints (e.g. the arms and head are considered distal segments of the body).
Head
The Head segment is created from the 2 markers on the head: REAR, LEAR, and a virtual location at the Mid-Point between C7 and STRN.
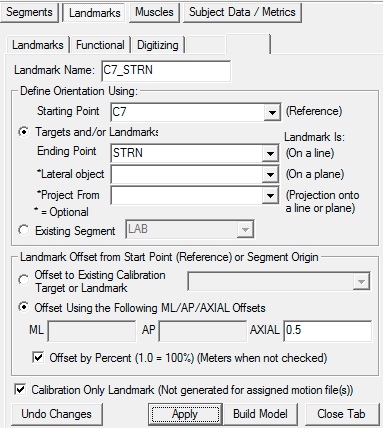
To create the midpoint of the C7 and STRN labelled C7_STRN:
- Click on the Landmarks TAB
- Click on Add New Landmark tab
- In the Landmark Name box, enter C7_STRN
- In the Starting Point box, enter C7
- In the Ending Point box, enter STRN
- From the Offset Using the Following AP/ML/Axial Offsets box, in the AXIAL enter 0.5
- Check the Offset by Percent (1.0=100%) (Meters when not checked)
- Click Apply.
We have now created all the needed landmark for the head segment. To create the head segment in Visual 3D:
- Click on Segments tab
- From the Segment Name box, select Head.
- From the Segment Type box, select Visual 3D.
- Click Create.
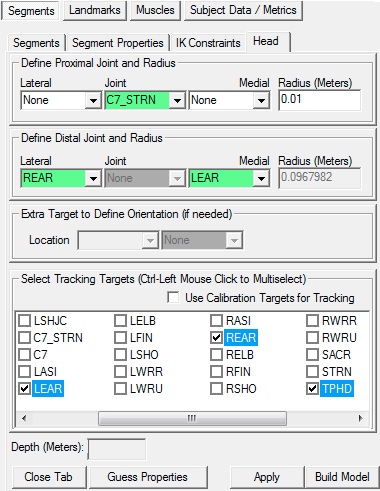
A dialog will open that will allow us to define the segment. The Z axis, pointing upwards, is the predominant axis. This is defined as the direction from the midpoint of C7 and STRN to the midpoint of REAR and LEAR.
- In the Define Proximal Joint and Radius section, select C7_STRN for the Joint.
- In the Proximal Radius box, enter 0.01.
- In the Define Distal Joint and Radius section, select REAR for the Lateral., select LEAR for the Medial.
- In the Select Tracking Targets, click on LEAR, REAR, and TPHD
- Click on Build Model
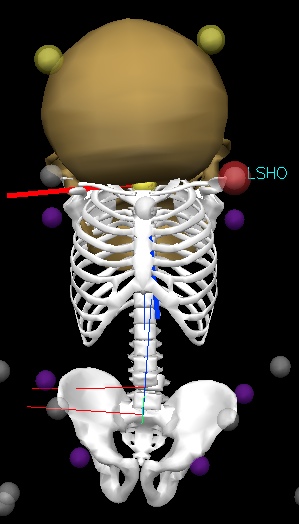
You should now see a head segment on your standing model. If you do not see the head segment after clicking Build Model, double check the values you entered in the last step. The resulting model will look very strange.
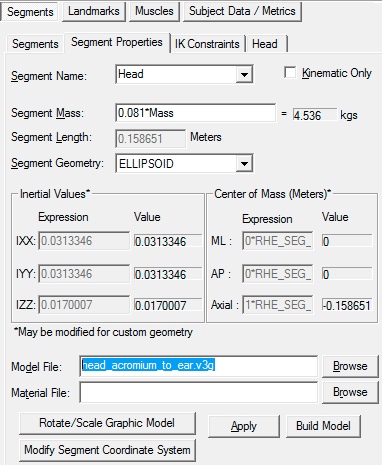
The coordinate system needs to be rotated to reflect our convention (x - med/lat, y - ant/post, z axial). Switch to the Segment Properties TAB, select the Head segment in the combo box, and select the button Modify Segment Coordinate System.
Select the button to Browse for a new model file and select head_acromium_to_ear.v3g from the Visual3D models folder.
Select Apply.
The animated model is still a little big for this dataset, but remember that this is only a graphic item, not the actual data.
Upper Arm
The upper arm segment is defined by the shoulder joint centers (RSHJC and LSHJC), the elbow joint centers (REJC and LEJC) and the elbow markers (RELB and LELB). Once the elbow joint centers are calculated then the upper arm segment is created.
Shoulder Joint Centers
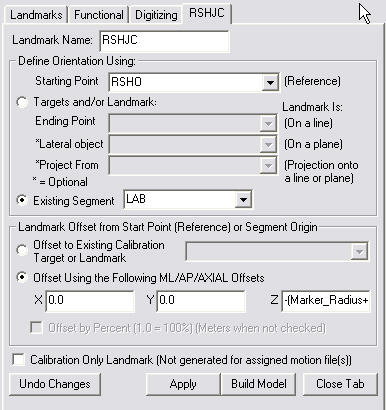
The shoulder joint center landmarks are created as offsets from the shoulder markers (RSHO, LSHO).
Marker_Radius Metric
Before you try to build the model to this point, it is important to note that the expression for the axial offset contains the Model Metric Marker_Radius
This is not a default metric in Visual3D, so the user must create this metric.
Switch to the Model Metrics Tab in Model Builder Mode.
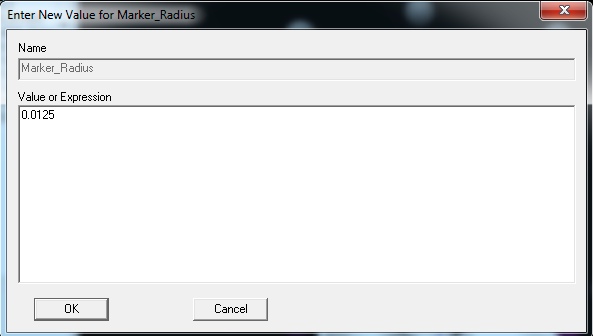
Subject Data may be defined as a floating point value, string, or an expression. To create a new Subject Data item, click the Add New Item button. This will bring up a dialog to enter the new subject data Name and it's value or expression.
The Subject Data name may consist of alphanumeric characters, and any other characters which are not mathematical operators. Additionally, the name may not contain spaces. Any automatically generated name which uses a segment name containing spaces will have the spaces removed from the name.
After you have added the Marker_Radius value, you will be able to build the model to this point.
To create the right shoulder joint center landmark RSHJC_STATIC:
- Click on the Landmarks TAB
- Click on Add New Landmark tab
- In the Landmark Name box, enter RSHJC_STATIC
- In the Starting Point box, enter RSHO
- From the Offset Using the Following AP/ML/Axial Offsets box, in the AXIAL enter -(Marker_Radius+0.17*Distance(LSHO,RSHO))
- Click Apply.
To create the left shoulder joint center landmark LSHJC_STATIC:
- Click on the Landmarks TAB
- Click on Add New Landmark tab
- In the Landmark Name box, enter LSHJC_STATIC
- In the Starting Point box, enter LSHO
- From the Offset Using the Following AP/ML/Axial Offsets box, in the AXIAL enter -(Marker_Radius+0.17*Distance(LSHO,RSHO))
- Click Apply.
Wirst and Elbow Joint Centers
The Wrist joint centres are created as the mid-point between the medial (RWRR, LWRR) and lateral wrist markers (RWRU, LWRU).The elbow joint centers are created using the elbow markers (RELB, LELB), one of the wrist markers (RWRU, LWRU), and shoulder joint centers (RSHJC, LSHJC).
Wrist Joint Center Landmark
As mentioned above, the wrist joint center is the mid-point between the two wrist markers.
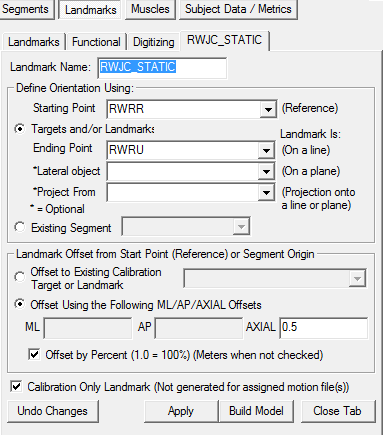
To create the right elbow joint center landmark RWJC_STATIC:
- Click on the Landmarks TAB
- Click on Add New Landmark tab
- In the Landmark Name box, enter RWJC_STATIC
- In the Starting Point box, enter RWRR
- In the Ending Point box, enter RWRU
- From the Offset Using the Following AP/ML/Axial Offsets box, in the AXIAL enter 0.5
- Check the Offset by Percent (1.0 = 100%)(Meters when not checked) box.
- Click Apply.
To create the left elbow joint center landmark LWJC_STATIC:
- Click on the Landmarks TAB
- Click on Add New Landmark tab
- In the Landmark Name box, enter LWJC_STATIC
- In the Starting Point box, enter LWRR
- In the Ending Point box, enter LWRU
- From the Offset Using the Following AP/ML/Axial Offsets box, in the AXIAL enter 0.5
- Check the Offset by Percent (1.0 = 100%)(Meters when not checked) box.
- Click Apply.
Elbow Joint Center Landmark
As stated previously, the elbow joint center is defined using the should joint center (RSHJC_STATIC, LSHJC_STATIC) the wrist joint center (RWJC_STATIC, LWJC_STATIC) and the elbow marker (RELB, LELB).
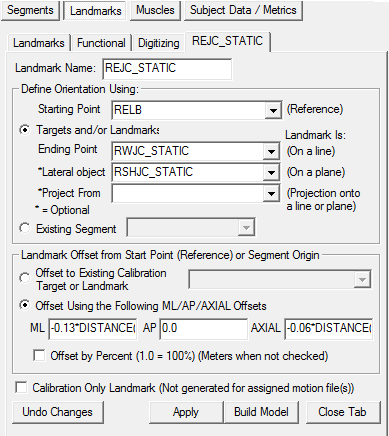
To create the right elbow joint center landmark REJC_STATIC:
- Click on the Landmarks TAB
- Click on Add New Landmark tab
- In the Landmark Name box, enter REJC_STATIC
- In the Starting Point box, enter RELB
- In the Ending Point box, enter RWJC_STATIC
- In the Lateral object box, enter RSHJC_SATIC
- From the Offset Using the Following AP/ML/Axial Offsets box, in the ML enter -0.13*Distance(RELB,RWRU) and in the AXIAL enter -0.06*Distance(RELB,RWRU)
- Click Apply.
To create the left elbow joint center landmark LEJC_STATIC:
- Click on the Landmarks TAB
- Click on Add New Landmark tab
- In the Landmark Name box, enter LEJC_STATIC
- In the Starting Point box, enter LELB
- In the Ending Point box, enter (i)LWJC_STATIC
- In the Lateral object box, enter LSHJC_SATIC
- From the Offset Using the Following AP/ML/Axial Offsets box, in the ML enter -0.13*Distance(LELB,LWRU) and in the AXIAL enter -0.06*Distance(LELB,LWRU)
- Click Apply.
Create the Upper Arm Segment
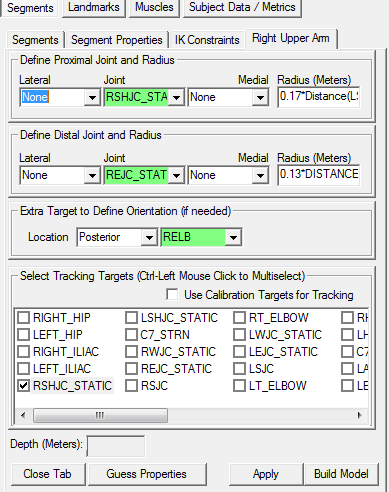
To create the right upper arm segment in Visual 3D:
- Click on Segments tab
- From the Segment Name box, enter Right Upper Arm.
- From the Segment Type box, select Visual 3D.
- Click Create.
- In the Define Proximal Joint and Radius section, select RSHJC_STATIC for the Joint.
- In the Proximal Radius box, enter 0.17*Distance(LSHO,RSHO).
- In the Define Distal Joint and Radius section, select REJC_STATIC for the Joint.
- In the Distal Radius box, enter 0.13*DISTANCE(RELB,RWRU)
- In the Extra Target to Define Orientation section, select Posterior for the Location. and RELB for the marker.
- In the Select Tracking Targets, click on RSHJC_STATIC, RSHO and RELB.
- Click on Build Model
To define the Left Upper Arm, go to the Segment tab and select Left Upper Arm from the Segment Name list.
- In the Define Proximal Joint and Radius section, select LSHJC_STATIC for the Joint.
- In the Proximal Radius box, enter 0.17*Distance(LSHO,RSHO).
- In the Define Distal Joint and Radius section, select LEJC_STATIC for the Joint.
- In the Distal Radius box, enter 0.13*DISTANCE(LELB,LWRU)
- In the Extra Target to Define Orientation section, select Posterior for the Location. and LELB for the marker.
- In the Select Tracking Targets, click on LSHJC_STATIC, LSHO and LELB.
- Click on Build Model
Forearm
The forearm segment is defined by the elbow joint centers (REJC and LEJC), the wrist joint centers (RWJC and LWJC) and the medial wrist markers (RWRR and LWRR).
Create ELBOW landmarks
To help better track the forearm segment, we can create RT_ELBOW and LT_ELBOW landmarks.
To create the RT_ELBOW landmark:
- Click on the Landmarks TAB
- Click on Add New Landmark tab
- In the Landmark Name box, enter RT_ELBOW
- In the Existing Segment box, select Right Upper Arm
- From the Offset Using the Following AP/ML/Axial Offsets box, in the AXIAL enter -1.0
- Check the Offset by Percent (1.0=100%) (Meters when not checked)
- Click Apply.
To create the LT_ELBOW landmark:
- Click on the Landmarks TAB
- Click on Add New Landmark tab
- In the Landmark Name box, enter LT_ELBOW
- In the Existing Segment box, select Left Upper Arm
- From the Offset Using the Following AP/ML/Axial Offsets box, in the AXIAL enter -1.0
- Check the Offset by Percent (1.0=100%) (Meters when not checked)
- Click Apply.
Create Forearm Segment
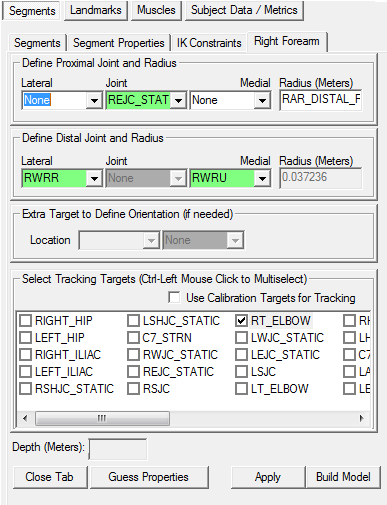
To create the right forearm segment in Visual 3D:
- Click on Segments tab
- From the Segment Name box, enter Right Forearm.
- From the Segment Type box, select Visual 3D.
- Click Create.
A dialog will open that will allow us to define the segment. The Z axis, pointing upwards, is the predominant axis.
- In the Define Proximal Joint and Radius section, select REJC_STATIC for the Joint.
- In the Proximal Radius box, enter RAR_DISTAL_RADIUS.
- In the Define Distal Joint and Radius section, select RWRR for the Lateral. and RWRU for the Medial.
- In the Select Tracking Targets, click on RT_ELBOW, RWRR, and RWRU
- Click on Build Model
You should now see a forearm segment on your standing model. If you do not see the forearm segment after clicking Build Model, double check the values you entered in the last step.
To create the left forearm segment in Visual 3D:
- Click on Segments tab
- From the Segment Name box, enter Left Forearm.
- From the Segment Type box, select Visual 3D.
- Click Create.
A dialog will open that will allow us to define the segment.
- In the Define Proximal Joint and Radius section, select LEJC_STATIC for the Joint.
- In the Proximal Radius box, enter LAR_DISTAL_RADIUS.
- In the Define Distal Joint and Radius section, select LWRR for the Lateral. and LWRU for the Medial.
- In the Select Tracking Targets, click on LT_ELBOW, LWRR, and LWRU
- Click on Build Model
Hand
The hand segment is defined by the wrist joint centers (RWJC_STATIC, LWJC_STATIC), the hand joint centers (RHDJC_STATIC, LHDJC_STATIC) and the lateral wrists markers (RWRR, LWRR).
Hand Joint Center Landmark
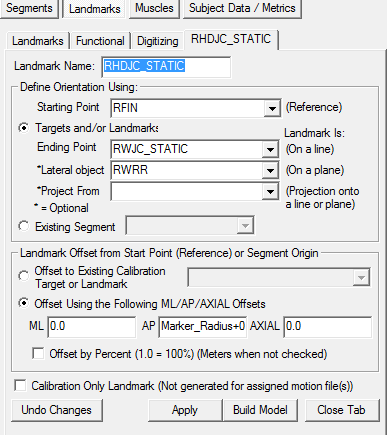
To create the right Hand joint center landmark RHDJC_STATIC:
- Click on the Landmarks TAB
- Click on Add New Landmark tab
- In the Landmark Name box, enter RHDJC_STATIC
- In the Starting Point box, enter RFIN
- In the Ending Point box, enter RWJC_STATIC
- In the Lateral object box, enter RWRR
- From the Offset Using the Following AP/ML/Axial Offsets box, in the ML enter Marker_Radius+0.3*DISTANCE(RFIN,RWJC_STATIC).
- Click Apply.
To create the left hand joint center landmark LHDJC_STATIC:
- Click on the Landmarks TAB
- Click on Add New Landmark tab
- In the Landmark Name box, enter LHDJC_STATIC
- In the Starting Point box, enter LFIN
- In the Ending Point box, enter LWJC_STATIC
- In the Lateral object box, enter LWRR
- From the Offset Using the Following AP/ML/Axial Offsets box, in the ML enter Marker_Radius+0.3*DISTANCE(LFIN,LWJC_STATIC).
- Click Apply.
Creating the Hand Segment
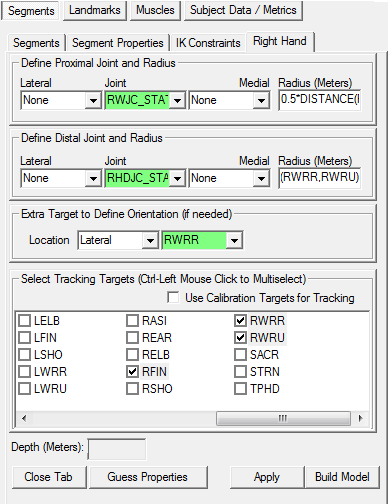
To create the right hand segment in Visual 3D:
- Click on Segments tab
- From the Segment Name box, enter Right Hand.
- From the Segment Type box, select Visual 3D.
- Click Create.
- In the Define Proximal Joint and Radius section, select RWJC_STATIC for the Joint.
- In the Proximal Radius box, enter 0.5*DISTANCE(RWRR,RWRU).
- In the Define Distal Joint and Radius section, select RHDJC_STATIC for the Joint.
- In the Distal Radius box, enter 0.5*DISTANCE(RWRR,RWRU)
- In the Extra Target to Define Orientation section, select Lateral for the Location. and RWRR for the marker.
- In the Select Tracking Targets, click on RWJC_STATIC, RFIN, RWRR, and RWRU
- Click on Build Model
To create the left hand segment in Visual 3D:
- Click on Segments tab
- From the Segment Name box, enter Left Hand.
- From the Segment Type box, select Visual 3D.
- Click Create.
A dialog will open that will allow us to define the segment.
- In the Define Proximal Joint and Radius section, select LWJC_STATIC for the Joint.
- In the Proximal Radius box, enter 0.5*DISTANCE(LWRR,LWRU).
- In the Define Distal Joint and Radius section, select LHDJC_STATIC for the Joint.
- In the Distal Radius box, enter 0.5*DISTANCE(LWRR,LWRU)
- In the Extra Target to Define Orientation section, select Lateral for the Location. and LWRR for the marker.
- In the Select Tracking Targets, click on LWJC_STATIC, LFIN, LWRR, and LWRU
- Click on Build Model
Scaling the hand graphics
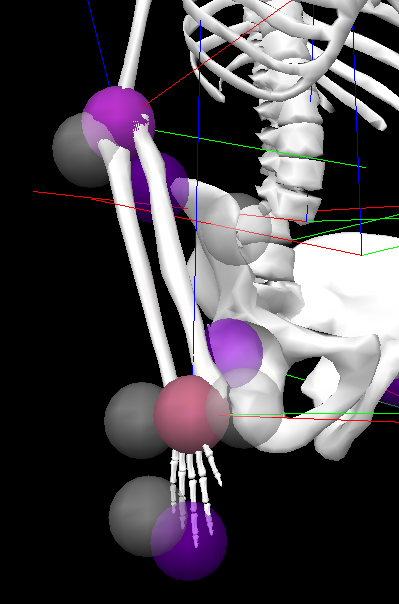
The hand segments are now created. Their corresponding graphics (.v3g files) are however incorrectly scaled.
To correct this for the right hand, we need to change the hand .v3g files:
- Go to the Segment Properties tab
- In the Segment Name, select Right Hand
- The Model File field is currently set to rhand.v3g
- Click browse, and select righthandwristtobaseoffinger.v3g from the models folder.
- Click Apply
To correct this for the left hand, we need to change the hand .v3g files:
- Go to the Segment Properties tab
- In the Segment Name, select Left Hand
- The Model File field is currently set to Lhand.v3g
- Click browse, and select lefthandwristtobaseoffinger.v3g from the models folder.
- Click Apply
Summary
You should now have a complete upper extremity model, with the following segments created:
Pelvis, Thorax/Ab, Head, Right and Left Upper Arms, Right and Left Forearm, Right and Left Hands.
References
Rab, G, et al., “A Method for Determination of Upper Extremity Kinematics” Gait & Posture 15 (2002) 113-119

