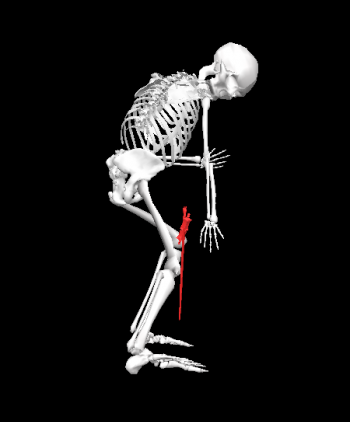
Xsens Prop
Introduction
Visual3Dv2020.## supports reading MVNX files with one prop sensor. The sensor will be loaded automatically as a segment (ex. PR1). If more props are required to process your data, please contact C-Motion. When using an Xsens prop in Visual3D, all information is loaded automatically and no further steps are required.
You can however choose to load a graphics object or adjust the location of the prop segment. This wiki page will explain the steps in the pipeline so that you can modify the script for your own data.
Sample Data
Sample data can be downloaded here.
- Save the sword.obj file in your Models folder
- Open the MVNX file:
- File -> Open
- Browse for MVNX file
- Notice all the information for the prop signal is loaded and the segment coordinate system is displayed in the 3D viewer
- Run the pipeline:
- Pipeline -> Workshop
- Open Pipeline
- Browse for Sword.v3s
- Execute Pipeline
The pipeline will:
- Adjust the position of the prop so that it is fixed to the center of mass of the hand
- Load the sword graphic object
- Color the sword red
Segment Properties
The graphics object and kinetic segment properties can be defined using the Segment Properties command. In this example, the sword graphic object is being associated with the prop:
Set_Segment_Properties
/CALIBRATION_FILE=
/SEGMENT_NAME=PR1
! /KINEMATIC_ONLY=
! /MASS=
! /CG_FROM_PROX_AXIAL=
! /CG_FROM_PROX_ML=
! /CG_FROM_PROX_AP=
! /INERTIA_XX=
! /INERTIA_YY=
! /INERTIA_ZZ=
! /AP_DIRECTION=
! /AXIAL_DIRECTION=
/MODEL_FILE=sword.obj
! /MATERIAL_FILE=
! /GRAPHICS_ROT_X=
! /GRAPHICS_ROT_Y=
! /GRAPHICS_ROT_Z=
/GRAPHICS_SCALE_X=2.5
/GRAPHICS_SCALE_Y=2.5
/GRAPHICS_SCALE_Z=2.5
! /GRAPHICS_TRANSLATE_X=
! /GRAPHICS_TRANSLATE_Y=
! /GRAPHICS_TRANSLATE_Z=
;
Graphics Object
In Visual3D graphics objects are just for visual affect and can be adjusted as needed. Graphics objects are described here, which will also explain how to store the graphics object in the correct location on your computer.
Kinetic Properties
Set the segment to kinetic (/KINMEATIC_ONLY=FALSE), set the segment mass, and inertial properties. These settings will be specific to whatever your prop segment represents.
Adjusted Position
A. By default, Visual3D uses the position data from the MVNX file. In this example, you will notice that the hand and the sword are close at Frame 1.
B. However, at the end of the file there is an offset between the the sword and the hand segment.
C. By overwriting the sword position with the hand center of gravity signal, the sword position is then moved to the hand, which may be a more realistic location since the prop is in the person's hand.
The position data for the prop is stored in BODY::ORIGINAL::PR1_POS. By storing data in BODY::PROCESSED::PR1_POS, the processed signal will be used instead. An example of using the hand center of gravity instead of the data original signal would be:
Evaluate_Expression
/EXPRESSION=KINETIC_KINEMATIC::RHA::CGPOS
! /SIGNAL_TYPES=
! /SIGNAL_FOLDER=ORIGINAL
! /SIGNAL_NAMES=
/RESULT_TYPES=BODY
 /RESULT_FOLDERS=PROCESSED
 /RESULT_NAME=PR1_POS
! /APPLY_AS_SUFFIX_TO_SIGNAL_NAME=FALSE
;
Adjust Graphics Object Color within Visual3D
This step would be done just for graphics. Typically an OBJ file has a corresponding MTL file which contains the color information. However, you can also add color to a segment graphic in Visual3D using the Map_Object_Color_to_Signal_Value command. The example below colors the sword graphic red:
Map_Object_Color_to_Signal_Value
/OBJECT_NAME=PR1
/SIGNAL_TYPES=KINETIC_KINEMATIC
/SIGNAL_FOLDER=PR1
/SIGNAL_NAMES=CGPOS
! /COMPONENT_SEQUENCE=X
/MIN_COLORS=RED
/INNER_COLORS=RED
/MAX_COLORS=RED
! /INNER_COLOR_INDEX=127
/MAX_COLOR_INDEX=256
/MIN_VALUES=0
/MAX_VALUES=200
! /REMOVE_EXISTING_COLORIZATIONS=FALSE
! /COLOR_MAP_FILE_NAMES=
! /COLOR_MAP_FILES=
;


