Locate3D Overview
| Language: | English • français • italiano • português • español |
|---|
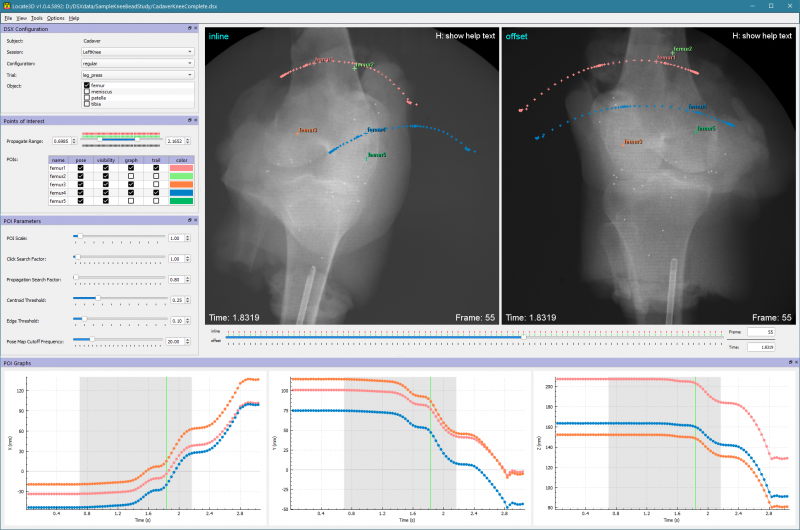
Locate3D tracks radiopaque beads in X-ray trials. It is most often used to track objects (e.g., bones and implants) with implanted beads. If the object contains three or more beads in fixed locations, and these 3D locations are known relative to the object's CT coordinate system, then the beads' 2D locations in the X-ray images can be used to calculate the object's 3D pose in the X-ray lab frame. Locate3D is thus similar to X4D, except that it uses multiple beads to determine the pose of an object, instead of the contours of the object itself. Locate3D requires that the configuration of the X-ray equipment has been calculated (with CalibrateDSX), and that the locations of the beads in the object's local frame have been determined (with Surface3D).
Tutorials
How To: Digitize Points of Interest
How To: Track Objects Using Points of Interest
Menus
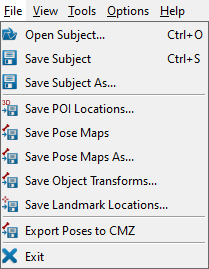
File Menu

- Open Subject... (Ctrl + O)
- This command loads a subject file.
- Save Subject (Ctrl + S)
- This command saves the currently loaded subject to its existing subject file.
- Save Subject As...
- This command saves the currently loaded subject to a new subject file.
- Save POI Locations...
- This command saves three text files containing the coordinates of the current object’s POIs. The files are as follows:
- one with the 3D coordinates in the X-ray reference frame of all POIs for all frames,
- one for the first view with the 2D POI coordinates in the image frame of the view, and
- one for the second view with the 2D POI coordinates in the image frame of the view.
- If a name for any of these files is already specified in the subject file, it is used to write the data to. If the file already exists, it is overwritten without notification. For any that is not specified, a file browser is displayed, allowing you to select the file and folder.
- Save Pose Maps
- This command saves the pose map of each selected object in the current trial to a .csv file. This file contains 6 values for each pose: the XYZ translation and the XYZ Euler angles representing the transform from the X-ray lab frame to the object's local coordinate system (i.e., as if you were traveling from the lab frame to the object frame). If a name for the pose map file is not already specified in the subject file, you will be prompted to browse for the file to create. A link to this file will then be added to the subject file. Before the poses can be saved, they must be calculated using the Compute Object Poses from POIs command.
- Save Pose Maps As...
- This command saves the pose map for each selected object in the current trial to a new .csv file. You will be prompted to browse for a new file for each object. A link to this new file will then be added to the Subject file.
- Save Object Transforms...
- This command saves the pose map of each selected object in the current trial to a .txt file. This file contains a 4x4 transform for each pose, expressing the transform from the X-ray lab frame to the object's local coordinate system (i.e., as if you were traveling from the lab frame to the object frame). If a name for the transforms file is not already specified in the subject file, you will be prompted to browse for the file to create. A link to this file will then be added to the subject file. Because these transforms are calculated from the object poses, the Compute Object Poses from POIs command must be used before the transforms can be saved.
- Save Landmark Locations...
- This command saves a text file with the 3D coordinates of all landmarks on the current object for all frames that have poses. These locations are calculated using the object poses, so the Compute Object Poses from POIs command must be used before the landmarks can be saved. If a name for the landmarks file is not already specified in the subject file, you will be prompted to browse for the file to create. A link to this file will then be added to the subject file.
- Export Poses to CMZ
- This command exports the pose map of the selected object in the current trial to the session's CMZ file. If the CMZ already contains poses for this object for this trial, those poses will be removed before the current ones are exported. This command does not affect the poses of unselected objects, nor of other trials in the CMZ file. If a CMZ file is not already specified in the subject file, you will be prompted to enter the name of a new one.
- Exit
- This command exits the program. The program can also be closed using the X in the top right corner of the program window.
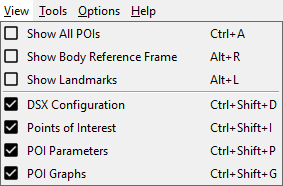
View Menu

- Show All POIs (Ctrl + A)
- toggles the display of all of the POIs for all objects in the current trial.
- Show Body Reference Frame (Alt+ R)
- toggles the display of the reference frame for the current object, as long as a local frame is defined in the subject file and the pose for the current frame has been calculated.
- Show Landmarks (Alt+ L)
- toggles the display of all of the landmarks for the current object.
- DSX Configuration (Ctrl + Shift + D)
- toggles the display of the dockable widget that shows the current session’s objects.
- Points of Interest (Ctrl + Shift + I)
- toggles the display of the dockable widget that shows the details of the points of interest.
- POI Parameters (Ctrl + Shift + P)
- toggles the display of the dockable POI Parameters widget.
- POI Graphs (Ctrl + Shift + G)
- toggles the display of the dockable widget that shows the XYZ coordinate graphs of the currently selected POIs.
Tools Menu

- Propagate POIs (Ctrl + P)
- This command propagates all POIs in the current object through all of the frames selected in the Propagate Range slider. For each POI, Locate3D fits a GCV spline to the poses in that POI's pose map (as shown in the POI Graphs widget). For each reporting time in the range, if the POI does not already have a pose at that time, Locate3D interpolates the X, Y, and Z splines to calculate the expected location of the POI in each X-ray view. A region of the X-ray image around this point is then searched for a suitable location of the POI center. The size of this region is determined by the Propagation Search Factor parameter. If the POI moves a lot from frame to frame and this movement is not adequately predicted by the splines, you make need to increase the Propagation Search Factor. However, if this parameter is too large, or if several POIs are close to each other, Locate3D may misidentify POIs during propagation.
- Compute Object Poses from POIs (Ctrl + C)
- This command clears the pose map of the current object, then calculates poses for all frames using the POI locations. For each frame, if three or more POIs have defined locations, Locate3D will calculate the object pose using a least-squares optimization that fits the POIs defined in the 3D voxel data to the POIs defined in the X-ray coordinate system. The 6-DOF pose for that frame is then added to the object's pose map.
- Recalculate 3D POIs (Ctrl + R)
- This command is enabled only for asynchronous trials. When the first pose for a POI is digitized, there is no valid pose map yet to extrapolate from the two frame times to the reporting time (the pose map splines are straight lines with slope=0, passing through the point being digitized). Thus, the 3D coordinates of the POI at the reporting time could have large errors. There is no way to account for this while digitizing the first POI because the shape of the pose map is not yet known. This function lets you recalculate the 3D coordinates with higher accuracy after the pose map contains more poses.
Options Menu
Help Menu

- Help (F1)
- opens the Locate3D wiki page in the default browser.
- About...
- displays a dialog with information about Locate3D, including the installed version number. It also contains the Deactivate button, for deactivating your DSX suite license.

