AMASS2 calibrate
Introduction
The camera system calibration provides a very accurate determination of every camera’s location, orientation, and internal image characteristics, all of which are required to efficiently compute the three-dimensional locations of markers in our measurement space.
The importance of an accurate system calibration cannot be overemphasized. Your application’s accuracy requirements and the ability of the software to produce 3D marker measurements are quite independent. A poor calibration will compromise the system’s ability to produce clean and reliable marker data. The tracking program automatically combines the multitude of unidentified marker directions computed from the image of every camera, and selects which rays belong to each marker based on how closely the rays intersect in space. If there are significant errors in determining the ray directions then incorrect rays can be combined to provide erroneous 3D marker locations, or rays cannot be associated with other rays to yield a 3D measurement. A poor or inappropriate calibration will produce no data rather than inaccurate data.
To perform a calibration you must do the following:
- Set up the cameras to view the volume where measurements will take place
- Capture raw camera data while the calibration wand is moved around the volume
- If necessary, convert the raw data to .cen file format
- Set the calibration parameters
- Run the calibration program
- Review and accept/reject the results of the calibration
It must be emphasized that a good and accurate calibration of the camera system is critical to the generation of clean and accurate three-dimensional marker position data. For this reason users should pay close attention to this section of the documentation.
In contrast to other motion capture systems AMASS is very tolerant of extraneous markers (reflections, stray light, other cameras’ strobes, etc.) during both calibration and tracking operations. Hence eliminating those sources is only a necessity if it has a significant effect on the ability to record the markers of interest.
It should also be noted that the AMASS calibration does not assume any specific model for lens distortions, and is capable of computing accurate parameters even for lenses that show extreme distortions (of at least up to 10%).
The calibration wand
Description
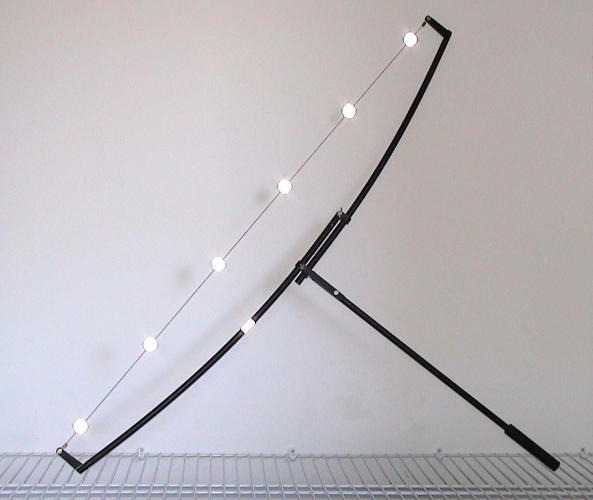
An AMASS calibration wand must be used to perform the calibration. It consists of a tensioned cable that supports six markers spaced more or less evenly. A seventh marker is attached to the frame tensioning the cable. The function of extra marker is to better define the orientation of the wand about the axis of the cable, but it is not used in the final calibration computation and has no direct effect on the final system accuracy. The cable scheme provides the maximum unobstructed views of the markers, and the tension in the cable is sufficient to make the markers behave as a rigid body. The resulting calibration can thus be made free of wand distortion and marker obscuring artifacts, providing the highest degree of confidence in the resulting camera calibration parameters. The next figure shows the standard sized wand ( ~ 1.0 meters between outer markers) that is normally shipped with AMASS.
Wand identification
Even though the cable markers are quite evenly spaced, there are subtle differences in their locations in relation to each other. After an initial calibration the relative marker position measurements are refined sufficiently to enable the subtle differences to be measured, and the program attempts to identify the marker distribution as belonging to one of the wands distributed with AMASS. If the wand cannot be identified then it is assumed that there were some deficiencies in the wand motions, camera setup, or data capture, and the calibration is aborted. This technique ensures that a successful calibration guarantees high accuracy.
The standard size wand is shipped in a protective case and in a collapsed state, and must be set up correctly to provide a valid calibration. Instructions for deploying the wand are included with the wand and may also be found in Appendix C of the AMASS pdf documentation. Of particular importance is that the cable of the wand is not twisted when the wand is unfolded. A twisted cable results in the calibration software not being able to recognize the wand.
Each marker on the cable has a small black dot (see next figure) and when the cable is tensioned all dots must face towards the tensioning frame. If the dots face in random directions then the cable is twisted and the software will present a message saying that the wand cannot be identified. This situation is the most frequent cause of difficulty for new users of AMASS, but is not an issue for smaller sized wands because they do not fold.
To fix a twisted cable, release the tension on the cable, unlatch the pin from the collar, and rotate the tube holding the pin by one complete revolution in one direction or the other, until the dots on the markers line up. Note that it is possible for the alignment to be off by more than one revolution. Refer to this youtube video for more details.
Data capture
Camera setup
The optimal camera configuration will depend upon the nature and number of cameras, the size of the setup space, the size of the measurement volume, and requirements of the particular application. Typically some experimentation will be necessary to achieve the best results.
Once the cameras have been positioned and calibrated they must not be disturbed. Any position or orientation change of a camera, no matter how small, will invalidate its calibration and either produce large measurement errors or cause its data to be ignored in the tracking process.
The placement of cameras is dictated by several general photogrammetric principles:
- A marker must be imaged by at least two cameras in order for its 3D location to be measured.
- Each camera should be as close as possible to the markers to be measured.
- The cameras should image the markers from as many different directions as possible.
- Maximize the number of cameras that image each marker.
- Try to minimize the number of times that multiple cameras and multiple markers occur in a single plane.
Wand motions
The motions of the wand are critical in providing a successful (and accurate) calibration because the wand image data constitute the only input to the calibration. The motions should be smooth and continuous, and at a comfortable speed. It is also important to rotate the wand about the handle as it is moved, but not continuously in one direction. Movement speed will be somewhat dependent on the frame rate of the camera system. For systems with frame rates 100 fps or above the wand can be moved fairly quickly, but for 30 fps or less the motions should be slower.
The Frame increment in the calibration parameters can be used to specify that every 2nd, 3rd, etc. frame be processed. This is useful for systems with very high framing rates for which using every frame essentially provides redundant data for determining the calibration parameters. Fast and sudden changes in wand movement directions should be avoided because that may interfere with the wand tracking, and cause flexion and vibrations of the wand. Before performing a calibration the user should place markers at the limits of the desired measurement volume so that wand may be moved to cover all of it. You can run the ViewCen utility on the sample calibration data provided with AMASS to see an example of good wand motions.
During calibration the program determines distortion corrections for the image of each camera, but it can only do so for parts of the image containing wand data that is also recorded by at least one other camera. Hence parts of the image where no wand markers are recorded, or where wand markers are recorded only by that particular camera, cannot be calibrated. The internal parameters for each camera include a mask that specifies the calibrated parts of each camera’s image. Any maker image falling outside of the area defined by the mask will be discarded when the calibration parameters are applied to tracking. Extrapolation of the calibrated region is not supported because the errors become very large very quickly, defeating one of the primary goals of the software. The fact of the matter is that the program cannot calibrate parts of the image for which it has no data.
Number of frames
The number of frames required for a good calibration will depend on a several factors including the camera system’s frame rate and the size of the volume being calibrated. For standard video systems collecting data at rates of 50 – 100 fps, between 2000 and 4000 frames are recommended. This number may need to be increased if the cameras observe many “junk” markers, there are many marker merges in the camera images, or more time is required to move the wand through all parts of the measurement volume. For very high frame rates you may wish to specify the use of every other, or every third frame for the calibration computation. Do not use a calibration performed at one frame rate for tracking data collected at a different frame rate because in some systems camera characteristics depend upon the frame rate settings.
Reference markers
Of special concern during calibration date capture should be static reference markers locations, because if they do not fall inside of the calibration volume they will not be reconstructed and cannot be used to define the Global Coordinate System. If they are at floor level, care should be taken to ensure that the wand is moved close to the floor and in the vicinity of every static marker.
Calibrate parameters
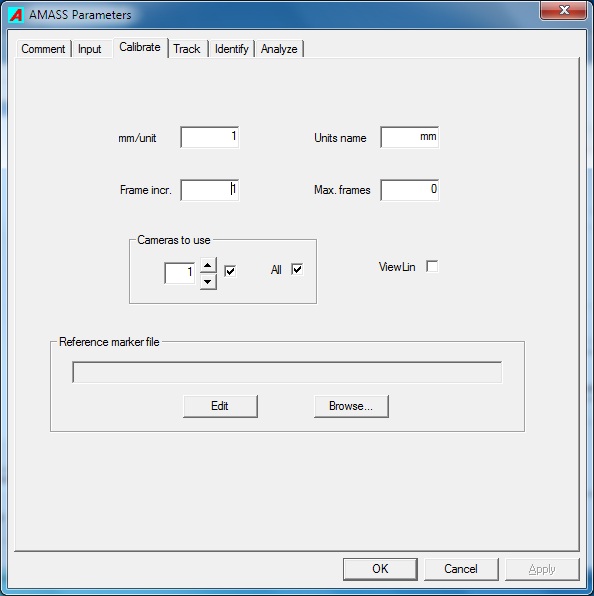
The Calibrate page of the Project parameters displays all user modifiable parameters for the calibration. On inspection it will be seen that not one of the parameters refers to the calibration computation itself, relieving the user from making difficult and confusing decisions with respect to the complex calculations that are involved in the calibration process.
- mm /unit
- In AMASS all output distance measures are expressed in terms of a single unit of length whose size is specified through this parameter. The user should enter the size of their desired length unit in millimeters. For example, if it is desired to have all output in centimeters then the required value is 10.0. The default unit length is millimeters, with a value of 1.0.
- Units name
- Here the user should enter a name for the desired length units indicated in the first parameter. It accepts a name length of up to 20 characters, and the default name is mm (for millimeters).
- Frame incr.
- In situations where a large number of frames are collected for a calibration, or in captures involving high frame rates, using every frame in the calibration calculation may be inappropriate. In that case the user can choose to use fewer frames from the .cen file, e.g. every second or every third frame. For example, entering a value of 5 will result in every 5th frame being used for the computation.
Note that the frame increment must be small enough to allow the software to track markers over frames for each individual camera. The calibration will fail if the wand markers in the images move too much between successive frames that are utilized.
- Max. frames
- This entry specifies the maximum frame number (as recorded in the .cen file) to be used for the calibration. An entry of zero implies all frames recorded in the .cen file. The number of frames actually utilized will be influenced by the Frame incr. entry.
- Cameras to use
- On occasion it may be useful to exclude one or more cameras from the calibration because a camera is malfunctioning, a poorly calibrating camera is influencing the calibration of the other cameras, or you may wish to investigate the contribution of a particular camera on the calibration. The check boxes in this group can be set to ignore data from any camera during the calibration.
- ViewLin
- Check this box if you want the ViewLin program to run automatically after every calibration computation.
- Reference marker file
- If you wish to output tracking results in a desired Global Coordinate System (GCS) you must include at least three (more is better) static markers in the measurement volume, and specify their 3D coordinates in the GCS via the Reference marker (.ref) file. AMASS places no restrictions on the locations or configuration of the static markers, however, their locations must be specified accurately enough for the software to be able to uniquely identify them from their relative separations. Symmetrical distributions of markers should be avoided because typically it is too difficult to specify their locations accurately enough to resolve identification ambiguities.
- The Reference marker file entry holds the full name of the file that contains the x, y, and z coordinates of the static Reference markers that will be used to translate the calibration data to the desired GCS. You may choose to not provide reference markers, browse for an existing .ref file, or create a new file.
- If the system is calibrated without a Reference marker file (or if the markers were not recorded or cannot be identified) the GCS will be defined by the first three camera locations. Camera 1 defines the system’s origin, camera 2 lies on the system’s positive x-axis, and camera 3 (if present) lies in the system’s x-y plane.
- To clear the Reference file name first select Browse… followed by Cancel in the browse window.
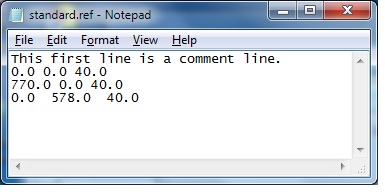
- To create a new Reference marker file select Browse…, and in the browse window type in a file name, select a destination folder, and then click Open. A window will pop up asking if you wish to create a new file. If you answer Yes a NotePad window will open allowing you to enter the coordinates of your reference markers. The first line is always a comment line for entering a description of the file’s contents. A sample .ref file looks like the following.
- This file defines three reference points 40.0 units above the z-plane. Note that the order of markers within the file is not relevant.
Note on camera interdependence
This section points out an important, and not very obvious, aspect of the calibration process. The only measurements input to the calibration are the 2D image marker locations digitized from all cameras. Initially the software has no knowledge of camera or wand locations. The location of a particular camera can be estimated from the image coordinates of the markers it sees, and the assumed location of those markers in the 3D space. However, we need to use all of the other cameras to compute the markers’ locations in 3D space, meaning that errors in another camera can affect the calibration of our camera. Through an iterative process and use of data from many frames the computation deletes outliers and converges on a set of calibration parameters (camera positions and orientations, wand locations, camera geometry, etc.) that most consistently fit all of the input data. The process of excluding bad input data is not clear cut and is influenced by a several factors, but chiefly the number of cameras being calibrated. With more cameras it is easier to spot data that is not correct, and a calibration with just two cameras is typically the least accurate.
As a consequence it is important that problems with individual cameras that demonstrate large calibration residuals, or low ray or frame counts (see ViewLin), should be corrected, and the data capture and calibration should be repeated. Alternately, a badly calibrating camera can be disconnected from the system or excluded from the computation by use of the Cameras to use setting in the calibration parameters.
Calibration issues
If the calibration is successful the results may be viewed by using the ViewLin utility.
If the calibration fails then it will display an error message and the rest of this section describes some common error messages with suggested remedies.
Any error condition that cannot be readily corrected should be reported to C-motion support. Make sure to include the .cen file with any error report because problems cannot be diagnosed or repaired without it.
Failed to open or read .cen file
Check that the input file is a valid .cen file by examining it with ViewCen.
Unable to track image data
If the wand movement is too rapid for the frame rate being used for the capture then the program may not be able to track the markers frame-to-frame. Repeat the wand data capture using slower wand movements, or reduce the Frame increment parameter setting if it is greater than 1.
Initial calibration error
The .cen data were insufficient to compute intial camera parameters. This can be caused by insufficient number of frames, insufficient wand motions and/or rotations, too much wand marker obscuration, or all wand markers not being visible for a sufficient number of frames to a number of cameras. Repeat the wand data capture while trying to address these issues.
Wand identification failed
The measured marker configuration of the wand did not match any wand stored in the calibration data base. This message can result from poor quality .cen data but is typically the result of the wand cable being twisted when it is opened up from its folded state. Refer to this youtube video for instructions.
Calibration failed
This type of message can result from a number of complex conditions. Please report it to C-motion support and include the .cen file.
Failed to open or read .ref file
Check that the Reference marker file exits in the named folder, and that there are no errors in the .ref file’s marker x, y, z coordinate data formatting.
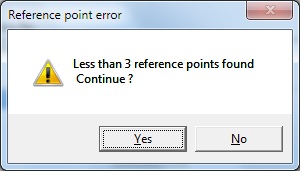
Less than 3 reference points found
The calibration program could not find at least three static markers in the measurement volume whose distribution matched the marker location entries specified in the .ref file.
The dialog gives the option to continue or stop the calibration. If you choose to continue then the GCS will be defined by the first three camera locations. Camera 1 defines the system’s origin, camera 2 lies on the system’s positive x-axis, and camera 3 (if present) lies in the system’s x-y plane.
Less than 3 reference points identified
This error is similar to the previous one except that three or more static markers were found but their distribution could not be matched with the marker coordinate data in the .ref file. Typically this condition is cause by incorrect coordinates being entered into the .ref file. Again the user may choose to either continue or stop the program.


