AMASS Installation/fr
| Langue: | English • français • italiano • português • español |
|---|
Télécharger AMASS
Les logiciels de C-Motion peuvent être téléchargés directement par Internet au site: www.c-motion.com.
Les informations pour accéder à la page de téléchargement ne sont disponible que pour nos clients.
Une fois connecté, un écran comme celui ci-dessous devrait être affiché :

- Cliquer ensuite sur le bouton DOWNLOAD afin de sauvegarder le logiciel d'installation d'AMASS sur votre ordinateur.
La majorité des fureteurs (web browsers) vous donnent la possibilité de choisir l'endroit sur votre disque dure pour y sauvegarder les fichiers téléchargés. Assurez-vous donc de connaître l'endroit où ces fichiers sont sauvegardés.
Lancer ensuite le fichier executable (.exe) préalablement téléchargé.
Installion du SDK de NaturalPoint
Si vous planifiez utiliser les cameras Natural Point, téléchargez le SDK d'Optitrack ici puis suivre les instructions à l'écran pour l'installer.
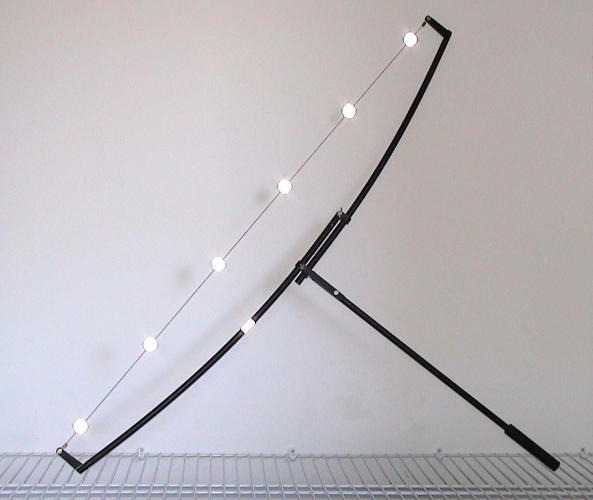
Le baton AMASS
Le baton de calibration AMASS doit être utilisé afin de calibrer le système. Ce baton de calibration comporte un cable sous tension sur lequel est fixé six marqueurs répartir de façon plus ou moins uniforme.
NOTE Si AMASS affiche un message d'erreur à l'effet que le baton ne peut être identifié lors de la calibration, il est alors présumé que soit les movements du baton, la configuration des caméras ou la collecte de données cause problème puis le logiciel abandonnera automatiquement le processus de calibration. Ce processus assure que seules les calibrations avec grandes précisions sont acceptées. Cependant, il se peut aussi que les marqueurs soient à l'envers. Un petit point noir est marqué sur chaque marqueur du baton, ceux-ci doivent pointer "vers le bas", c'est-à-dire vers me manche du baton.
Cliquer ici pour de plus amples informations
Visual3D
DOWNLOAD and install Visual3D if appropriate. Instructions are here.
Configure AMASS
AMASS configuration shortcut - If using the NaturalPoint L-Frame, copy the .ref file from the tutorials sample to your own working directory (i.e. the place you will be saving motion capture files). Here is another copy L_Frame.ref
Start AMASS, create an initial Project. Click on the AMASS program icon in the desktop to start the AMASS shell program.
Note: AMASS starts and loads the last project it was working on. If there was no previous project, or it was moved, then the following screen appears.
For a new installation, click “Create a Default Project”.
Project Control
Enter a file name (i.e. something like "std_project.prj").
Set the Folder box in the bottom of the screen to the directory where you will be saving data.
Project Tabs - Here are some standard settings...
Input Tab
This tab set AMASS input data format options.
- Input system = Capture (multiple input files formats are supported. Capture2D is the program used for NaturalPoint cameras. Other input sources are also supported.)
- ViewCen = Checked (to view centroids meaning to actually see the targets/markers)
Calibrate Tab
This tab set AMASS volume calibration options. No need to change anything unless the file location changed.
- Cameras to use = All checked (This option allow you to disable input from specific cameras)
- Reference marker file = C:\[your directory]\L_Frame.ref.
Click Browse… and navigate to select the file you want. This file identifies your L-Frame and where the markers are located on it. The sample is for a NaturalPoint frame.
Track Tab
This tab set AMASS target tracking options.
- Calibration file = BLANK (you haven't calibrated the volume yet)
This is not critical, since if you create a new calibration file (or run the tutorial) when you click an "Apply" button that will overwrite whatever is here.
Identify Tab
This tab set AMASS target naming and identification options. You likely do not have a marker file. when you go to identify your first set of targets, save the marker names you use and this entry will automatically be updated.
- Marker file = can be blank. If it is something else, click Browse… and then navigate to select your .mkr file.
- Link File = can be blank. It is unused now, but will be needed for the automatic tracking feature (coming soon)
Click OK to close the AMASS Parameters/Project window.
You are now ready to collect data!
Turn on your cameras and click the Capture2D button.


