Animation Surface Models
| Language: | English • français • italiano • português • español |
|---|
A surface mesh can be associated with each segment. If the user selects a default segment name, a default mesh that is associated with that segment name will be chosen. For example, if you create the "Right Thigh" segment (e.g. RTH), a right thigh skeletal mesh is chosen by default.
- If you do not see a skeleton, check to see that you have selected the "view skeleton" option.
- If you do not see a skeleton and have selected the "view skeleton" option, you may need to check the default model path in the model section of the Preferences.
The skeletal model file associated with a segment can be reassigned by the user in the Segment Properties dialog. Each mesh is scaled to unit length in the model file, and then scaled to the segment length in the Visual3D animation view. If you want to create your own custom skeletal meshes, please contact C-Motion for assistance.
Wavefront_obj_file_format
A full description of the Wavefront obj file format can be found here. Refer to Wavefront_obj_file_format for how to export for use in Visual3D.
Position and Orientation of the surface model
Visual3D will import models that are stored in either the Wavefront (obj) or VRML (wrl) formats
Visual3D treats all segments independently. This means that wireframe model files must contain polygons for only one segment.
The position and orientation of the animation surface model is defined with respect to the segment coordinate system of the segment that the model is assigned to. In order to understand how to orient wireframe models to make them suitable for animation in Visual3D, it is important to understand how the segment coordinate system is constructed for each segment.
Visual3D allows the segment coordinate systems to be modified after the segment has been created.
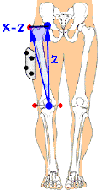
Step 1. The segment endpoints are calculated. As described in the Visual3D documentation elsewhere, there are many ways to calculate the segment endpoint. The relevance to the calculation is that the markers that are used to define the segment endpoints also determine the frontal plane of the segment coordinate system. In this illustration the three red markers are used to calculate the blue segment endpoints
Step 2. The z-axis is defined by the vector from the distal segment endpoint to the proximal segment endpoint.
Step 3. The frontal plane (x-z) plane is defined by the markers.
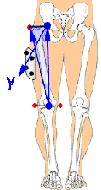
Step 4. The y-axis is project forward in the anterior posterior direction.
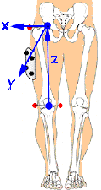
Step 5. The x-axis is then calculated perpendicular to the y-z plane.
In order for a polygonal model to be displayed correctly in Visual3D it must be oriented to align with the segment coordinate system. Note that the model will be created for an ideal segment coordinate system because motion capture data on real subjects only approximates the ideal coordinate system. Don’t be surprised if your polygonal models appear slightly askew. In the segment properties dialog in Visual3D you can re-orient your polygonal model to make the animation look better without modifying the motion capture data.
Lastly Visual3D will scale the polygonal model to the length of the segment (as determined by motion capture data and model definition) assuming that the polygonal model as a length of 1 in the z-direction. Note that this means that your z-values will lie between z=-1 and z=0 for a segment that is constructed to lie from segment endpoint to segment endpoint.
Warning!! Visual3D assumes 6 degree of freedom segments which means that joint properties are not defined. The point at which a segment rotates is therefore not necessarily about the segment endpoint. You may have to play with the origin of your wireframe model to make the segment look right in the animation.
Example - Transforming an obj file for a Visual3D segment
The following is a very simple obj file that described the polygons for a cone.


