Computing The Dimensions of The Rod Using Functional Joints
This is a fairly elaborate, but straightforward process for computing the CalTester dimensions. It uses the functional joint landmark functionality. This topic is included for curiosity (and legacy) value, but has been replaced by interactive functionality in the CalTester Interface.
If you have passive spheres attached to the CalTester rod, and these spheres are not removed and the rod has not been damaged (e.g. bent), the dimensions provided with the rod are accurate.
For those users that place markers manually onto the rod, or who have designed their own rod, the dimensions can be computed from movement data.
The dimensions can be computed using the functional joint calculation in Visual3D
Consider 5 tracking markers attached rigidly to a pointer
- UP1
- UP2
- UP3
- UP4
- UP5
Place the bottom tip of the rod in the divot on the force platform and move the rod through a range of motion consistent with the regular use of the rod (e.g. keeping the tip of the rod stationary, rotate the rod around a vertical axis with an arc of at least 20 degrees). In a second trial, turn the rod over so that the top of the rod is placed in the divot and repeat the movements. Let this produce files:
- move1.c3d
- move2.c3d
Create a static trial by exporting the first frame of data for each file. Let this produce files
- static1.c3d
- static2.c3d
The following pipeline will compute a functional joint (e.g. the location of the tip of the ROD relative to the LAB) and another landmark defined as the location of the tip relative to 3 of the tracking markers on the ROD.
- File_New
;
- Set_Pipeline_Parameter
- /PARAMETER_NAME=FOLDER
- /PARAMETER_VALUE=c:demo filesCalTesterDimensions
;
- For_Each
- /ITERATION_PARAMETER_NAME=INDEX
- /ITEMS=1+2
;
- Set_Pipeline_Parameter
- /PARAMETER_NAME=MOVE
- /PARAMETER_VALUE=::FOLDER&move&::INDEX&.c3d
;
- Set_Pipeline_Parameter
- /PARAMETER_NAME=STATIC
- /PARAMETER_VALUE=::FOLDER&static&::INDEX&.c3d
;
- Create_Hybrid_Model
- /CALIBRATION_FILE=::STATIC
;
- Set_Subject_Weight
- /CALIBRATION_FILE=::STATIC
- /WEIGHT=1.0
;
- Set_Subject_Height
- /CALIBRATION_FILE=::STATIC
- /HEIGHT=1
;
- Open_File
- /FILE_NAME=::MOVE
;
- Assign_Model_File
- /CALIBRATION_FILE=::STATIC
- /MOTION_FILE_NAMES=::MOVE
;
- Add_Functional_Joint_Landmark
- /LANDMARK_NAME=TIP&::INDEX
- /CALIBRATION_FILE=::STATIC
- /REFERENCE_SEGMENT_NAME=LAB
- /SIGNAL_TYPES=TARGET+TARGET+TARGET+TARGET+TARGET
- /SIGNAL_NAMES=UP1+UP2+UP3+UP4+UP5
- /SIGNAL_FOLDER=ORIGINAL+ORIGINAL+ORIGINAL+ORIGINAL+ORIGINAL
- /MOTION_FILE=::MOVE
- /EVENT_START=
- /EVENT_STOP=
- ! /MINIMUM_HELICAL_ROTATION_ACCEPTED=5
- ! /CREATE_100_REPRESENTATIVE_LANDMARKS=FALSE
- /APPROXIMATE_NUMBER_OF_COMBINATIONS_USED=1000000
- ! /SEARCH_WINDOW=0.5
- /RATE_OF_VOLUME_REDUCTION=0.8
- /NUMBER_OF_ITERATIONS_REDUCING_WINDOW=50
- ! /MINIMUM_NUMBER_OF_VALUES_IN_RADIUS=500
;
- Add_Landmark
- /LANDMARK_NAME=CALTIP&::STATIC
- /CALIBRATION_FILE=::STATIC
- ! /USER_GENERATED=TRUE
- ! /USE_PERCENTAGE=FALSE
- ! /CALIBRATION_ONLY=FALSE
- /USE_TARGETS=TRUE
- ! /SEGMENT_NAME=
- /TARGET_TYPES=TARGET+TARGET+TARGET
- /TARGET_NAMES=UP1+UP2+UP3
- /MCSX=
- /MCSY=
- /MCSZ=
- ! /LANDMARK_LOCATION=
- /REFERENCE_LOCATION_NAME=TIP&::INDEX
- /REFERENCE_LOCATION_TYPE=LANDMARK
- /USE_REFERENCE_LOCATION=TRUE
;
- Build_Model
- /CALIBRATION_FILE=::STATIC
- ! /REBUILD_ALL_MODELS=FALSE
;
- End_For_Each
- /ITERATION_PARAMETER_NAME=INDEX
;
The next step is to combine the information from these two model files.
- Switch to Model Builder mode.
- Select the model static1.c3d. The Landmark CalTip1 was created by defining the location of the TIP landmark relative to 3 points. This Landmark will not be available in static2.c3d so we need a Bit Of a Trick. Open the Landmark dialog. Note that the offset values are listed in the dialog boxes, but the boxes are greyed out.A similar situation is described here
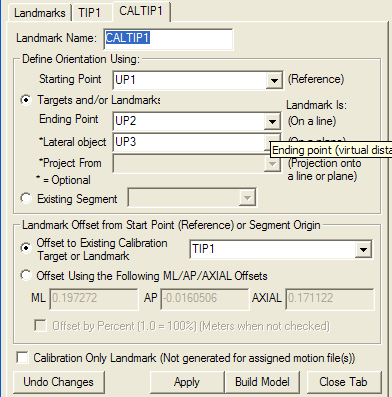
Select the option to use the offsets and select the apply button.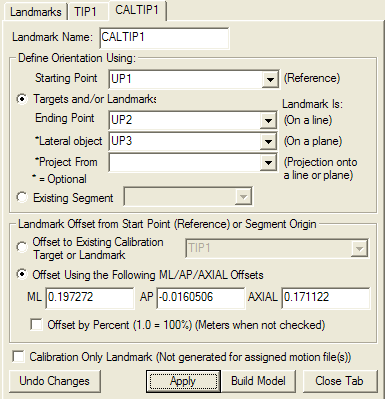
- Save the model template (under the model menu item)
- Select the model static2.c3d
- Append the model template (under the model menu item)
Note: Do not apply the model template or the current landmarks will be deleted.


static2.c3d will now contain landmarks located at the top and bottom tip of the rod.
static2.c3d will now contain landmarks located at the top and bottom tip of the rod.
Create a kinematic only segment based on these landmarks.

Use the following definition:

Specify the coordinate system so that the origin is at the bottom tip of the rod (as defined the extra lateral target is towards the bottom of the rod) and has the z-axis point from the bottom to the top tip of the rod.

The last step is to compute the location of each of the tracking markers relative to the CalTester Segment Coordinate System.


The INI file would look like
; CalTester Rod MTD2 - Motion Labs Systems
; Mass is measured in Kg
; distances are measured in m
[Rod_Size]
Mass=1.4
Length=1
Plate_Thickness=0.0024;
; the bottom tip is the origin (0,0,0)
; the top tip is located at (0,0,Length)
[Marker_Locations]
Marker1=Right_Top
Marker2=Right_Bottom
Marker3=Left_Top
Marker4=Left_Bottom
Marker5=Left_Middle
[Right_Bottom]
X=0.171449
Y=-0.0010302
Z=0.197626
[Left_Bottom]
X=-0.166439
Y=0.0333992
Z=0.196851
[Left_Middle]
X=-0.167359
Y=0.0327892
Z=0.398778
[Right_Top]
X=0.167039
Y=0.0
Z=0.798305
[Left_Top]
X=-0.16694
Y=0.0325118
Z=0.79783