Getting Started/en
This page provides information for installing, activating, and verifying that Visual3D launches successfully on your computer.
For information on using Visual3D, you can visit the Tutorials Section or the online documentation
A video of the installation process can be found [Here]
Visual3D Hardware Requirements
Visual3D runs under Microsoft Windows Vista/Win7/Win8/Win10. It has no specific minimal hardware requirements. It runs as either a 64-bit or 32-bit application. It even runs on a netbook with an Atom processor and 256MB of memory. But naturally, more powerful and advanced hardware is best, as is more memory. We recommend having 8GB or more of memory and multi-core processors or better.
Visual3D also runs on a Mac under Parallels or VMWare (or dual boot to Windows with Bootcamp).
Sorry, there is no iPad, MAC, or Linux version.
Downloading Visual3D
C-Motion software is all downloaded over the Internet at www.c-motion.com.
Customers are provided login information to access the download page.
After you log in at www.c-motion.com, you will see a downloads screen as show in the following video:
(Note: The C-Motion web site has changed, so while the screens are a little different, the process is the same.)
- Click the Download Software Buttons to save the installation files to your computer. The Real-Time modules are Zip files that contain an install.txt file describing where to copy files.
- Click the Download License Key File button to download the license key file to your computer.
<HTML5video width="400" height="300" autoplay="false" loop="true">downloading</HTML5video>
Most web browsers will offer you a choice of where to save the downloaded file. Make sure you remember where you save the downloaded file.
Installing Visual3D
Visual3D comes with a separate license file and an installer that stores the license file into the proper location for you.
(If updating Visual3D, just install right over top the existing installation. Your settings will remain intact - there is no need to uninstall or deactivate licenses first.)
NOTES:
- You can run Visual3D v5 and v6 on the same computer (version 6 will not overwrite version 5).
- Visual3D v6 comes in two versions; 64 bit and 32 bit. You will need to download and install the appropriate version for your computer.
To install Visual3D:
- Download the software and license key from your institution's account at C-Motion
- Run the installer and follow the instructions
- To run the installer: in Windows Explorer you double-click on the installation file with a name similar to: Visual3D_Setup_x64_v6.00.11.exe or Visual3D_Setup_x32_v6.00.11.exe
- When the installer is running, make sure to click Browse to install License Key. The license file is essential for the initial install and if features have been added.
It goes something like this:
<HTML5video width="640" height="480" autoplay="false" loop="true">installv5</HTML5video>
FOR WINDOWS 8 or WINDOWS 10:


Visual3D Activation
Visual3D licenses are activated and managed via the Internet - it has a license activation scheme very similar to Microsoft Office. When you start Visual3D on a computer, it checks to see that it is properly licensed. New installations must therefore be activated.
The activation process is fully automatic. The first time you start Visual3D you should see a message that "Visual3D has automatically activated."
Manual Activation
If you are not connected to the Internet the first time you start Visual3D, you will get a message with a TOKEN and other information. You can manually activate a license from the downloads web page (from the list of activated systems section), or you may copy the entire message in the dialog box and e-mail it to support@c-motion.com.
You will receive a code to enter (at the bottom of that same dialog box) that will activate Visual3D on that computer only.
NOTE: Be aware that C-Motion staff must run a special program to validate the license and generate that manual activation code, so they need to be awake and at their computer in order to get the e-mail. It is not instantaneous or automated (yet).
NOTE: If you see the tab Free CMO Reader in Visual3D, it means that the software is not activated.
NOTE: If all licenses are in use, then you either need to purchase additional licenses, or De-activate an old license.
Visual3D Deactivation - Moving Visual3D to a Different Computer
Moving Visual3D requires freeing up the activated license so it can be used elsewhere.
In Visual3D, go to HELP->DEACTIVATE to free up the license. This is automatic and handled over the Internet.
Non-Internet deactivations by C-Motion staff are quite involved and require manual database updates and are only done in emergencies (i.e. totally crashed computers). If someone leaves the lab taking a licensed and activated copy of Visual3D with them means that a replacement license needs to be purchased. Replacement/additional licenses start at $2000 USD.
After deactivating a license, then you should uninstall Visual3D. That way it won't accidentally reactivate if someone launches it.
Verifying The Installation
Verify that Visual3D is installed, licensed and working correctly
- Download the sample data file Visual3DExample1.cmo.
- Launch Visual3D.
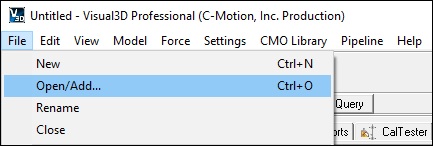
- From the File menu, choose Open/Add…
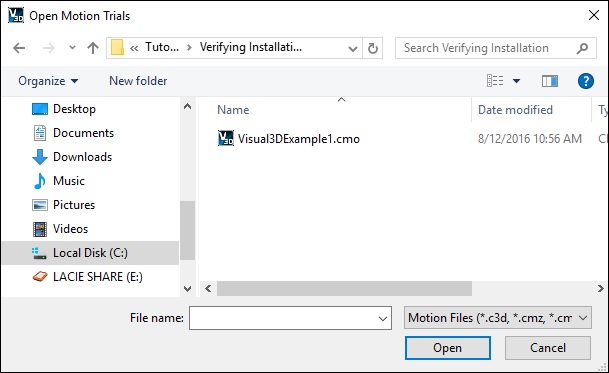
- Locate the file which you downloaded.
- Click the file name to select it and click Open.
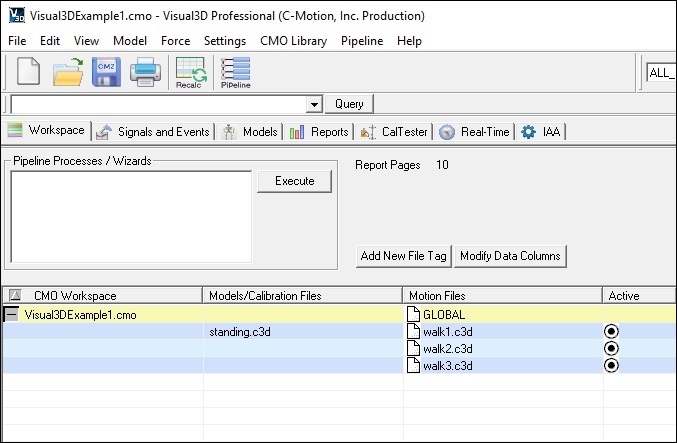
- Visual3D will open to the Workspace tab and you will see 3 items highlighted in blue.
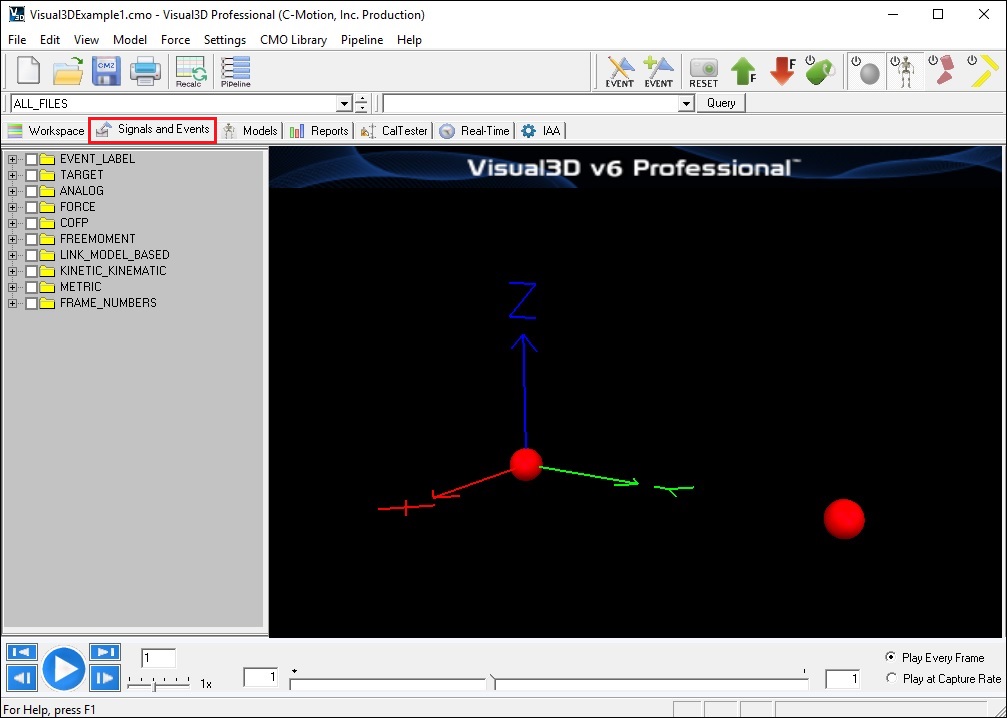
- Above the workspace there are several tabs. Click the Signal and Event Processing tab.
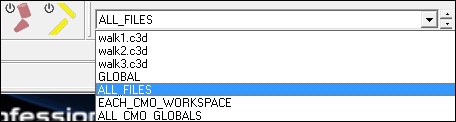
- At the top of your screen, locate the drop down menu with the default value of ALL_FILES. This is the combo menu and it indicates which of the files loaded into your workspace are currently active.
- Use the mouse to change the menu selection from ALL_FILES to Walking1.c3d.
- Click the Play button—the right-pointing triangle—in the VCR control panel at the bottom of the screen. You will then see the animated walking model, similar to the one in the following illustration. If you do not see the animated skeleton check the troubleshoot section below.
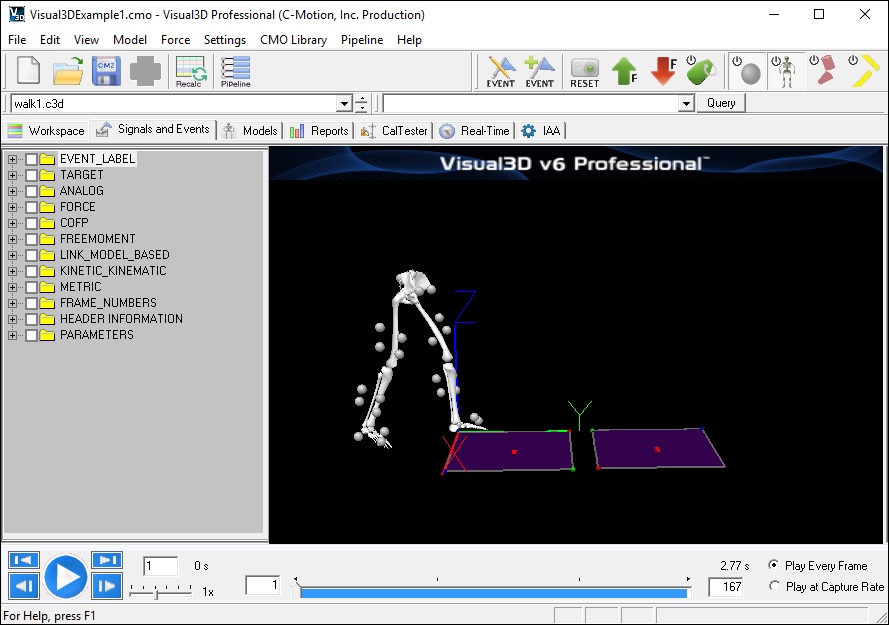
- Use the VCR control buttons and the view options to alter the view.
Note: The 3D animation viewer camera perspective is controlled using the mouse keys and mouse movements. The Visual3D tutorials describe how to control the camera angle along with many other helpful things.


Test the printing option
- Click the Pause button on the viewer.
- Click the Reporting tab to switch to the Visual3D Reporting Mode.
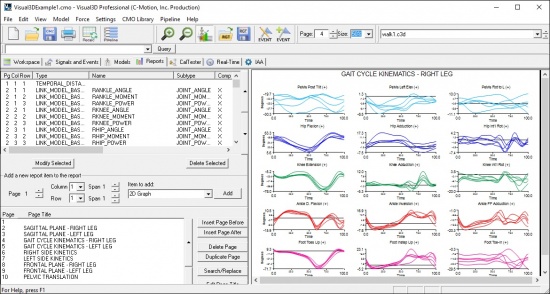
- In the upper right corner of your screen, just above the tabs, is the page-number control. Use this control to cycle through the various report pages.
- Click on the printer icon, or choose Print… from the File menu.
- If necessary, select a printer and click OK.


Associating cmo files with Visual3D
The Visual3D installer should associate .cmo and .c3d files with Visual3D. However, if you want to change a setting:
In Win 7, 8, and 10 use the windows file explorer and find any CMO file.
Then, right-click on it and select Properties.
Right on top is a Change button to set the association. In each dialog that follows scroll to the bottom to select "other" applications until eventually you will get a file open dialog. Go to: C:\Program Files (x86)\Visual3D v5\Visual3D.exe select that and all should work OK from then.
Setting Visual3D Default Folders
Visual3D pipeline commands can include default path names for folders. This allows the user to specify paths relative to a default path, which is convenient when a user modifies their data directories, or want to sent a pipeline to another folder that has a different default path.
Each installation of Visual3D (Production, Beta, etc) includes folders containing the animation model files, configuration files, etc. This can be confusing for the user should they modify or add a new model file, and then can find it available in one version of Visual3D and not the other. More critically, if the user modifies one of the default models, the next installation will overwrite the file. To combat any changes in the installation, users can specify a common path for all Visual3D versions that the Installer is not aware of.
Create a C:\VISUAL3D directory and copy all your Model, Plug-in, Pipeline, and Data directories there.
Select the "Preferences" option under the "Menu" Item.
Default Folders
Select the "Default Folders" tab set the defaults to the new locations.
Subsequent Visual3D updates will not change these new locations, so be careful if C-Motion releases new model graphics - meaning that you many need to copy any new graphic files to your own models directory (note that this is very rare).
This dialog is divided into folders that are constant unless changed by the user explicitly (top two groups), and those folders that are dynamic and changed by Visual3D as the user selects files (e.g. Visual3D attempts to remember the last path selected).

Persistent Paths
Default folders for Visual3D
| Plugins Folder | Visual3D searches this folder for Visual3D Plugins. These plugins may be processing plugins that will appear in the list of Pipeline commands, or they may be Real_Time plugins that will appear in the options for Real-Time Streaming |
| Segment Graphics Folder | The animation models associated with the model segments are stored in. If no path to an object file is selected in the Segment Properties dialog, Visual3D searches hear for the file. |
| Pipelines Folder | Default folder for Pipelines. Used mainly for the Pipeline Favorites. The pipeline commands may refer to the default pipeline folder as VISUAL3D_DEFAULT_PIPELINE_FOLDER |
Default folders for data and templates
| Default Data Folder | The pipeline commands may refer to the default data folder as VISUAL3D_DEFAULT_DATA_FOLDER |
| Default Report Template Folder | The pipeline commands may refer to the default report template folder as VISUAL3D_DEFAULT_REPORT_FOLDER |
| Default Model Folder | The pipeline commands may refer to the default model template folder as VISUAL3D_DEFAULT_MODEL_FOLDER |
A typical way to define the default folders for use in a pipeline is Set_Pipeline_Parameter_To_Folder_Path
Transient Paths
| Report Template Folder | Current default FOLDER for the report template. Reset every time a Report Template is opened. |
| Model Folder | Current default FOLDER for the standing trial. Reset every time a Hybrid Model is created. |
| Motion File Folder | Current default FOLDER for the motion trial. Reset every time a movement file is opened. |
Uninstalling Visual3D
Please do Help->Deactivate to free up the license before uninstalling.
To uninstall Visual3D, you can either use the uninstall utility in the Programs group or use the Windows add/remove programs control panel. They both link to the same install shield program. Note: Make sure you have Administrator privileges on the PC—if not, you may need to seek help from your laboratory IT support staff.
- You should always uninstall beta and evaluation versions of the software.
- Once you have the full version, however, it is normally not necessary to uninstall.
- You can download updates and newer versions ”on top of” your previous installation.
Trouble Shooting
Activation does not persist
When Visual3D is launched a PC that has been activated previously may still request manual activation .
The activation code is stored in the user registry so it should only ever need to be entered one time.
The code is unique to the PC, so it will always be the same code on that computer.
Problems we've seen:
- Some IT departments have weird policies that recreate a user directory on each login (deleting it on logout) that causes this problem.
- logging on as a different user requires an activation for that user name
- The IT department limits user access security to prohibit writing to the registry
- a bug in the Visual3D software.
we are not aware of any problems, so if you think there is bug contact support@c-motion.com - if you switch between version 4 and 5 you will need to reactivate each time because they share the same registry locations, but use different techniques and codes.
System Crashes
Visual3D crashes immediately after being installed
There are three things that should be attempted before contacting C-Motion.
- Update the graphics card drivers on your computer. Visual3D uses OpenGL for its 3D rendering. Occasionally there can be a conflict with OpenGL. Updating your video card drivers will many times fix the issue.
- Update Microsoft Internet Explorer
- Update Microsoft DirectX
When I use Visual3D on a laptop in a docking station with an external monitor Visual3D works fine. When I undock the laptop and use it on battery power alone, Visual3D causes the screen to flash for about 20 seconds every time a window is opened or item selected, effectively making it unusable
Look at the display settings/ advanced for a ’powerplay’ tab. This tab has performance vs battery power settings and by default it's set to maximize battery life when running off the battery. Change this to maximize performance.
Cannot Uninstall Visual3D
Trouble Shooting - I installed Visual3D on a computer successfully. I now want to uninstall Visual3D but it seems that I can't do it
Check your permissions for this account. If Visual3D was installed by the Administrator, a user may not have the privileges to uninstall the software.
Missing Tabs
Trouble Shooting - I have just installed Visual3D and it seems to be missing most of its features
As of version 3.60, Visual3D will run as a data viewer when no license key is installed. This viewer will allow you to visualize the data and the reports, but no processing is available.
When Visual3D is first installed on a computer the user needs to manually install a license key. This will take Visual3D out of viewer mode and enable all of the normal features of the software.
The process of installing the license file is explained in the section titled Visual3D License Registration.
Odd Animation Graphics
The skeleton looks pretty good, there are some problems with the 'transparency' of some of the bones. For some reason the spine seems to appear in front of the head, and also the shoulder blades seem to be in front of the ribs. However, when I rotate the model, the positions are actually correct.
- Visual3D uses OpenGL graphics libraries. OpenGL drivers are often the last libraries implemented on graphics cards for windows operating systems.
- The solution is typically to download the current graphics drivers for your computer.
- It turns out that my laptop has two graphics boards (Intel (HD) – Graphics Chip, an Onboard-Graphics Card, as well as an NVIDIA NVS 3100M, firm 3D-graphics adapter). By default the laptop uses the Onboard-Graphics Card and I had to appoint the NVIDIA processor manually to Visual3D to fix the problem with the skeleton.
Bones Don't Appear
Trouble Shooting - I have loaded the example files but I can't see the bones in the 3D Viewer
- The most common cause of missing bones is that the toggle button
 to display the bones in the 3D viewer has been toggled off.
- Find this button on your screen and press it to see if the bones reappear.
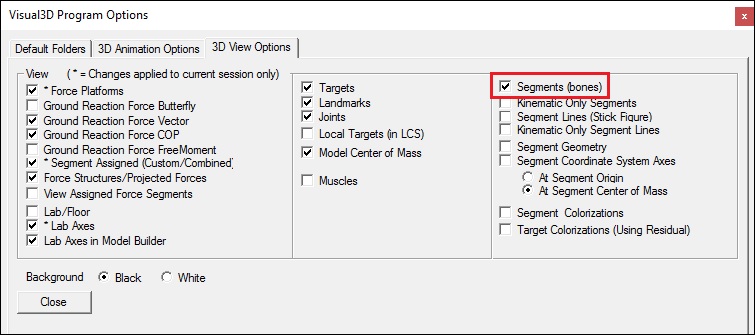
- You can also open the View menu and select Modify 3D Animation View Options. The Program Options dialog should open to the Visual3D 3D Animation Options(2) tab.
Note: The keyboard shortcut for this is Alt+V. - On this tab verify that the Segments checkbox is checked. If not check it now.
- The 2nd possibility is that the object files that contain the wire frame models of the bones have been accidentally removed from your system
- Open Windows file explorer and navigate to C:\Program Files\Visual3D v3\Models.
- Verify that .obj and/or .v3g files appear in the folder.
Note: Depending on the version of software you have it could be either .obj and/or .v3g or a combination of the two. - If the neither .obj and/or .v3g files appear in the folder you will have to re-install Visual3D.
- The 3rd possibility is that Visual3D is looking in the wrong place for the object files that contain the wire frame models of the bones.
- From the Properties menu select Program Options.
Note: The keyboard shortcut for this is Alt+O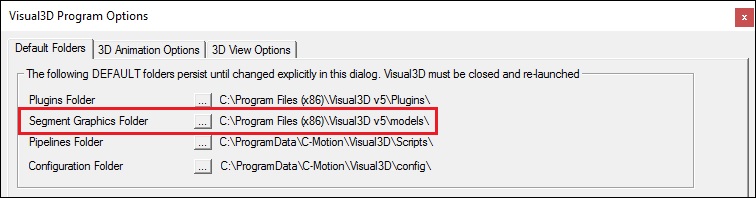
- Verify that the path is correct. If Visual3D was installed in the default directory, the path will be C:\Program Files\Visual3D v5\Models.
- If the path is incorrect, click the ellipses button
 next to the path labeled Segment Graphics Folder.
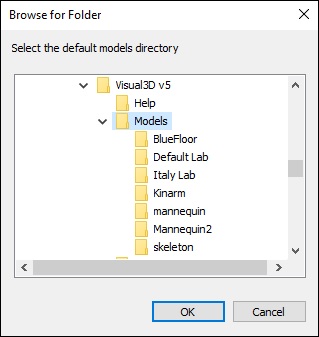
 - From the Browse For Folder dialog box select C:\Program Files\Visual3D v5\Models and click OK.
- From the Properties menu select Program Options.

.jpg)
.jpg)
Animation viewer is very slow
"I was wondering if you have information about an effect in the behaviour of V3D moving within the 3D animation view, especially at the model tab. Since June I have difficulties at this screen, first with 2 different machines, but lately only with one. It takes ages to update the screen when moving inside. Both systems are similar W10 64 bit. The one with 16GB RAM is having the difficulty, which also happens with V3D V5, as I thought it might be a question of the graphic card."
the user found a fix:
- The problem is happening under Windows 10 with Intel HD3000 graphic on board.
Officially, Intel does not support this setup. Windows has own driver, but since update June 2017, it is not using openGL properly (even after dxdiag says acceleration is on).
Fix: Make sure Windows is NOT set to automatic driver download. Downloading Intel HD3000 driver for Windows 8 (32 or 64bit) De-installing the Display adapter driver in the device manager. Restarting Windows. Installing the downloaded Intel driver and after restarting, it should run smoothly.
Copyright © 2002-2016 C-Motion, Inc. All rights reserved.