Identification
The Identify program reads in a .seg file and a set of Identify parameters, and presents a graphical interface which allows a user to assign segments to markers. The list of available markers is read from the specified .mrk file. As an aid to the identification the user may also provide a link (.lik) file to indicate which markers are to be connected with straight lines in the display.
The end result of the identification process is exporting a .c3d file, which is the default input file for Visual3D.
Parameters
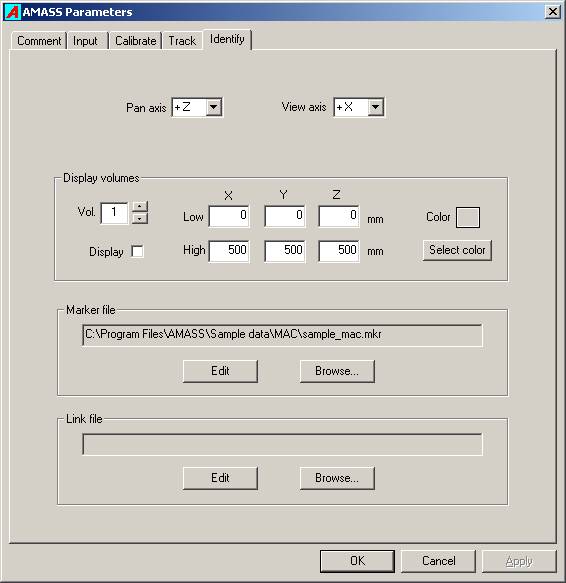
The Identify parameters provide input to the Identify program which allows the user to associate maker labels with the segments generated by the Track program.
Pan axis
When the left mouse button is held down and the mouse is dragged left or right in the Identify 3D view display, the Pan axis defines the direction of the axis about which the view will be rotated. The user may select the negative or positive direction of any of the three Global Coordinate System (GCS) axes.
View axis
This setting determines along which GCS axis the initial view of the markers is presented. During identification the view will typically be changed by the user as the image is manipulated by panning, tilting, and zooming.
Display volumes
The user may create up to ten “virtual” boxes in the Identify 3D view to mark regions of interest and aid in identification of segments. The boxes are defined by Low and High corner points in the GCS, where every Low coordinate is less than any corresponding High coordinate. Any box may be reduced to a plane by the entry of the same value in a common Low and High coordinate, i.e. if the floor is at the z-coordinate of -20, then entering -20 in the z-component of Low and High corners will cause a plane to be drawn at z = -20 user units. The size of the plane is specified by the other two coordinates.
Volume number
This box allows the user to select the volume number to be edited.
Display
The check box tells whether the particular box is to be displayed when the Identify program starts. Within Identify the facility exits to turn on and off the display of individual volumes.
Low coordinates
These three values hold the X, Y, and Z coordinates of the Low corner of the box.
High coordinates
These three values hold the X, Y, and Z coordinates of the High corner of the box. Each High coordinate value must be larger than the corresponding Low corner value. Only one (x, y, or z) coordinate of Low and High corners may be equal, in which case a plane will be drawn.
Color
The user can choose a color for the wire frame of each box when it is displayed. The Select color button presents a color picker window from which the user can select a standard color or create a custom color.
Marker file
The marker (.mkr) file is a file containing the marker labels that the user applies to the segments during the identification process. Clicking the Edit button launches Notepad and allows the user to edit the file. Clicking on the Browse… button allows the user to load an existing .mkr file or create a new one.
To create a new Marker label file, click Browse…, and in the browse window type in a file name, select a destination folder, and then click Open. A window will pop up asking if you wish to create a new file. If you answer Yes a NotePad window will open allowing you to enter marker labels. After the comment line type in one marker label per line, and then save the file. A marker description (32 characters maximum) may also be added to each marker label after a slash (/).
Note that if the .seg file you are processing has saved identifications, the marker file must have at least as many labels as the highest numbered identified marker.
Example .mkr file
An example .mkr contains a comment line and a marker name on each line:
This first line is a comment line.
one
two
three
four
Link file
This entry accepts the name of a Link (.lik) file which contains a list of marker label pairs that are to be joined in the 3D view. Clicking the Edit button launches Notepad and allows the user to edit the file. Clicking on the Browse… button allows the user to load an existing .lik file or create a new one.
To create a new Link file, click Browse…, and in the browse window type in a file name, select a destination folder, and then click Open. A window will pop up asking if you wish to create a new file. If you answer Yes a NotePad window will open allowing you to enter links. After the comment line type in one link per line, and then save the file.
The Identify screen
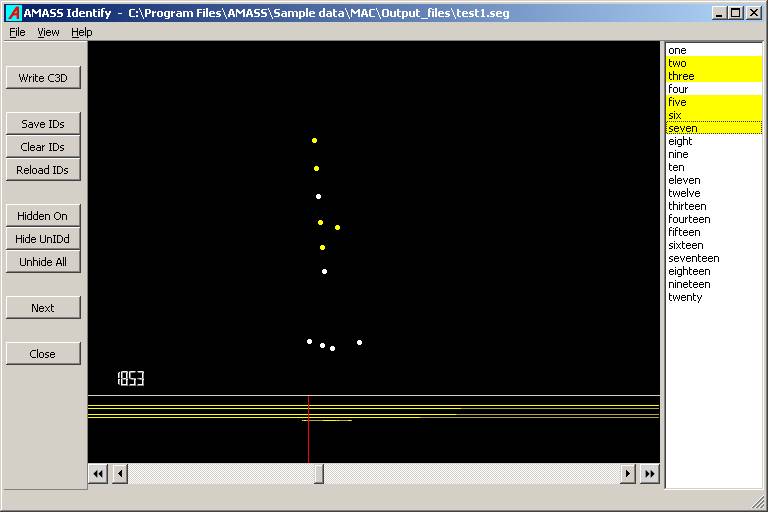
The Identify screen has four main areas. The control area on the left contains nine buttons. The central area presents a marker view area, a 3D view of the markers for the current frame above a continuity area that shows lengths of identified segments as horizontal lines. On the right is the marker label area that list marker labels as read from the .mrk file.
Marker view area
In the image area unidentified markers are indicated in white and identified markers are drawn in yellow. An identified marker in the current frame will have its label background as yellow. Moving the mouse cursor over a marker will show its segment number if it is unidentified, or its label if it is identified.
Continuity area
The strip below the view area has vertical space for every label shown in the label area. If there are more labels than fit into the label area, the segments in the continuity area will scroll in conjunction with the labels in the label area.
Hovering the mouse cursor over an unidentified marker in the view area will show the length of its segment (in aqua) in the first line of the continuity area. If a marker segment has been assigned a label its continuity will be graphed as a yellow line in a position corresponding to its label’s position in the label areaa. If the mouse cursor is moved over an identified marker its segment continuity will temporarily change to aqua. Note that both the aqua and yellow continuity lines may have light and dark sections which help indicate breaks in segments that have been connected by the segment connection facility in the Tracking program.
By default, each segment is given a vertical space of three pixels. You may use the up and down arrow keys on the keyboard to increase or decrease the height devoted to the continuity area.
label area
Marker view manipulation
The following mouse actions are effective for manipulating the view area view:
Left mouse drag horizontal; rotates the image about the pan-axis.
Left mouse drag vertical; tilts the image.
Right mouse drag horizontal; translates the image horizontally.
Right mouse drag vertical; translates the image vertically.
Left + right mouse drag vertical; zooms the image.
Right double-clicking a marker will translate that marker to the center of the image view.
Extraneous markers (segments) may be hidden from view by left double-clicking on the marker if it has not been assigned a label. Left double-clicking on a labeled marker will remove a label from the marker. Double-click again if you want to hide it. Clicking the Hidden On button will show all hidden markers as unfilled circles, and clicking the Hidden Off button will hide them again. To bring back a marker from the hidden state, left double-click on the unfilled circle.
You can hide all unidentified markers by clicking on the Hide UnIDd button. This is useful for turning off all junk markers after you have finished the identification process. You can also resurrect all hidden markers by clicking on Unhide All.
Segment identification
Identify provides two methods for assigning segments to markers; point select and label select.
Point selection mode
This technique lets the user select a series of labels in the label area and then click on markers in the view to do the assignment. Left click on individual marker labels in the label area in the order you wish to assign them (the mouse may also be dragged over a sequence of labels). Clicking or dragging over a selected label will unselect it. The background of the first label selected will change to red, and the backgrounds of successively selected labels will change to aqua, and all markers that may be assigned the first label will circled in red in the image area. Left click on the marker you wish to give this first (red) label. The marker will change to yellow, and the background of the label will become yellow indicating an identified marker. The next label in the order selected will now assume a red background indicating that it is the next one to be applied. At any time the entire label selection may be cleared by left double-clicking on any label in the label area
Label selection mode
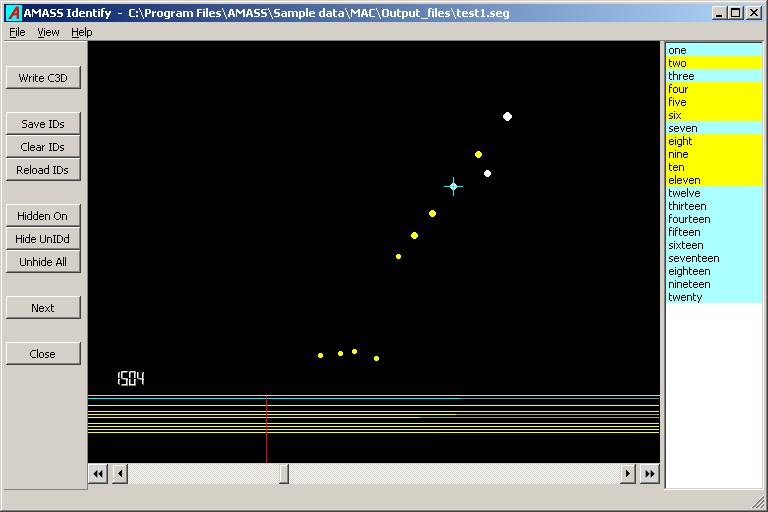
This mode is entered by left-clicking to the left or right of the red frame cursor in the continuity area, depending on whether you wish to scan forwards or backwards in frames. Pressing the left or right arrow keys on the keyboard achieves the same purpose.
The program searches for the next unidentified marker in the current frame, or if there is not one in the current frame, the next (or previous) frame that has an unidentified marker. It then indicates the marker with a blue cross in the image area, and in the label area shows which labels may be assigned to the marker by an aqua background. To perform the assignment left click on a permitted label. The program will then automatically scan to the next unassigned marker, etc. If you wish to hide a marker that the scan has selected, do a left-click anywhere in the image area. To skip labeling a selected marker without hiding it, right click anywhere in the image area. Pressing the left or right arrow keys also has the effect of skipping the immediate identification of a marker.
To exit Label select mode, move the frame slider to a different frame number.
Saving identifications
At any time the current identifications may be saved to the input .seg file by using the Save IDs button, and retrieved by the Reload IDs button. Of course, if Tracking is performed again to regenerate the .seg file, any saved identifications are lost. Clicking the Clear IDs button cancels all assignments current in the program, but does not modify the identifications stored in the .seg file.
Button functions
Write C3D: Outputs all identified marker data to a .c3d file. Only data for markers up to the largest marker number used are output.
Save IDs: All current segment identifications are saved to the input .seg file. Note that the identifications are saved in terms of the marker numbers as ordered in the marker label area (and the input .mrk file), and not in terms of the label names themselves. If you reload the .seg file using a different .mrk file, Identify will apply the new marker labels to the identified segments.
Clear IDs: Clears all segment identifications.
Reload IDs: Reads the .seg file and overwrites any current segment identifications with those previously saved to the .seg file.
Hidden On/Off: An unidentified segment may be hidden (turned off from view) by left double clicking on it. All hidden segments may be made visible again by clicking the Hidden On button to show them as unfilled circles. The text in the Hidden On button will change to Hidden Off. Similarly, clicking the Hidden Off button will turn off from view all hidden segments (those displayed by unfilled circles).
Hide UnIDd: This button can be used to hide all segments that have not been assigned to markers, and is convenient for cleaning up the view window.
Unhide All: This button will unhide all hidden segments and bring them into view.
Next: Closes the current identification session and restarts Identify using the next .seg file in the input file list, provided more than one .seg file was selected.
Close: Closes the Identify program and takes the user back to the AMASS shell.


