Sift - Dynamic Time Warping Dialog
| Language: | English • français • italiano • português • español |
|---|
Dynamic Time Warping is a distance based algorithm that allows you to compare and measure similarity between two time based sequences, by minimizing the Euclidean distance between points. Essentially it aligns each point of one trace to a corresponding point on the other trace that require the least distance. All distances are added together to make the total cost function of the trace. The large the cost function, the less similar the two traces are. This can be useful when trying to identify a singular trace or to find outliers. A more detailed overview of Dynamic Time Warping in Sift can be found here.
The Dynamic Time Warping dialog is found on the toolbar and under the Analysis menu.
Dynamic Time Warping Dialog
The Dynamic Time Warping dialog is split up into two tabs.
- Finding Anomalies / Outliers in a Dataset
- Comparing a Singular Trace to a Dataset
Finding Anomalies / Outliers in a Dataset
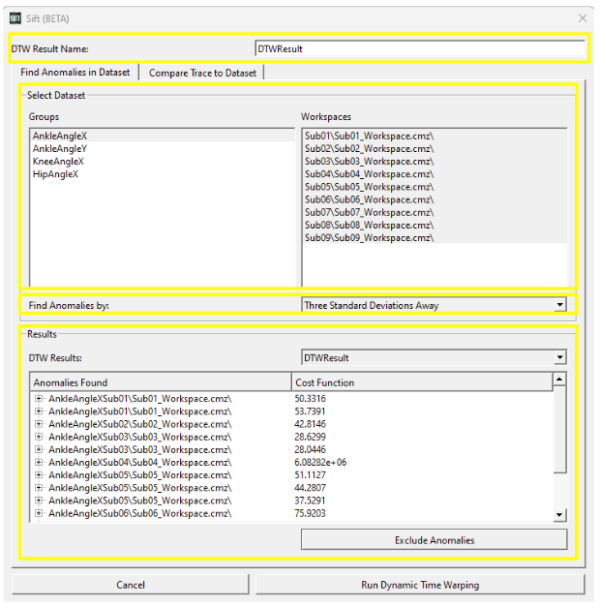
This tab allows you to find anomalies within a data set.
To run Dynamic Time Warping you first need to select a result name at the top section.
In the next section you can select which groups and workspaces you want to run dynamic time warping on. Multiple groups and workspaces can be selected.
You then need to select how you want to find anomalies. The median distance for each trace from its distances to all other traces are computed and are considered an anomaly that are one, two or three standard deviation away from the average median distance.
The bottom section displays the results. The traces and cost function of each anomaly are displayed. Traces can be excluded from the group by selecting the Exclude Anomalies button. Previous results can be displayed by the drop down menu.
Comparing a Singular Trace to a Dataset
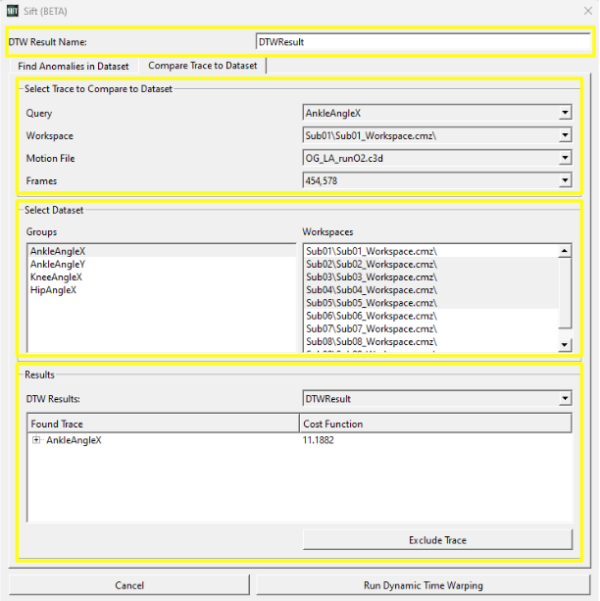
This tab allows you to find a trace in a data set that is most similar to a chosen one.
To run Dynamic Time Warping you first need to select a result name at the top section.
In the next section you need to select the trace you want to compare to the dataset. To do so you need to specify a Query, Workspace, Motion File and Frames.
In the next section you need to select the groups and workspaces you want to compare the previous trace against. Multiple groups and workspaces can be selected.
The bottom section displays the results. The found trace and cost function of the trace most similar to the selected trace. This trace can be excluded from the group by selecting the Exclude Anomalies button. Previous results can be displayed by the drop down menu.


