Tutorial RT Biofeedback - Vicon Nexus
| Language: | English • français • italiano • português • español |
|---|
Overview
This tutorial shows is step-by-step guide to stream real-time data from a Nexus (Vicon) to Visual3D to take advantage of the real-time data processing and biofeedback* capabilities.
Nexus streams out the data it receives as it processes them. Visual3D can save the streamed frames out to a C3D file, or directly capture a static trial from the data streaming in.
Capturing data in Visual3D is desirable for capturing a static trial in preparation for real-time digitizing or functional joints. Our real-time biofeedback (part of Visual3D Professional) will also support capturing data on an event trigger, which is also a unique way of capturing the last 'n' seconds of data when an event happens which you can't predict ahead of time to start a manual capture. You would probably want to use Nexus to capture other times in order to prevent loss of data or to customize the parameter section of the C3D file being captured.
- RT Biofeedback is available only in Visual3D Professional.
Step 1 - Subject Calibration in Nexus
Before streaming in real time, Nexus must be running and the subject calibration trial must be labeled. This allows Nexus to label markers in "Live" mode.
|
1. Calibrating the capture volume Nexus using the software's standard protocol. 2. Create a subject either using a predefined template in Nexus or creating your own. (image on right) |
|

|
3. Collect a static trial. 4. From data managent, load the static trial and label the marker trajectories.(image on right) |
|

|
5. Run the 'Calculate Autolabel Trial Parameters' from the Pipeline menu (image on right). This allows Nexus to label markers in "Live" mode. |
|

|
6. Go back to "Live" mode, with the subject in the capture volume to test that Nexus correctly autolabels markers in real-time. 7. Before launching real-time streaming in Visual3D, take note of the system file currently selected. (image on right) |
|

Step 2 - Apply Model Template in Visual3D
To create the segments in Visual3D, you must first load a static trial into Visual3D and apply a model template (.mdh).
To load the static trial, you can either:
OPTION 1 - Load the static trial you collected in Nexus during Step 1
OPTION 2 - You can collect a static trial in Visual3D.
I recommend using the static trial collected in Nexus (Option 1).
OPTION 1 -
|
1. Go to the Models tab of Visual3D |
OPTION 2 -
Collect a short static trial using the following process:
|
1. From the Model menu, select Create (Add Static Calibration File), then Hybrid Model from RealTime Streaming. |
|

|
2. Define the name of the model: |
|

|
3. Select the correct real-time system from the drop down menu and click start streaming.
4. While the subject is standing still, collect a static trial by either clicking Create Snapshot (Static Trial) to save the static trial in the workspace or Save Static File to Disk to save the static trial as a C3D file. |
|

|
4. Go to Model -> Apply Model Template and browse to your model template (.mdh) |
Step 3 - Visual3D Real-Time Set Up
1. Launch V3D (V3D main screen)

2. Select the Real-time capture TAB
3. a) In the dialog box you should see your plug in ______.dlls Click Vicon_Nexus_RT.

3. b) A dialog box will appear to select your current Nexus System file. When using standard Nexus file structure, the system file should be located under:
C:\ProgramData\Vicon\Nexus\Configurations\Systems

Streaming data from Nexus is continuous.
Note: streaming status in lower left
It is very important that Nexus automatic labelling works properly in "Live" mode and identifies markers correctly. If the markers aren't correctly identified in Nexus, Visual3D can not process any realtime data.
After streaming for a long period of time, the labeling in Nexus may start to fail. In Nexus, clicking CTRL+R may improve the labeling.
Step 4 - Compute model based item: RT pipeline
The RT Pipeline is available only in Visual3D Professional
After having created or loaded a model, and established connection with the system back in the Real-Time tab, it is then possible to compute any model based item through the real-time pipeline.
- Open up Model Based Data Computation under the Real-Time Pipeline
- Double click Compute_Model_Based_Data
- Click Edit

- Change the corresponding:
- Data Name: Ankle
- Folder: ORIGINAL
- Model Based Item Properties: JOINT_ANGLE
- Segment: Right Foot
- Reference Segment: Right Shank
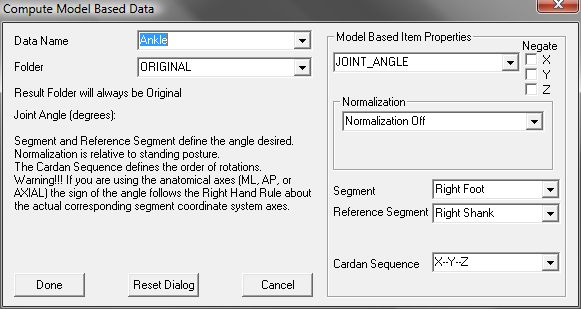
- Click Done


Step 5 - Create Graph
- Click Add in the Real-Time Graphs section, and enter the following:
- Data to: LINK_MODEL_BASED::ORIGINAL::Ankle

- Data to: LINK_MODEL_BASED::ORIGINAL::Ankle
- Click OK

Your result should show a Real-Time stream that looks like the picture below

Remember to save the Graph and RT Pipeline