Test
Test
East Coast ASB
For internal use only
This page describes the format and text for the different tutorials sections.
Videos
Embed Video Info
Local File might collect personal data.
Other pages
The test page shows the font changes when using different title information.
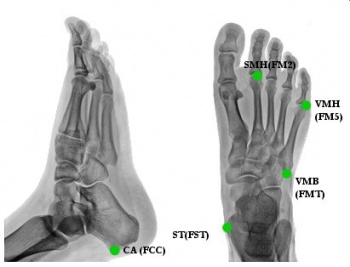
Segment Definition
Original image size: 891 × 643 px (144 KB)
Define a segment using:
1 Proximal Target
2 Distal Targets
|
1. Create SEGMENT_XXXX Segment:
- In the Segments tab, select SEGMENT_XXXX in the Segment Name box.
- Click on the Create Segment button.
- In the SEGMENT_XXXX tab, enter these values:
|
Define Proximal Joint and Radius
Lateral: None Joint: XXXX Medial: None
Radius: XXXX
Define Distal Joint and Radius
Lateral: XXXX Joint: None Medial: XXXX
Select Tracking Targets:
XXXX, XXXX, XXXX, XXXX
|
|
- Click on Build Model. A 3D image of a SEGMENT_XXXX will appear distal to the OTHER_SEGMENT_XXXX.
- Click on Close Tab before proceeding.
|
caption
|
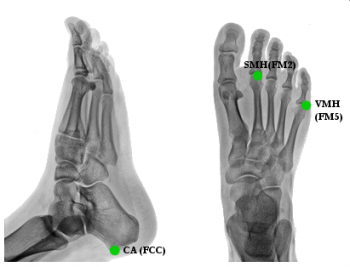
Define a segment using:
1 Proximal Target
1 Distal Target
1 Lateral Target
|
1. Create SEGMENT_XXXX Segment:
- In the Segments tab, select SEGMENT_XXXX in the Segment Name box.
- Click on the Create Segment button.
- In the SEGMENT_XXXX tab, enter these values:
|
Define Proximal Joint and Radius
Lateral: None Joint: XXXX Medial: None
Radius: XXXX
Define Distal Joint and Radius
Lateral: None Joint: XXXX Medial: None
Extra Target to Define Orientation
Location: XXXX XXXX
Select Tracking Targets:
XXXX, XXXX, XXXX, XXXX
|
|
- Click on Build Model. A 3D image of a SEGMENT_XXXX will appear distal to the OTHER_SEGMENT_XXXX.
- Click on Close Tab before proceeding.
|
caption
|
KINEMATIC ONLY SEGMENTS:
Original image size: 391 × 186 px (35 KB)
|
1. Create SEGMENT_XXXX:
- 1. In the Segment Name combo box type SEGMENT_XXXX
- 2. Check the Kinematic Only Check Box
- 3. Select the Create button
|
391x186
|
- 4. In the SEGMENT_XXXXb tab, enter these values:
- Define Proximal Joint and Radius
- Lateral: None Joint: XXXX Medial: None
- Radius: X.XX
- Define Distal Joint and Radius
- Lateral: None Joint: XXXX Medial: None
- Radius: X.XX
- Extra Target to define Orientation
- Select: DIRECTION_XXXX XXXX
- Select Tracking Targets:
- Check: Use Calibration Targets for Tracking
|
- 5. Click on Build Model.
- 6. Click on Close Tab before proceeding.
|
891×643px
|
Segment Definition: KMATv2
|
1. Create SEGMENT_XXXX:
- 1. In the Segment Name combo box type SEGMENT_XXXX
- 2. Check the Kinematic Only Check Box
- 3. Select the Create button
- 4. In the SEGMENT_XXXXb tab, enter these values:
- Define Proximal Joint and Radius
- Lateral: None Joint: XXXX Medial: None
- Radius: X.XX
- Define Distal Joint and Radius
- Lateral: None Joint: XXXX Medial: None
- Radius: X.XX
- Extra Target to define Orientation
- Select: DIRECTION_XXXX XXXX
- Select Tracking Targets:
- Check: Use Calibration Targets for Tracking
|
- 5. Click on Build Model.
- 6. Click on Close Tab before proceeding.
|
|
Landmark Definition
Original Image size: 391 × 563 px
|
1. Create LANDMARK_XXX:
- Click Landmarks button
- Click Add New Landmark button
- Create Landmark: LANDMARK_XXX
|
Landmark Name: LANDMARK_XXXX
Define Orientation Using:
Starting Point: XXXX
Ending Point: XXXX
*Lateral object: XXX
*Project From: XXX
Click Existing Segment: XXX
|
|
- Offset Using the Following ML/AP/AXIAL Offsets:
X: 0.0
Y: 0.0
Z: 0.0
- Check: Offset by Percent (1.0 = 100%) (Meters when not checked)
- Check: Calibration Only Landmark (Not generated for assigned motion file(s))
|
caption
|
Point in a Line
|
1. Create LANDMARK_XXXX Joint Center:
- Click Landmarks button
- Click Add New Landmark button
- Create Landmark: LANDMARK_XXXX
|
Landmark Name: LANDMARK_XXXX
Define Orientation Using:
Starting Point: XXXX
Ending Point: XXXX
|
|
- Offset Using the Following AXIAL Offset: X.X
- Check: Offset by Percent (1.0 = 100%)
- Check: Calibration Only Landmark
|
caption
|
Point in a Plane
|
1. Create LANDMARK_XXXX:
- Click Landmarks button
- Click Add New Landmark button
- Create Landmark: LANDMARK_XXXX
|
Landmark Name: LANDMARK_XXXX
Define Orientation Using:
Starting Point: XXXX
Ending Point: XXXX
Lateral Object: XXXX
Project From: XXXX
|
|
- Do NOT Check: Offset by Percent (1.0 = 100%)
- Check: Calibration Only Landmark
|
caption
|
Point Relative to a Segment
|
1. Create Landmark_XXXX:
- Click Landmarks button
- Click Add New Landmark button
- Create Landmark: Landmark_XXXX
|
Landmark Name: Landmark_XXXX
Define Orientation Using:
Click Existing Segment: XXXX
|
|
- Offset Using the Following ML/AP/AXIAL Offsets:
X: 0.0
Y: 0.0
Z: 0.0
- Check: Offset by Percent (1.0 = 100%)
- Check: Calibration Only Landmark
|
caption
|
Point Relative to 3 Points
Point Projected on a line
Point Projected on a plane
Videos
Embedded Videos
The following code should be contained within < >
HTML5video width="520" height="320" autoplay="true" loop="true">downloading</HTML5video
YouTube Video
The following code should be contained within < >.
HTML5video type="youtube" width="400" height="300" autoplay="false">XXX</HTML5video
Side By Side Images
Words
Multisubject
Inspect3D
|
Text:
|
Text:
|
Sample files can be downloaded here.
|
Col 1, Row 1
|
Col 2, Row 1
|
|
Col 1, Row 2
|
Col 2, Row 2
|
XHTML Tables
| This is the header cell, which is always shown
|
| This cell is not shown by default.
|
| Collapsible table with data
|
|
|
Collapsible Table (click to expand)
ffe5e5
ff6666
NewLink
OtherLink
Link


