Sift - Data Options Dialog
| Language: | English • français • italiano • português • español |
|---|
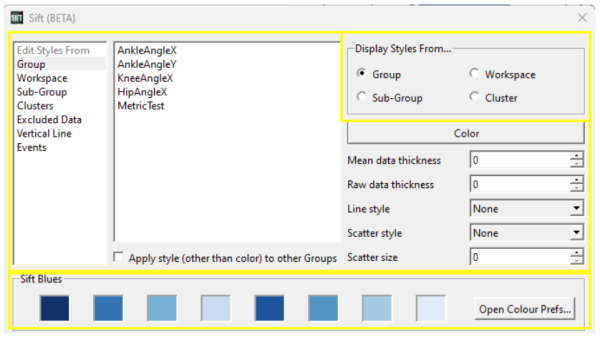
The ![]() Data Options Dialog allows you to customize your how you want to view your data in Sift. The dialog can be found in the toolbar and under the File menu.
Data Options Dialog allows you to customize your how you want to view your data in Sift. The dialog can be found in the toolbar and under the File menu.
Data Options Overview
There are three main sections in the data options dialog.
- Display Styles Options: This allows you to choose which styles you want displayed.
- Edit Styles From: You can select which data type you want to edit the style of.
- Colour Palette: This displays the current application's color palette and the dialog to change it.
Display Styles Options

You have four different ways to display styles. This will update the plots in the Explore page, and appropriate plots in the Analyse Page.
- Group
- Workspace
- Sub-group
- Cluster Note: Displaying styles as clusters is useful after running K-Means on PCA Results.
Edit Styles
There are 7 different data type you can edit the styles of.
- Group
- Workspace
- Sub-Group
- Clusters
- Excluded Data
- Vertical Line
- Events
Group
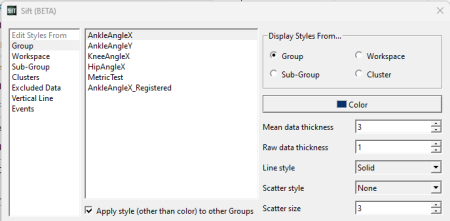
Color: Selecting this will open a color dialog, allowing you to change the groups color.
Mean Data thickness: Changing this value will change the thickness of the mean trace of the group when plotted.
Raw Data thickness: Changing this value will change the thickness of the raw traces of the group when plotted.
Line Style: Changing this option will change the line style of the traces (mean and raw). There are 6 options.
- None
- Solid
- Dash Dot
- Dash
- Dot
- Dash Dot Dot
Scatter Style: Changing this option will change the scatter style (style of each data point plotted).
Scatter Size: Changing this value will change the size of each scatter point.
Apply style (other than color) to other Groups: If check the data styles selected will be applied to all other groups.
Workspace
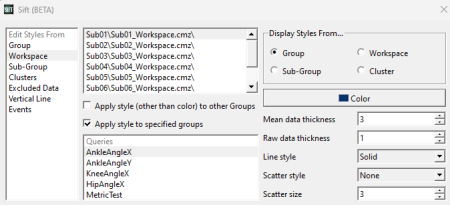
Color: Selecting this will open a color dialog, allowing you to change the groups color.
Mean Data thickness: Changing this value will change the thickness of the mean trace of the group when plotted.
Raw Data thickness: Changing this value will change the thickness of the raw traces of the group when plotted.
Line Style: Changing this option will change the line style of the traces (mean and raw). There are 6 options.
Scatter Style: Changing this option will change the scatter style (style of each data point plotted).
Scatter Size: Changing this value will change the size of each scatter point.
Apply style (other than color) to other Groups: If checked the data styles selected will be applied to all other groups.
Apply style to specified groups: If checked, the data style will be only applied to workspaces in the groups that are selected below.
Sub-Group
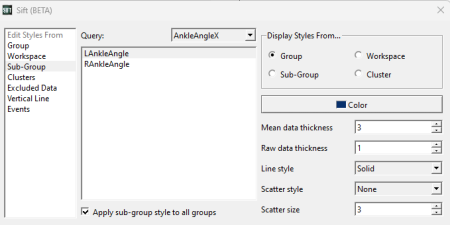
Query: This drop down will hold al groups. Selecting a group will show their sub groups.
Color: Selecting this will open a color dialog, allowing you to change the groups color.
Mean Data thickness: Changing this value will change the thickness of the mean trace of the group when plotted.
Raw Data thickness: Changing this value will change the thickness of the raw traces of the group when plotted.
Line Style: Changing this option will change the line style of the traces (mean and raw). There are 6 options.
Scatter Style: Changing this option will change the scatter style (style of each data point plotted).
Scatter Size: Changing this value will change the size of each scatter point.
Apply sub-group style to all groups: If checked the data styles selected for subgroups will be applied to all other groups.
Clusters
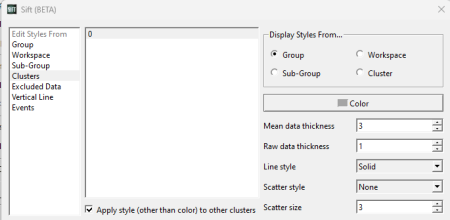
Color: Selecting this will open a color dialog, allowing you to change the groups color.
Mean Data thickness: Changing this value will change the thickness of the mean trace of the group when plotted.
Raw Data thickness: Changing this value will change the thickness of the raw traces of the group when plotted.
Line Style: Changing this option will change the line style of the traces (mean and raw). There are 6 options.
Scatter Style: Changing this option will change the scatter style (style of each data point plotted).
Scatter Size: Changing this value will change the size of each scatter point.
Apply sub-group style to other clusters: If checked the data styles selected will be applied to all other clusters.
Excluded Data
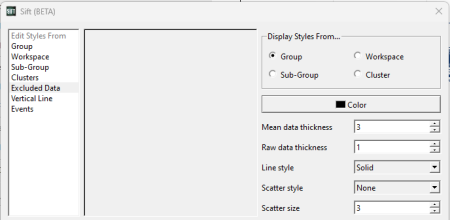
Color: Selecting this will open a color dialog, allowing you to change the groups color.
Mean Data thickness: Changing this value will change the thickness of the mean trace of the group when plotted.
Raw Data thickness: Changing this value will change the thickness of the raw traces of the group when plotted.
Line Style: Changing this option will change the line style of the traces (mean and raw). There are 6 options.
Scatter Style: Changing this option will change the scatter style (style of each data point plotted).
Scatter Size: Changing this value will change the size of each scatter point.
Note: To view excluded data make sure the Show Excluded Data option is checked in the General Options Dialog.
Vertical Line
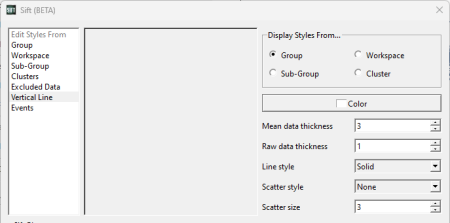
Color: Selecting this will open a color dialog, allowing you to change the groups color.
Mean Data thickness: Changing this value will change the thickness of the mean trace of the group when plotted.
Raw Data thickness: Changing this value will change the thickness of the raw traces of the group when plotted.
Line Style: Changing this option will change the line style of the traces (mean and raw). There are 6 options.
Scatter Style: Changing this option will change the scatter style (style of each data point plotted).
Scatter Size: Changing this value will change the size of each scatter point.
Note: To view vertical lines make sure the Show vertical line for video and animations option is checked in the General Options Dialog.
Events
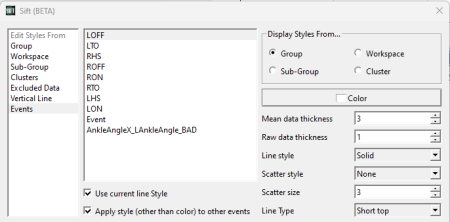
Color: Selecting this will open a color dialog, allowing you to change the groups color.
Mean Data thickness: Changing this value will change the thickness of the mean trace of the group when plotted.
Raw Data thickness: Changing this value will change the thickness of the raw traces of the group when plotted.
Line Style: Changing this option will change the line style of the traces (mean and raw). There are 6 options.
Scatter Style: Changing this option will change the scatter style (style of each data point plotted).
Scatter Size: Changing this value will change the size of each scatter point.
Use current line Style: If checked, the current line style will be used for the selected event.
Apply style (other than color) to other events: If checked, the current line style will be applied to all other events.
Note: To view events make sure the Show Intermediate Events option is checked in the Plot Options Dialog.
Colour Palette
At the bottom of the dialog you can view the colours that are in the current colour palette. You can change the colour palette by opening the colour palette dialog by opening Open Colour Prefs....
Colour Palette Dialog
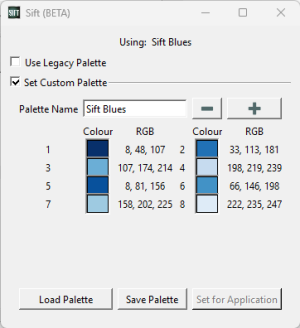
Use Legacy Palette: If checked a legacy palette will be used.
Set Custom Palette: If checked you have the option to edit the colour palette. The colour palette name can be changed in the line edit. You can add a colour using the ![]() button, and delete a colour using the
button, and delete a colour using the ![]() button. Colours can be edited by selecting a colour which will prompt a colour dialog.
button. Colours can be edited by selecting a colour which will prompt a colour dialog.
Load Palette: Palettes can be loaded in from your computer. Some standard colour palettes can be found in the folder Sift is downloaded on you computer.
Save Palette: Palettes can be saved to a .xml file to be later loaded in.
Set for Application: Once a new palette is made or loaded in, selecting Set for Application will refresh SiFt to the new colour palette.

