AMASS2 track
Introduction
The Track program accepts a .cen file, the Tracking parameters, and a .cal file, and runs without any user intervention to produce a .seg file containing three-dimensional segments reconstructed from the image data. A segment is a 3D trajectory of points extending over multiple frames that is reconstructed from image data, and it may or may not represent an actual marker.
During tracking the program uses the system calibration data to transform all rays (a ray is a measured line from a marker to a camera) from every imaged marker, for every camera, to the Global Coordinate System. In each frame it then it searches through all rays to find ones which pass in close proximity to each other in order to identify rays belonging to the same marker. The clusters of ray intersections are then reduced to single points to represent the most likely locations of the markers, and these point positions are then tracked across frames to yield segments. If a marker is not observed by at least two cameras its segment will terminate, to be commenced again as a new segment when it is again observed by at least two cameras.
Hence we define a point as an instance of a segment at the time of a particular frame. Note that every point may not be representative of a marker because the Track program may create “ghost markers” from the accidental intersection of rays from different sources. Also, a marker may not always result in a point, for example when it is not recorded by at least two cameras.
The ability of the Track program to reliably identify rays that belong to the same marker is strongly dependent upon the accuracy of the calibration. Rays that do not tightly intersect (have high residuals) cannot reliably be assigned to a single marker, resulting in poor tracking, “ghost markers” (caused by the program combining rays that actually come from different markers), and gaps in the marker segments. Hence, even if your experimental requirements do not call for high accuracy, the quality of the calibration is critical to effective marker trajectory generation.
All marker (point) positions are expressed in the user distance units in the Global Coordinate System as defined by the reference markers during the system calibration.
Track parameters
The Track parameters influence the 3D reconstruction and formation of the segments.
- Predictor error
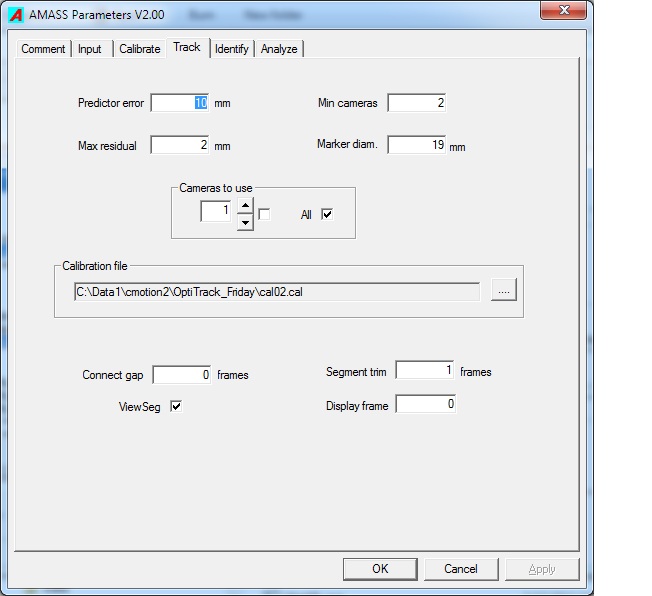
- During tracking 3D point positions are gathered into trajectories or segments, and typically five previous frames of a point’s locations are used to predict its position in the next frame. The Predictor error parameter defines how far the point’s calculated location in the next frame may be from its predicted location in order for the point to be considered to belong to the current segment. If there are no points found within the Predictor error distance of the predicted location the segment is terminated. Setting this value too low will result in many short segments while setting it too high may cause segment crossovers (the trajectory of two markers are swapped). The default value is 5mm.
- The predictor error should be set with regard to
- units being used
- marker size
- minimum expected marker separations
- residual values given by the calibration.
- Choose a value that minimizes the number of segment breaks yet does not produce segment crossovers.
- Maximum residual
- For any ray from a marker to a camera the residual for that ray is defined as the shortest distance from the calculated location of the marker to the ray. Two or more rays from a marker to different cameras are needed to calculate or “reconstruct” the most likely location of the marker in space. The Maximum residual parameter defines the largest value the residual may have for a ray. If a ray has a residual larger than this maximum the observation for the camera recording that ray is excluded from that marker’s position computation. If this number is set too low many rays will be erroneously excluded from the marker position computations resulting in segment breakups and less accurate marker locations. If it is set too high then rays will be associated with markers they do not belong to, resulting in ghost markers, inaccurate marker locations, and segment crossovers. The default value is 2mm.
- Once some data has been tracked you can use the Plot residuals capability in Identify to evaluate your choice for this parameter.
- Minimum cameras
- A marker must be recorded in the images of at least two cameras for its position is to be reconstructed. Accidental intersections of rays belonging to different sources are quite common in a many-marker, many-camera, environment, and the software can have much difficulty in discriminating between real and “ghost” markers. However, if we require that three or more cameras observe a marker the system is much less prone to creating “ghost” markers that result from the accidental intersection of rays. Hence with systems that routinely record markers with more than two cameras it often useful to require that only markers imaged by more than two cameras be utilized. The default value is 2 cameras, but a value of 3 usually dramatically decreases the number of “junk” markers produced.
- Marker diameter
- This parameter conveys the physical size of the markers being tracked. However the program is not very sensitive to its value. One use is to ensure that no two reconstructed markers are closer together than this distance. The default value is 25.4 (mm) which corresponds to the markers on the standard wand.
- Cameras to use
- On occasion it may be useful to exclude one or more cameras from the tracking because a camera is malfunctioning, a poorly calibrating camera is influencing the calibration of the other cameras, or you may wish to investigate the contribution of a particular camera on the tracking. The check boxes in this group can be set to ignore data from any camera during the tracking.
- Calibration file
- The Calibration file box specifies the folder and name of the calibration file that is to be used for the tracking computations. You may Browse... for it in the Track page of the parameters, or achieve the same result by clicking on the Apply button in the ViewLin utility.
The next four parameters are only used by the Track function when started by use of the Track button in the AMASS shell.
- Connect gap
- After all segments have been generated the program can sort through the data and attempt to combine different segments it considers to belong to the same marker into a single segment. This valuable tool typically greatly reduces the number of segments the user has to identify. It does so by comparing the direction and location of the end of one segment to the directions and locations of the beginnings of all other segments. If it finds a close match, and the end of the first segment is no more than Connect gap frames from the start of the second segment, both segments are combined into a single segment. This single segment will not be continuous but will display a gap in the ViewSeg graph. This parameter should be used with caution and its optimal value will depend upon the application. Setting it too high may result in segments being combined incorrectly. A typical value is 10 frames, and a value of zero indicates that no connections should be carried out.
- ViewSeg
- Checking this box causes the ViewSeg utility to be run automatically after each trial is tracked. It displays the continuity of all segments over the frames in which they are active.
- Segment trim
- Typically a marker comes into a camera’s view, and goes out of view, by being partially obscured. This process may extend over several successive frames during which time the marker’s effective centroid as determined by the camera no longer coincides with its physical center, and results in a measurement error of the markers direction. One typically sees larger residuals, and spikes in measurement errors, just as marker segments are first started and just as they terminate. Additionally, the tracking can sometimes break a marker’s trajectory and produce two segments that overlap by 1 or 2 frames. The Segment trim parameter allows the user to remove from 0 to 2 frames from both ends of every segment during the tracking process, and can yield cleaner data.
- Display frame
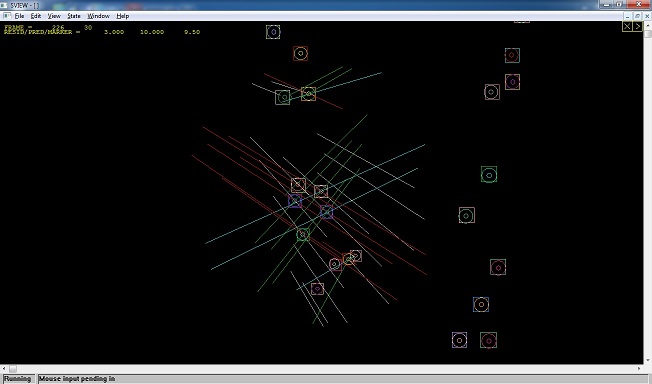
- Setting this Track parameter to a valid frame number will case the Track program to pause processing at the designated frame and allow the user to examine the marker reconstruction geometry. This facility is useful in diagnosing tracking problems and also serves as a very useful teaching tool. The graphics screen displays a 3D view of all rays, calculated marker locations, ray residuals, and predicted marker positions ( drawn to scale as squares), and allows image manipulation by use of the mouse. The markers are also drawn to scale according to the size entered in the Marker diam. parameter, and the small circles have a radius of 1.0 mm.
The view may be rotated and tilted by dragging with the left mouse button. Dragging up-down with the right mouse button performs zooming of the view, while left-right dragging changes the lengths of the rays that are displayed. Right double-clicking on a marker makes that marker the center of the display.
Note that the current implementation is preliminary and only a single frame can be displayed from a .seg file.
For a description of the additional parameters in the View3D group box, see View3D.
Tracking issues
No segments produced
This condition is usually the result of tracking with an old calibration file that is no longer correct for your camera setup. Recalibrate your system often, and especially of any of the cameras have been disturbed.
Another possible cause might be the system renumbering of the cameras between the calibration and trial data captures. This condition could result from a system hardware reset, or the physical reconfiguring of the camera cable connections.
Numerous short segments
The possible causes are
- Max. residual is set too low
- Predictor error is set too low
- On or more cameras have been disturbed and are out of calibration
- Intermittent light sources were recorded
- The marker motions are too fast for the camera system’s frame rate
- Insufficient number of cameras for the motions being measured
- Incorrect threshold and/or illumination settings for the cameras
- Data capture has missed recoding frames resulting in many segment breaks
If you have a sufficient number of cameras, setting Minimum cameras to 3 will eliminate most artifacts resulting from reflections and false ray intersections.
Segment crossovers
A segment crossover occurs when a segment from one marker gets connected to a segment of a different marker. This can happen when you use the Connect gap capability during tracking and that parameter is set too large. If this is an issue, set Connect gap to zero to turn off the connecting utility. Using Segment trim may also be very helpful.
It is also possible to get segment crossovers within a segment if the Predictor error is too large. The Predictor error value should always be less than the minimum separation of any markers.
Missing frames during capture
In some situations the Capture2D program may drop frames during camera data capture, especially if you are collecting data at high frame rates from many cameras. The situation can be complicated by other software that is also running on the data capture computer. Refer to the Capture2D documentation for recommendations.

